Übercløcker RЭmiχ

Can I add more Unicode symbols to the name? Yes.

But I won’t.

It’s that time of year again – time to prep for the winter competition season. The event of interest is Motorama 2009, only 2.25 months away (again…). Last year, I prepped Test Bot 4.5MCE-SP1-WTF-BBQ for the event, which sort of ended in semi-epic fail. A few months ago, I built Überclocker for Dragon*Con 2008, which ended in epic fail.

The mission this time is to bring Überclocker for the 30lb Sportsman Class. The 30SC division is a recently created weight class which attempts to shift the focus of lolbot combat back to innovative weaponry and designs. I originally designed ÜC for this class.

But of course the bot can’t just go in its current form, since nothing really works. Therefore, over the past few weeks, I have began to refresh the design to address the shortcomings of ÜC1, which pretty much meant starting from a new file.
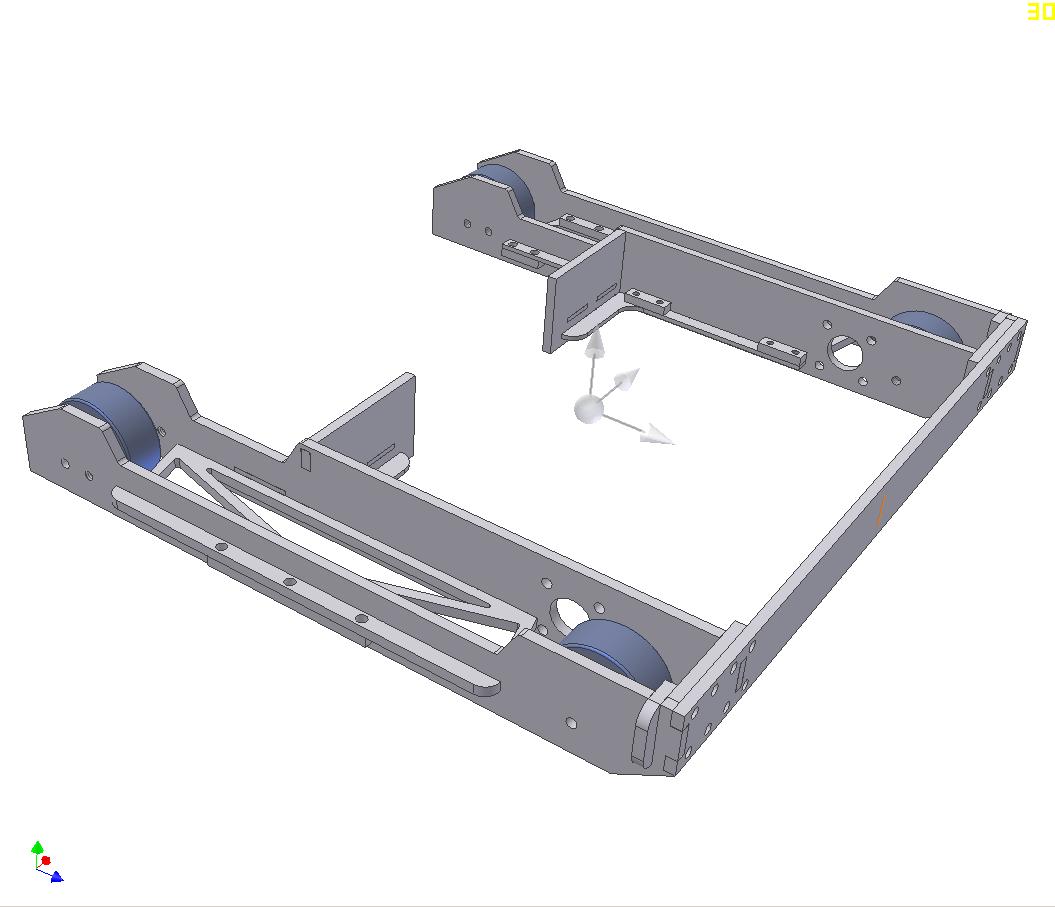
Let’s begin. A few hours of diddling got me the basic shape of the frame, which incidentally is sort of like the frame now. The big difference is the method of construction. Since proving to myself that I can build a bot in two weeks, I’m going to try to “Chinese Puzzle” the frame like I did on NK, with a variety of tabs, slots, nutstrips, and other elements cut into quarter and eighth inch aluminum plate to be magically assembled with the help of some retaining screws.

With prudent design, I should have to do minimal machining (e.g. tapping, enlargening, or boring out holes) on the superstructure of the bot.
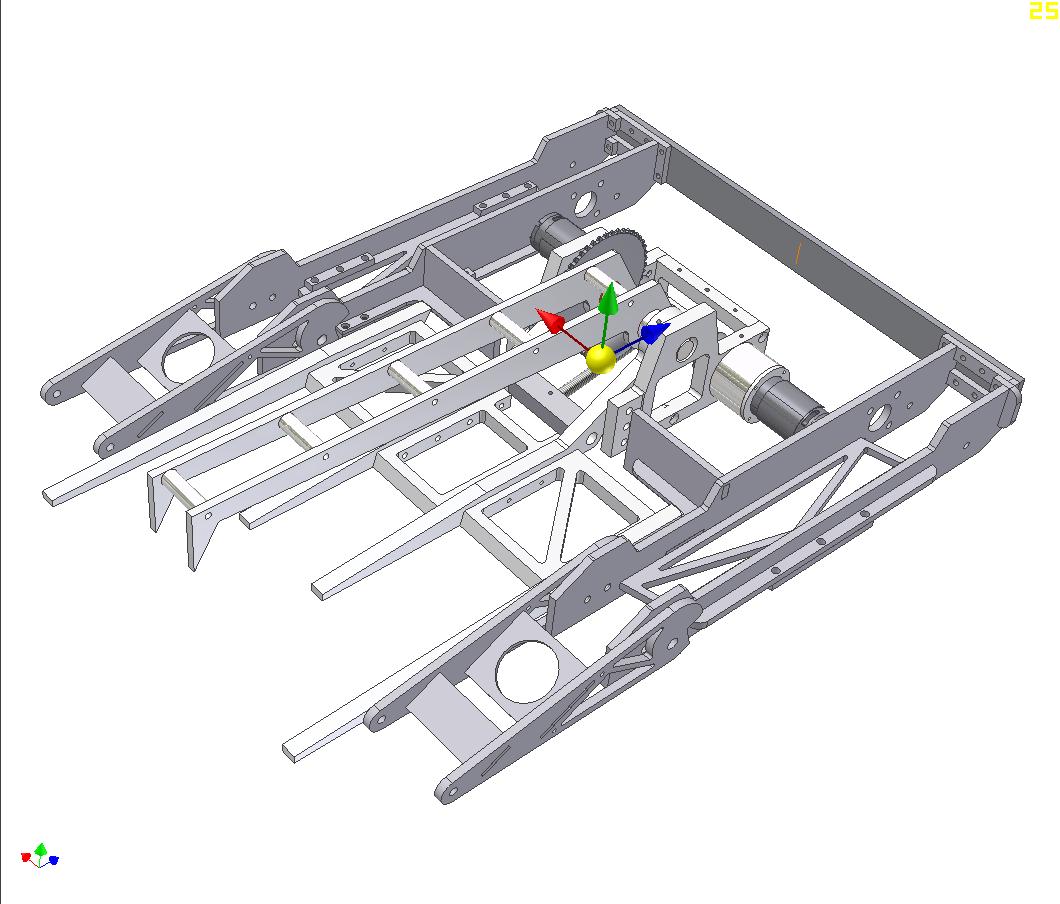
A few more hours of diddling, and the basic shape of the bot is defined. The extended legs will return in a different form. The old fr0k assembly is in place to gauge the dimensions of the bot, and will actually be replaced with a whole new assembly.
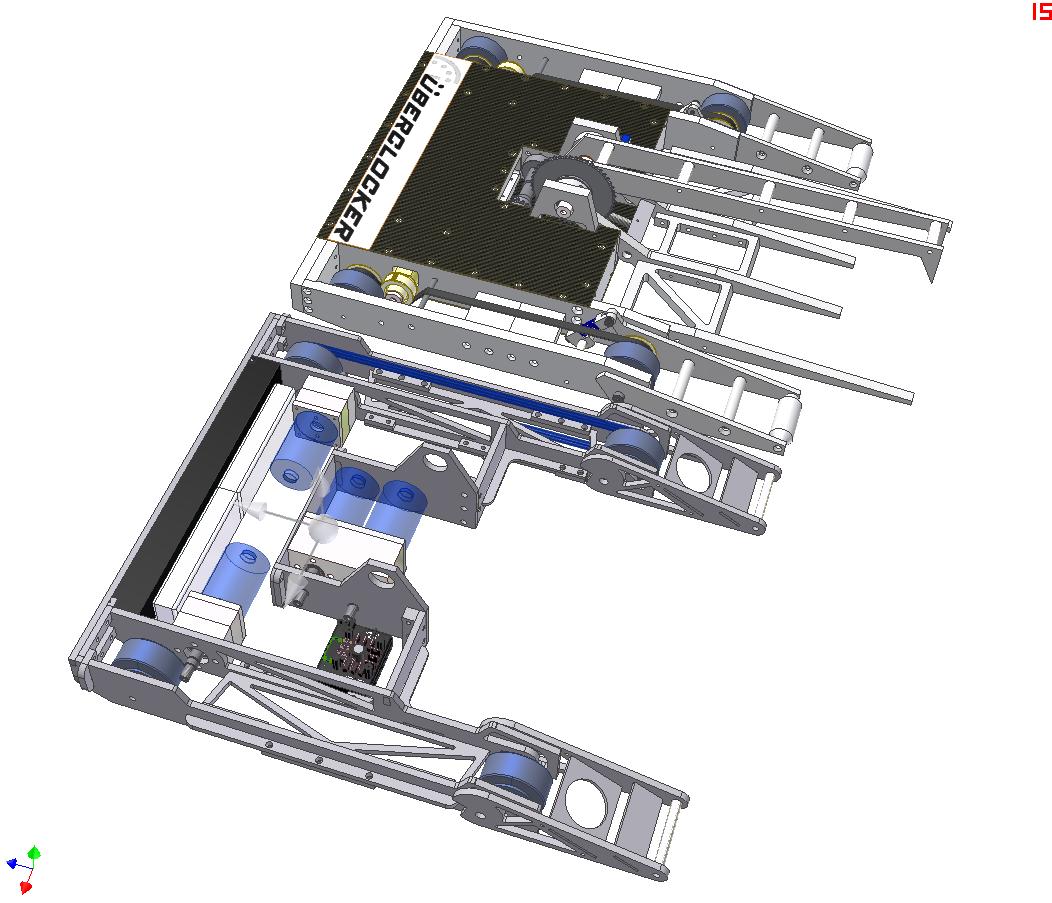
Comparing side-by-side with the current bot.

This version will be 2″ narrower (since I will not have a problem with lateral stability) and actually a quarter inch thicker. Did I just make a bot *TALLER*? Yes, it is so I can fit the electronics in more efficiently. I should be able to double-deck the Victor 883 controllers inside. Victors, while extremely reliable and properly rated, are not exactly compact. By not requiring as much electronic floor space, I can shorten the middle of the bot and move the center of gravity further back.

The wheelbase is also 2″ longer than the current build, and the fork drive assembly (the single heaviest part in the bot) is further back. Ultimately, the goal of all this is to move the center of gravity as far away from the front as possible, in an attempt at mitigating faceplants.
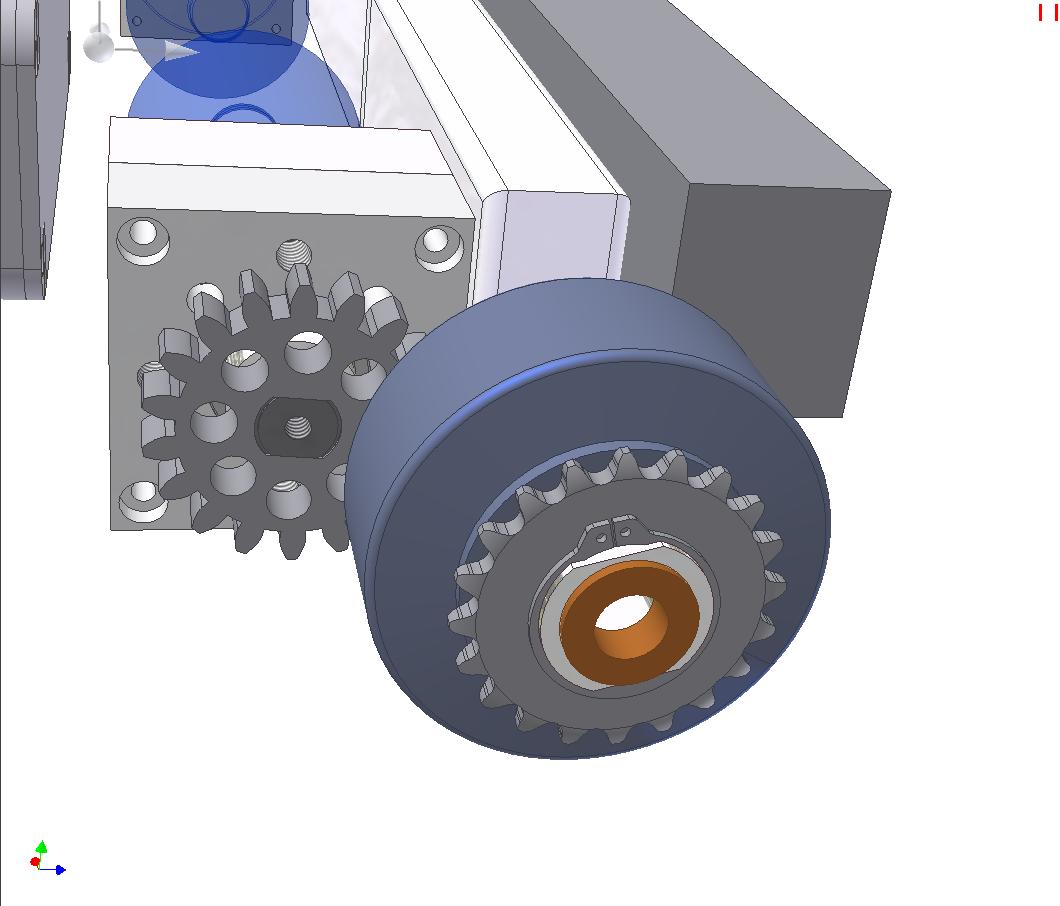
Let’s move on to the drivetrain. A major change from the current build will be the ditching of timing belts in favor of #25 chain. While there’s fundamentally nothing wrong with belts (TB and NK both use belt drive), I found that a set of timing belts and pulleys was just too wide for the new rear drive solution.

What is it? Direct gearing! The drive motors will be 1:1 geared to the rear wheels. This solves the problem of getting power to at least one wheel on each side reliably. On TB, the drive motor cranks the rear wheel directly, but doing so in Überclocker would require much larger wheels than I feel like using.

These gears will be 12 pitch and waterjet cut from 5/16″ steel. I’ve cut gears on the WJ before (hit refresh a few times to spot the site banner featuring some of that work), and figured this was a better (read:cheaper) solution to getting a handful of gears than buying the gears (which do not come in the face width and with the hub features I need) and machining them down. All of them.

Furthermore, cutting my own gears allows the use of custom bore features – like the double-D shape seen on the motor shaft. This allows me to cut a flat on the motor shaft and have the gear sit at a known location while transmitting torque. It will be retained by a screw and washer.

The sprocket on the other side of the wheel will also be a custom cut piece (thank goodness for geometry generators) with a large DD to match the one machined on the hub. A big retaining ring keeps everything in place. This allows the transmission of torque from wheel to sprocket with mininal width (just wide enough to pass a chain).

The whole assembly is 2″ wide.
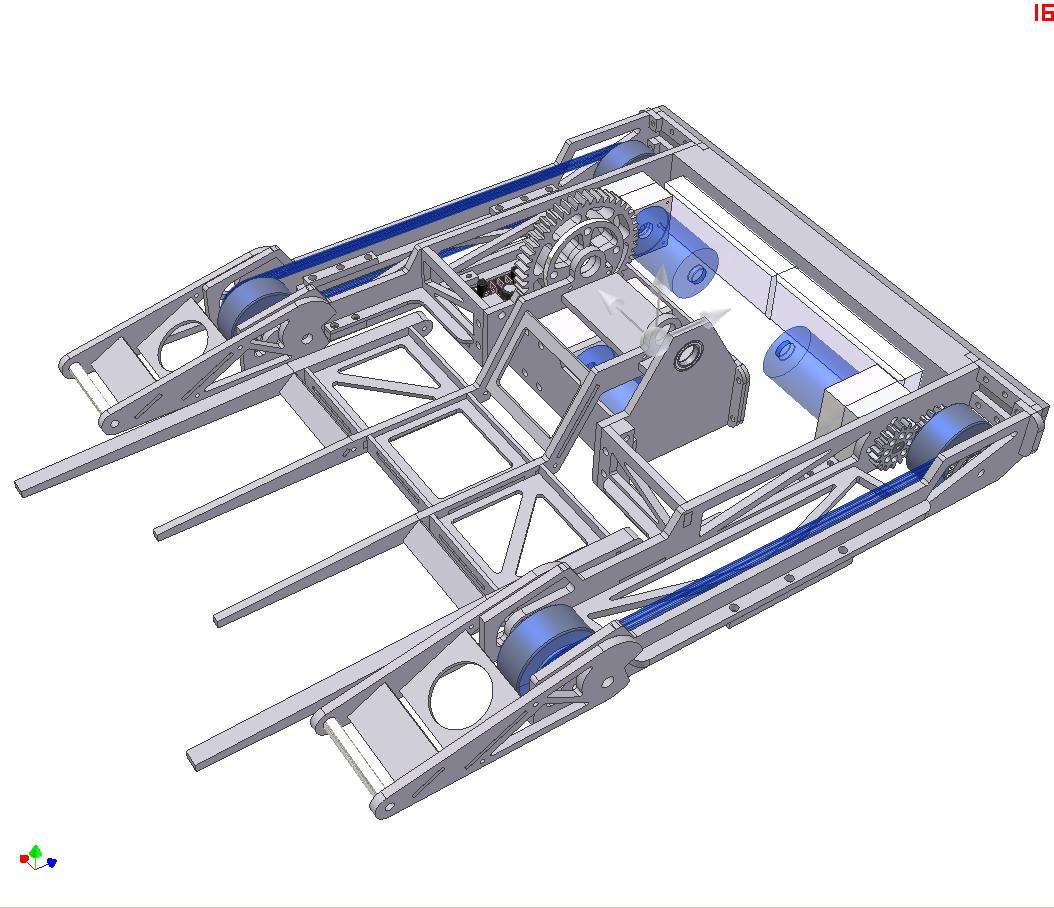
Oh hey, it’s a new fork. This one is much lighter, weight and build, than the current. Sections of threaded rod with nuts will bind all the plates and whatnot together, hopefully forming a stiff structure. Only the outer forks, which will be taking the first hits, are half inch metal, with the inner forks 1/4″ thick.

Notice the little trusses and holes starting to appear in the frame. This is my attempts at keeping weight down while maintaining some semblance of structural integrity.

Also, the fr0kdrive assembly has been compactified. I realized that with some tweaking of the geometry, I could stick the lift motors right under the pivot and drive the fork directly with gears….

And gears there will be. The two lift motors (the über-ghettofrakenb0xen) have been melded together into one case as the Integrated Dual Frakenb0xen. Each gearbox is 216:1.

On the other side is a 3.2:1 arrangement of 12 pitch spur gears. The pinions are stock commercial parts from McMaster-Carr, and the upper assembly will be waterjet-cut. Pinions ride in their own enormous ball bearings, and so does the entire fork assembly. Overall reduction from motor to fork is 691:1.

Such absurd gearing can easily destroy itself if there’s no limit on the torque produced by the motors. Überclocker currently uses shaft collars clamping on a split shaft to limit the gearbox output torque. This works well, but there’s no intermediate shaft this time.

I have decided to implement a cone clutch assembly on the drive gear. The blue and cyan parts are rigidly attached to the fork structure, with the blue part movable axially with adjustment screws. It is tapered externally and mates with an internal taper in the gear. The gear will slip at different torque levels depending on how hard I crank the screws. Or so I hope.

This will be a venture into precision secondary operations on a waterjet-cut part. Up until now I’ve been doing pretty mundane stuff to my WJ’d parts, like threading, enlargening holes, and the occasional boring. However, this would require some pretty precise lathework on the bore, and keeping the less-than-consistent edge of the WJ’d part in line will be interesting.

The gear, blue cone, and cyan mount will all be roughly profiled on the waterjet (straight sides). Then they will be externally and internally machined as needed.
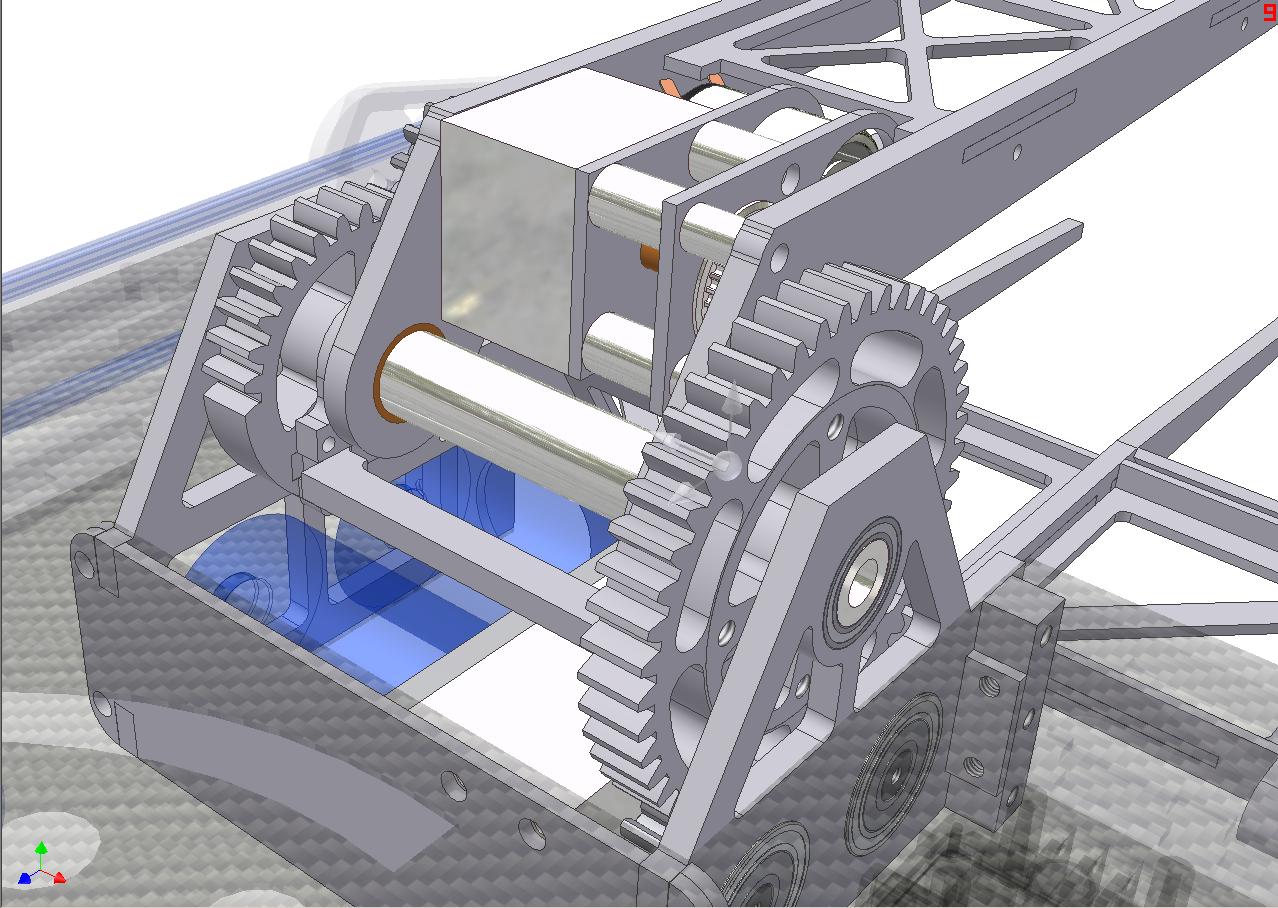
Also  being revamped is the clamp arm drive. The bot currently uses a really dumb leadscrew actuator mounted to a weak-ass insect-class motor. For some reason I expected this to stay together in battle.

It didn’t, so I’m upgrading. The new actuator is a 540(or 550) drill motor run through its own 150:1 gearing. I figured that as long as I was making a weird gear for the main fork drive, I’d make one for the clamp drive. The drill motor is mounted next to the gearbox, and power makes a U-turn from the motor into it, through a 1.75:1 belt drive (not really visible). This feeds into a drill gearbox assembly (36:1) and outputs onto another custom WJ’d spur gear set (2.5:1).  The large output gear is actually part of the main fork structure, so the clamp arm can move relatively to the arm, carring the actuator with it.

This gearset is clutched at the drill gearbox ring gear (like a normal cordless drill), mostly to prevent it from exploding if another bot tries to force its way out.

This is the number one “weird complicated mechanism” that might get revised before I get there in the actual build process.

And so the culmination of everything is…

The upper grabber structure is assembled the same way as the fork – truss plates and main side beams bound together with threaded rod. I actually planned ahead and am implementing squishy bumper feet things for industrial furniture (from McMaster) into the tips. This should make bots less likely to just slip out.

Top and bottom plate attachment is not yet designed, nor are internal electronics mounting implements. Now that I have discovered that McM sells carbon fiber panels in normal thicknesses and sizes, I’m going to try and CF the whole bot.

If all goes according to plan, I’ll have the large Überclocker logo on top backed in white plastic with an EL panel, so it glows with a sinister light. Or something.

So this would be Update #1, I suppose, for the new bot. The design is not yet final, and things will probably change some (like that clamp drive assembly). I do need to get stuff cut out soon, though, if I want to make Moto. I need to factor in the fact that there will be a roughly 1 month gap between now and then in which I will not have 24/7 access to some form of machine tool…

Summer 2008 Build Season Wrap: Dragon*Con 2008

About time, eh? This past summer, I continued my R&D position at the Media Lab while building three combat bots. Nuclear Kitten 5 and Pop Quiz 2 are updates to the insect fleet while Überclocker is a completely new build, exploring new building techniques and technologies.

Sadly enough, PQ2 and Überclocker fell victim to the age-old trap of trying too many new things and making too many changes at once, and not enough testing before deployment.

The final rundown after D*C 2008:

Überclocker

What can I say? While Überclocker looked awesome and had more pretty machined parts than I have ever put on any other bot before, performance was massively lacking. A number of factors contributed to this.

  1. Lack of design revision and validation. Combined with 5AM Joltgineering, this led to a vast number of absurdisms in the design. Unserviceable parts, spotty attachments, poor placement, the works. Had I waited a while after completing the design, then ran through the entire process again, I probably would have altered quite a few things. The bot’s assembly was very much one-way. If I wanted to change a lifter motor, half of the thing has to come apart – and most of the electronics have to be unwired. To replace a drive wheel involved 3 sizes of allen wrenches and fiddling with multiple spacers. All of this made it a nightmare to service at the event.
  2. 5am Jolt-gineeringâ„¢. It was summer. I had neither class obligations nor a very strict schedule. Much of this bot was designed in the early morning hours. Designs need a proper balance of neurotransmitters that are absent when you hard-reset your sleep cycle. This led to things which would normally be Really Bad Ideas suddenly seeming like optimal solutions.
  3. Lack of testing again plagues my builds. I thought that an entire summer would be enough to get the bot done, but it came down to the last weekend before the event anyway. The bot was never quite fully operational either, with part failures causing the ultimate scrapping of the top clamping fork. Fortunately, tuning the lifting fork servo was rather straightforward, and it performed admirably. The drivetrain, however, was never run under battle conditions. The inadequacy of my serpentine belt setup revealed itself rather painfully at the event where I lost both drive sides due to slipping belts (Which subsequently took 15 minutes to reseat.

When all was said and done, Überclocker won 1 match, not by its own merits, then lost the next two matches. At the end of my final match, one of the lifter fork motors went up in smoke from me trying to use the fork as a hammer. Compounded with the rest of the failures and the dysfunctional clamping fork, I forfeited the tournament.

All of Überclocker’s matches except for one (due to a corrupted file system on the camcorder’s miniDVD media) are here.

Here’s some action shots of ÜC at the tournament.

Überclocker initiates a ninja lift on Scimitar. This was one of its only good shots – where it didn’t just fall over.

In another match with Scimitar, the two bots perched precariously on the edge. At this point, I had lost the entire drivetrain, so couldn’t quite back him off.

Überclocker attempts to brute-force Poulan Rouge off the stage after failing at a lift

So, what actually worked?

  • The concept is good. Überclocker was one of the more popular bots at D*C this time around, mostly due to its unique design and strategy. It just needs a better execution. A more rearward center of gravity, stronger clamp fork, and more reliable drivetrain just to start.
  • Überghettofrakenb0xen performed spectacularly. The robot had no trouble dead lifting 30 pound opponents at a brisk speed. Ultimately it was rapid repeated reversal of the fork drive that caused a motor meltdown due to high current. The shaft clutch worked great in preventing gear explosion.
  • Spring-loaded front legs weren’t able to perform up to their full potential because the rest of the bot sort of prevented them from actually having any effect. However, they did allow negotiation of the hazards without much issue in most cases. The front parts were too low and would some times get caught on the edges of the bars and ride on them. This can be solved by using a bigger front roller.
  • It looks badass. What, don’t think so?

Überclocker is a concept which I want to continue developing to bring it to maximum effectiveness. Design revisions include trying to fix all the problems indicated and making the strong points better. However, I have no targeted event date for the redesign, and it could be as late as Dragon Con 2009.

Pop Quiz 2

It’s the flattest active-weaponed antweight ever. Again, just like Überclocker, the concept was great, but my lack of attention to detail ultimately tainted the execution. This build fixed one of the major shortcomings of the original Pop Quiz – a weak, unreliable weapon. This time, the blade was frighteningly fast, to the point that I never actually full-throttled it due to a fear of the bot just taking off.

The tradeoff was the unpredictable drivetrain. To stuff everything into a 3/8″ tall space, I had to build custom gear drives and modify the motors. While a stock solution such as Sanyo Micromotors do fit in the space, they were far more expensive than what I had already. The “frankenmotors” worked great in testing, but over extended operation, they began to gunk up. The square slot car motors themselves are already rather low quality and have widely varying no-load RPMs. This translated to different load characteristics. Throw in some manufacturing tolerances on my gear drives and I had a stochastic drivetrain.

To make matters even worse, I quite literally had no control over the bot’s direction due to the total lack of radio reception. If the weapon was running, then the bot would randomly interpret its own noise as signal and randomly drive around.  The GWS park flyer receivers have almost no filtering and seem to accept used toilet paper and old batteries as valid.

At the event, PQ had all of 1 match, lasting about 10 seconds. The single hit blew apart the momentary button switch that was the bot’s master power switch. In the battle royaly, PQ was able to land a few hits before pinging itselff off a wall and out of the arena.

All 20 seconds of Pop Quiz’s matches are here.

PQ wasn’t in the arena much at all, so I only got one picture of its work.

Pop Quiz goughes in the titanium plow of Segs, a rather innovative 8WD “flexible” bot. This same impact flipped PQ over and also destroyed the power switch.

Pop Quiz was a great trial in how flat I could build something, but returning to the previous chassis outline would benefit the practicality greatly. I can use real drive motors, have more space for batteries, and use a larger weapon motor. PQ1 had a strong drivetrain but weak weapon, and PQ2 had a strong weapon with a spotty drivetrain. It would be beneficial to combine the two traits, but like Überclocker, there is no scheduled rebuild for Pop Quiz at the moment.

Nuclear Kitten 5

NK5 was a two-week speedbuild that only happened because I discovered the magic of waterjet-cutting 2D parts and assembling them like 3D puzzles. We’d been doing this in the lab for a while, but I never gave it a shot myself – that is, until Big Blue Saw ran a free part sale. It all started when I tried to stuff the redesigned frame onto a 9 x 9″ square of aluminum. While the complexity of the frame put it over the “freeness threshold”, I couldn’t resist but fab it anyway. The rest of the bot followed.

The best part about this bot was the new bladehub motor. Previously, NK used a friction drive between the blade and the weapon motor. This was spottily reliable and also required constant adjustment. With my experimentation in hub motors over the past year, I decided to build a high-speed fully self-contained disc motor just for driving the weapon. Backed by the power of lithium batteries, the spinup time to “vibradrive” was under 2 seconds. I also never hit full speed with this weapon because the bot would begin to move around the floor powered by its own vibrations.

The new disc was lighter in profile but heavier overall, being made of steel instead of titanium. The tips were heat treated to avoid blunting, and this worked well. In the Battle Royale, the disc warped at the nonhardened points after the bot faceplanted into the steel arena bumper rail at full speed. Better than just shattering, I suppose. After the second match, the disc motor threw a magnet and was dragging it across the stator for the rest of the tournament. This gave it massive starting issues, but after everything got up to speed, the weapon still worked.

The combination of NK4’s fast, balanced drivetrain and this version’s weapon meant that NK was a great performer. It fought four opponents to capture the D*C 2008 Beetleweight championship. The caliber of the Atlanta bots is really rising fast… I’m sure next year will be even more action-packed. All of NK’s matches are here.

NK took moderate damage to the weapon system during the tournament and would require a rebuild of the motor. Since everything else pretty much works, I will probably run it at Motorama ’09 or a local event.

Some performance pics…

NK does a number on Drumbeat. The gouges on the back side are a bit bigger.

A long skitter mark from when NK was inverted and balanced rather interestingly on its weapon.

Final remarks

So there it is. There’s something I want to change for future events, and that is actually being prepared. It used to be that the bots were really simple and I would have finished building weeks before the event and spent the rest of the time messing around and practicing. With added time constraints and the complete destruction of any time management ability I might have had, this is becoming more difficult. I’ll have to hold myself to the rule that if the bot isn’t finished and tested, I won’t attend the event. The fuss of having to deal with broken subsystems at the event is one whose ultimate cost is the fun factor in attending. All that results is frustration.

I was so busy with Überclocker at DC ’08 that I took practically no pictures or had any time to just sit and watch the event. That’s not a very good attitude to approach the events with, especially one as laid back as D*C.

Until next time…