I’m back yet again!
The flurry of RageBridge 2 development in the past few weeks was primarily to make sure I had a few demo units ready for folks going to Dragon Con 2015. Basically, I sent a batch down ahead of time to be integrated into some bots that were going to compete at Robot Battles, as well as prepared some for a few new local builds. There were some other things going on also, including Clocker repairs and upgrades, and yet another entirely new random beetleweight. Oh, and the harrowing tale of having Mikuvan’s engine accidentally rebuilt before departure, and the followup shenanigans!
1. The world’s first dual counter-rotating 45° spinner, because why not?
2. Überclocker’s front leg upgrades
3. The convention and Robot Battles report! Plus, panel information.
Stance Stance Revolution
First, we start with a heavy dose of what:

Oh no! Which way is it facing!? Which way does it spin? How does it move?! Don’t worry if you’re getting a headache looking at it. This is entirely by design.
What you are looking at is the world’s first counter-rotating 45 degree spinner! An answer to a design question literally nobody saw coming.
It all started, really, after the debut of Plan X on ABC BattleBots, with its primary weapon that spun downwards (really it could spin either way, being reversible). For the next little while, every time a new robot was presented, everyone would ask which way it spun. That led to many joke Facebook Group threads, including a snippet of this one…

Featuring Near Chaos Robotics
Well I ended up not calling it Double Helix, because shortly thereafter, I had an epiphany… the blades would have some demon camber and it had an uncanny resemblance to Counter Revolution, so…

Logo courtesy of Cynthia!
Already, I’ve taken this joke too seriously.
I sat down with a blank CAD screen to decide how I wanted to do this. It was literally going to be Counter Revolution deformed through its center axis. I planned for a beetleweight, to act as the dopey-cop counter to Colsonbot. So it was probably going to be a 3D printed unibody, like Colsonbot, for convenience so it could be put together quickly. After all, heaven forbid I take this joke too seriously.

Let the Eschering begin… I created this mockup a day or so later and posted it to great fanfare and cries of “MY EYES!!!”
The blade design was a simple porting of Jamison Go‘s DDT, for which he had several spare blades. I played around with them, but ultimately decided to go with a custom blade design.

Creating those 45 degree struts meant a whole lot of messing with reference planes and other reference geometry. I first created a rotated, offset plane from the center axis of the robot, the blade tower midplane, then made an offset plane from THAT to set the width between the towers. The towers were brute-force mirrored across the midplane, then the parts which stuck out the bottom cut off flush. This is a look at the finished frame – all these steps were taken in the first few features, as seen on the left.

The bot as seen from the front. With the midplane method, it was easy to adjust the blade “offset”. The blades aren’t shown in their final positions either, since at this point I hadn’t looked at how to drive the blades. I decided to try and push the blade “exit point” from the frame as far to the corners as possible so it was easier to aim – “Try to hit with the corners” was going to be the strategy.

After some debate, I decided to just go simple and use pancake-style multirotor motors in a direct drive configuration. My last vertical KE weapon bot, Nuclear Kitten, used a custom-machined hub motor. These days, the flat multirotor motors are much the same form factor. I didn’t expect this configuration to live too long, because those motors are not built to take direct impacts from solid steel things. Direct drive sort of went away as the energy levels present in small bot contests went up. But it would live just long enough to make everyone’s heads spin!
Shown above, the “blue” motors are some Quanum 5208 multirotor motors. I was looking for motors which had the same stator diameter & size as NK’s old motor. However, they were ultimately too heavy.

Stepping down a pay grade (or stator diameter range) were the Multistar 4822s with 40mm stators, and which were nearly 80 grams lighter. It became apparent to me while shopping for motors that putting what is basically two full size weapons for a beetleweight in one bot was going to be difficult. The 4822 motors weigh only 98 grams (less with their long wire pigtails trimmed).
Luckily they were available in a U.S. warehouse, so I was able to get them in a few days to fully model them up, as shown above.

Here’s more brainfuck for you. It might actually hurt a little more to look at from underneath.
The underside and drivetrain was going to be a contortioning game. I planned to use two 22:1 Silver Spark motors – it wouldn’t be quick, but would provide basic maneuverability for the weapons platform. The question was where to put everything else. Even simulating component placement using bounding boxes, I knew it was going to be impossible to stuff everything inside. The weapon ESCs have to go outside, mounted to the blade towers, as you’ll see.

Some finalizing work, and here’s the design. With ripped off logo and all!
A 1/8″ diameter shoulder screw forms the idler axle, and the Fingertech switch is mounted awkwardly outside one of the two symmetrical cutouts permitting wire access to the weapon motor controllers.

CAD family shot next to Colsonbot! I guess Colsonbot would be the Captain Shrederator of the world of perverted miniaturized BattleBots 2015 entries I’m making here….

I wanted to use the MarkFrog to make this frame out of nylon with fiber strands, but unfortunately it was too big in every single dimension. To make it in Nylon would have mean better impact strength, but GUYS GET ME A BIGGER MACHINE PLEEEEEEEEEEEEEEEEEASE! Jamison’s new DDT is all printed on this machine and it did excellently at the event. Maybe I should have scaled this to an antweight instead…
Thus, I popped the frame out in ABS plastic.

The Multistar motors arrive, so it’s time to design the blade. From looking at their product photos, I decided to make cutouts in a blade with a large inner diameter such that they sat on the endcaps, instead of being supported only by the shaft. I was also intending to use the prop adapters (which bolt on) in an external bearing to offer some semblance of double-support. Now, the aluminum these things tend to be made of is so soft I don’t think it even matters (How do they even machine it without it bending?!), but it made me feel better.

I was able to finish out the blade design and cut it out of prehardened 4140, the same plate that I made Nuclear Kitten’s blades out of all the way back in 2008! 4140 prehard isn’t THAT hard – Rockwell 30C or so, so it’s not the best choice and far inferior to a heat treated blade… but something about taking jokes too seriously.

The blade centers were dished inward a little to sit on the motor can.

Retainment was through a big aluminum machined washer. This bolted through the prop adapter, necessitating longer screws – which… GREAT! Because the screws that come with these motors are suspiciously soft for looking like black oxide cap screws. 10.8? 8.8? Probably more like -1.8.

Blades mounted. The outboard bearing is some small 6mm bore flanged bearings I had, from some unknown appliance which died valiantly (and probably chaotically) for the cause.

Remember when I said the weapon ESCs had to go outside the bot? They’re nestled in the blade trench, a half inch away from whirling death. I put in an indentation and cable tie anchoring point specifically to use a zip tie to hold them together. The motor wires are cut super short and soldered directly to the controllers.
I’d like to pause for a bit and discuss these controllers. They’re the “Afro” series from Hobbyking, and besides making me wonder how they came up with that name, I also really enjoy their extensibility. You see, the DIY multirotor community has been working on a better firmware suited their needs for years. They now have a massive database of upgraded firmwares for many of the ATMega-based brushless controllers. the Afro line evolved out of this community’s needs, and in fact contains a bootloader onboard such that you can upload new firmware using only the PWM wire – no need to try and find the programming pins on the boards. The firmwares offer many configurable options, including reversing.
Hmm. It’s piqued the interest of a few robot community folks, one of whom put together a guide on how to update the firmware to a “bot compatible” one. I performed these mods on my ESCs and did a demo video on how it affected a relatively high inertia load like a blade. The result was stellar. I dunno what Mr. SimonK did with the state estimator part of the sensorless firmware, but I can hard-reverse repeatedly without killing the ESC, and it will try to keep track of the motor all the way down to zero speed. The starting routine seems far more robust. A Hobbyking controller with stock firmware would have died instantly.
The best part is, there’s a guide on how to find the pin settings for your ESC – which opens the realm up, if I feel like exploring it, of putting it on one of these. A few builders have already done brushless drive experiments using this, and the results are far better than a stock Hobbyking car ESC with reverse functionality. Only a few bots have dared run brushless drive before now, but I suspect the smaller classes will see an explosion of ESCs of brushless drives, saving weight to get the same performance.
It also means that Brushless Rage is obsolete ;_;

Here is the real-life contortioning game. The receiver also ended up having no place to live because of the battery wires. So it gets piled on top of the battery! Luckily the battery (which is shared with Colsonbot) is short enough….

A final weigh-in… just barely under the 3lb limit!

SSR leaves very unique 45 degree impact marks on testing subjects.
Here’s a testing video showing a few hits on the empty Dimension cartridge. As you can see, it flies. One issue is the blade hitting the ground since it swings so low. I suspect in an arena with a wooden floor, it could dig in and send the bot flying, which would be most excellent indeed.
Another interesting behavior: When it hits, it tends to twirl around. I kind of want to practice the “one-two” of hitting with one blade enough to spin it around to hit with the other. This is a result of the blade having a horizontal, downward component to its impact. In this case, the rear counterrotating blade is spinning the correct direction to twist the bot opposite the direction of hit-induced turn, keeping it upright.
Finally, you can see that with enough bouncing, it will self-right very easily, doing a barrel roll in the process.
This joke is ending up more hilarious than any of us could have thought.
And a final beauty shot, if you consider it a beautiful thing.
I ended up replacing the idler rollers with hard plastic ones. I tried to link the two wheels on each side with O-rings, but the o-rings would keep sliding off since they also touched the ground. It handled well enough with “corner drive”.
Überclocker
Alas, poor Clocker.
After Motorama, it was sort of in a heap with a broken off front leg replaced with a chunk of cutting board. I remade 2 of the stripped hubs before a demo session to high schoolers over the summer, but besides that it’s not changed much.
For this Dragon Con, I wanted to move back to double-supported legs. Basically, while the single supported version 3 legs worked well, enough bouncing around caused the attachment parts and hardware to start stress fracturing, eventually breaking off.
Clocker version 2 had double-supported legs, but they were built in such a way that it was very difficult to service the drivetrain… and if there’s one thing Clocker v2 needed, it was drivetrain service. The reaction to this led me to the single-sided legs, but now I think if I put a liiiiiiiiiiiiiiiiiiittle more mental energy into it, I could design the legs to use the same screw head as the drivetrain side plates, such that it doesn’t take forever to remove.
Wild idea, huh?

Growing the design from simple geometry. The legs pivot on a flanged standoff-like entity which is fully tightened to the frame. On the other side, I moved from single-shear to double-shear support for the spring.

Other side, with hardware loaded. The use of 1/4″-20 button headed screws allows me to use the same 5/32″ allen key driver to zip the entire outside on and off.

Time to take the whole thing apart! I also ended up remaking the front axle standoffs and straightening out the inner side rails, because the single-point bending of the leg had also affected them significantly. The new legs slide right together (due to correct nozzle offset on the waterjet cutter – the one it defaults to usually leaves far too much material!) and bolt through using large standoffs. No more using the 1/8″ intermediate plate as the fastening device as on Clocker v2.

Bolting together the springy-leg trunion side.

What the installation looks like after the flanged standoffs are installed. There’s one on each side. The inner side is Loctite’d to prevent rotation, while the outer side is free to be removed. The fit is deliberately loose to let it take some damage without binding.

And a final overhead view of the bot. No, Clocker’s not running RageBridge 2 beta units. I leave that to my guinea pigs loyal subjects.
Dragon Con 2015
This year, I fell into a classic convention trap – doing so many panels and things with your fan track (Makers & Robotics) that you pretty much forget the rest of the con existed! I was involved in 4 panels and looked on at many more. In fact, analyzing my camera contents, I in fact only took one photo of Miku cosplayers.

That’s 99.18% less than the historical average.
First up, my Maker’s Resources panel, which was condensed down to ~1 hour (SORRY VAL!) and focused more on getting people set up with CAD. With Autodesk furiously pushing Fusion 360, it is in my opinion the current “missing link” for mechanical hobbyists and well-featured CAD programs. I got the hang of it a week beforehand, and was prepared to give a live demo, but sadly, showing off Inventor and Solidworks and Fusion 360 was too much for my computer to handle.
I was also involved in the Rapid Prototyping for Costumes panel with Chris Lee, Jamison, and Cynthia, who debuted her version3! RWBY scythe project to some dramatic fanfare.
Next up, a few of us from JACD took part in the Battlebots New Season panel with quite a few other competitors who ended up deciding to attend after hearing that the BattleBots organizers were going to be in town. Unfortunately, I had to miss the “Highlights and Memories” panel, but I told everybody to make fun of me as much as possible so I’ll await the video results from that.
Finally, I also took part in the Power Racing Series panel hosted by several local Southeast builders. We had a whole lineup of entries I was otherwise not used to seeing from teams and builders who have mostly gone to events in the region – I’d witnessed the construction of these cars on the PRS Google and Facebook groups, but they weren’t at Detroit Maker Faire. There isn’t usually much region cross-pollinating due to the races being spread far apart and the stakes not being (that) high (yet).
Luckily, this time I changed that. If forcing everyone on the New York Thruway to stare at me was bad enough, this time I trolled all of I-81:

After having rigged CMV enough times for New Yorks and Detroits, I figured that it had already traveled 1 Dragon Con or so of mileage, and therefore was eligible to be brought down to Atlanta. In 2014, I decided against this idea because there was no race and I questioned my rigging ability. As it turns out, if your load experiences several hundreds of pounds of load, or multiple G’s of acceleration, enough to break or unravel the straps, something very bad has already happened. With this in mind, I was far more comfortable driving long distances with Chibi-Mikuvan strapped to the roof, distracting small children and tired vacationers alike. The green pallet wrapping is for bug splat prevention on the front white portions.
So this year, I signed up for the Dragon Con Parade…

PC: Jen Herchenroeder
The PRS racers got their own ‘block’ in the parade, and we (mostly) stayed together and showed off to the crowd. At the first major intersection, I decided to try something stupid and initiate some donuts. To my utter disbelief, this worked. I think it’s a combination of running in “infinity mode” (50A regulation fuse bypassed) and the rear tires being practically bald from the Detroit race. I proceeded to pull this stunt any time there was open space – most of the street intersections sufficed.
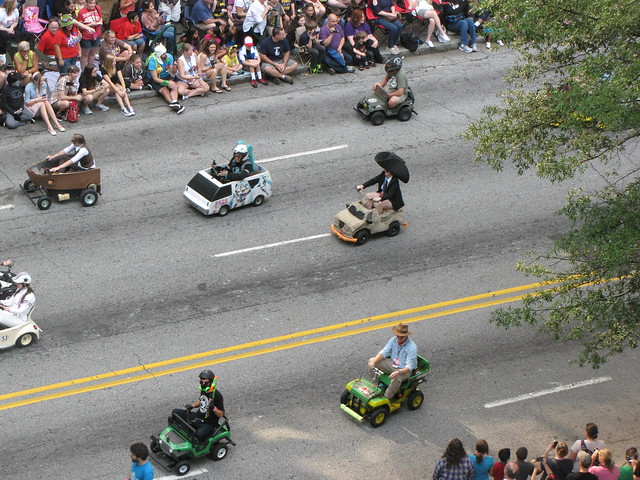
That is starting to look like some kind of old 16-bit racing game. Still waiting on someone to find video of it all, but with sufficiently worn-out tires, CMV can do powered donuts on dry asphalt. Hmm…. more moxie awaits at New York Maker Faire?
Immediately afterwards, we all TORE ASS DOWN COURTLAND AND PORTMAN STREET AND THROUGH THE MARRIOTT *ahem* maneuvered most of the karts into the lineup for the Power Racing Series panel.

From the evening before, a lot of the cars in a row at an impromptu car show in the Marriott. I didn’t bring CMV with me everywhere, so it sat this one out back in my mom’s garage.
Since I’ve basically been part of the Robotics & Makers panels since its inception, I’ve steadily watched not only the content variety grow, but also the skillset of the audience. This time, during my Resources talk, I’d say a strong plurality had designed something and either fabricated it manually at home, or had something 3D printed or used a makerspaces’ tools. When I polled for how many people had used CAD, a solid 75% of hands went up, and Solidworks in particular was something like 1 in 5. Damn, what do you guys need me for!?
I’m sure some of it is “audience self-selection”, but the strong gains each year in those who have tinkered with stuff on a hobbyist level impress me nonetheless. All the panels I led or were involved in were packed houses. I’m happy with anything which shows more and more folks are becoming involved in the Makerverse.

Stolen from builder Collin Royster, here’s a photo of the PRS panel. Chibi-Mikuvan is well-hidden behind the front table from this perspective.

Jim brought Nightmare up from Florida for the BattleBots panels and for general shenaniganry. I was briefly considering bringing Overhaul… sadly, it proved to be too impractical since it didn’t tessellate well with anything else, and I do not need 250 pounds on the roof. So there goes the prospects for the wimpy hotel room grudge re-match!
The staff of Big Hero 6 above are actually the three ladies of Team JACD: Hanna, Lucy, and Cynthia, who discovered their names are a great basis for their own team. Hence they splintered from JACD. I guess they were finally done with putting up with our bullshit. For Dragon Con, team HaLuCyNation built Destroying Angel:

It’s a 30lb rear-hinged lifter using 3 DeWut motors, a RageBridge, and a 6S lipoly battery. In other words, all parts that were hanging around. It was put together in little more than a the week prior (though designed for a month or more beforehand).

Moving onto Saturday evening, it’s robot time. Here, Colsonbot is getting a ‘body swap’ to the latest version of the frame. This version trims another half ounce or so off the weight by eliminating the front left and right chambers. There’s still plenty of electronics volume left. Hypothetically, this permits dual weapon motors, though I only brought the one. There’s no other changes. I completed this swap in about half an hour, since it just entailed desoldering and resoldering.
microbattles
This year, due to a Certain Robot-Oriented TV Show, both Robot Battles events had record turnout as well as a flock of new builders. The schedule was pushed to the max, even with two small bot arenas running simultaneously. The tournament had to be single elimination for expediency. Yet I’m super happy, because the builder population had been stagnant for years. Just look at how much Clocker vs. Nyx vs. Dale’s Homemade Robots there have been for the past few years.
Colsonbot won yet another match mostly due to driving – the four 11:1 Silver Sparks actually make for a very nimble drivetrain for a spinner. In its first match against Moxxi, a (mostly) wedge with a small undercutting blade which was not working well, I lost the heat shrink “tire” of the 28mm NTM motor in like 10 seconds. Therefore, the rest of the match was a pushing contest.
I’m considering moving the motor size down one notch and actually running two weapon motors, due to the limited space there is to put a “tire” – what worked the best after that match was actually winding electrical tape tightly against the rotation direction (such that it did not put force on the tape’s leading edge) for a few wraps. In its rematch against Moxxi, it spun up quite well and knocked stuff around.
It then face Jamison’s Silent Spring twice. Once by draw (no knockout or hole-shot after 2 minutes) where both bots worked consistently:
The next match was a win when SS stopped working, but Colsonbot was too damaged to be repaired in time for its next match.
It was extremely vulnerable to Silent Spring’s under-cutting blade, which took out the weapon motor and its surrounding mount area. Somehow not a single drive motor, even though the wheels were missing bits!

At least it kept driving until the end. I suppose I could have ditched the spin and made Colsonbot into a pusher, but there wasn’t really a point in doing so and it would only add to the tournament scheduling chaos. So Colsonbot exits the tournament effectively 1/1.
As for Stance Stance Revolution…

Poor Stance Stance Revolution.
In an eerie replay of Tombstone vs. Counter Revolution, I drew Silent Spring as the FIRST! beetleweight fight of the tournament! And it ended about as fruitfully.
After a flurry of blade-to-blade impacts, the ABS unibody fractured at the places it was the thinnest, and SSR broke in half. Now, to be fair, both halves DO still work….
It was really meant to be made from Nylon (using the Markfr4ck), a much higher-impact and resilient plastic, but after looking at the section areas that broke, I need to reconsider some of those parts. I intend to bring SSR right back since it’s too hilarious to not keep working. So that was it for the little bots. Damn you Jamison – I shall exact my revenge some day, probably at Franklin Institute next month.
robot battles
It’s big bot time!
This time, I had no 12lber. 12 O’Clocker required quite a bit more work than I remembered, and I couldn’t fit it into the last week’s schedule before departure.
Then I remembered I had a 12lber back in my parents’ garage.

Ahh, good old Test Bot v3.
Now sporting two different kinds of ballast – the old nickel drill pack wouldn’t revive, and that SLA brick has been in there as ballast for as long as I can recall. A spare RageBridge 1 was installed, and a tiny little lipo pack which can source more current than either of those two old batteries ever hoped to. So now I have a 12lber! It’s actually still dramatically underweight at 11.1 pounds. How did this thing ever make weight?
I mentioned earlier that both Robot Battles tournaments saw record attendance and new entries. I’d say that there were around 10 totally new bots this time, in addition to veterans who left but returned and people who have built before, just not for RB at Dragon Con. Here are a few samples of the new entries… I hope they have staying power for tournaments to come.

This pair of 12lb wedges was built by a father-son team local to the area. Named “Busted” and “Rusted”, they actually got paired up first for the first 12lber match, which was hilarious because they were also both new bot drivers…. and the bots were slow. I’m not sure what drive motors they were using, but taking it easy doesn’t even begin to describe the slowness. Lots of potential from the design, though, so perhaps a simple motor upgrade is in order for next year….

Here is “Aluminum Box”, a valiant first bot effort with a set of fairly standard components – drills on 3″ colsons. It didn’t have a weapon, but could push pretty well if it got a grip. Since this kind of design can hardly go wrong, I suspect it will have more attachments and shenanigans if it returns in the future.

I have a bit of investment in this newbie bot since the high school builders not only came all the way from New York City by train (That’s a level of dedication I will never reach, and probably never reached), they’re using a set of donated DeWuts.

A 30lb pneumatic flipper bot that did more lifting than flipping, and which used a lot of Vex gear. The lid stays put – only the center arm pops up. Unfortunately, it lost after being unable to self-right. Bigger piston time?

Jim (of Nightmare) with a wholly new 12lber, ShaBoomBox, which allegedly was put together mere hours before departure. It’s literally made of P60 gearboxes, using them as structural blocks to bind top and bottom plates together. Hey, it works. Jim has had enough practice with this kind of design since he has an antweight, and heavyweight built off the same concept.

Terry, a returning veteran, shows up with the 30lber version of Ventilator. I remembered the 60lb Ventilator way back when Robot Battles was still running 60lbers on stage (basically, before they got too terrifying with new high powered parts). Pretty sure this is in fact it with a different hammer mechanism (with less swing) and without the big round shell…

HaLuCyNation gets some Dragon Con TV press attention before their first match.

Alas, poor Clocker.
The careful reader will notice that in its update section, I merely said “I remade the stripped hubs”. No, I didn’t remake them better, I remade them as-is. That decision pretty much ended the way everyone expected, including me, because no matter how loud I was screaming “This is going to be REALLY SKETCHY” at myself, I didn’t listen.
Clocker, therefore, did not do too much this tournament. It had two tournament, with 2 (effective) losses, and the only win being against HaLuCyNation. In fact, the problem first cropped up in the exhibition match where the organizers of BattleBots themselves(Trey and Greg) drove the bots. Gee, with that embarrassment, will I ever be allowed back into Season 2!?
Subsequent to the match against Destroying Angel, I ran out of drive options. I decided to throw it into the rumble as a stationary arena hazard, grabbing whomever I got shoved up against…
…and won? All of the “plate and standoff fork” robots briefly got tangled up, then something happened which made everyone else bail off the stage. I still can’t quite figure out what happened, but… Yay! Clocker won something by doing absolutely jack shit! Perhaps that should just be my strategy from now on, seeing as how I seemingly insist on shooting myself in the foot in terms of mobility every time. The hex hub system is nice…. if I can bother to do it right. Part of the issue is weight – Clocker is bumped right against the 30lb limit with the plastic hubs, but that was with the previous thick aluminum pole legs up front. I actually didn’t re-weigh it right before leaving. Most likely, I have the weight for aluminum hubs like they were originally meant to be.
This event was supposed to be Clocker’s Last Tournament™, but I refuse to let my machinery die of stupidity… so I’m just going to make the aluminum hubs for Franklin Institute ಠ____ಠ
Test Bot fared a little better for itself. I was quite out of practice driving it, and being underweight didn’t help pushing traction as much. It lost to Omega Force after a spirited pushing and driving match ending in a 360 degree flip (There were 2 halves to this match – after the first one, the unrestrained battery knocked the logic power inductor off the Ragebridge 1 board, which I jumped 5V to using an offboard BEC) It then won against Aluminum Box before losing to Test Bot v4. Actually, I meant Dolos, but I sold the TB4.5 frame to Mike, whose friend is operating it with modifications as Dolos! In other words… good, the newer version was better than the older one.
In the 12lb rumble, I sent Test Bot into the fray (after starting it in a nonsensical position because come at me) and lasted up until the end when I ran straight into the loving hug of Hypnos, which TB seemed to fit perfectly square into.
Now that I have Test Bot v3 back in my possession, I’ll probably keep it operational (and loaded up to 12 pounds) as a handy practice bot.
That concludes all the robot shenanigans this time. None of the bots I brought made a spectacular showing, and it might seem that I’m losing interest in them with my hurried repairs and modifications, but what balanced it out was helping so many new folks out with their bots. I think I’ve been around the block enough to “get it”… and seeing so many new builders this time, many of which I connected with online before and dispensed questionably-sagely advice to, in attendance at this event meant to me that I really built like 5 or 6 robots :p
Overall, the time constraints and preferred format of Robot Battles was showing its limits here this year. You can only have so many bots before the “show” is forced to become a tournament. The “two out of three” system really adds to the length of match times, and with the convention seemingly unwilling to allot more time to RB, some hard decisions about the future of the tournament might be needed if the popularity of BattleBots keeps up.
Operation: STRUGGLEVAN
Be prepared for the most action packed van adventure yet!
Not that it’s a good thing. In fact, I’d strongly have preferred to not deal with any of it, but now that I’ve had to fix it before, during, and after Dragon Con, everything finally works great! Can I go to Dragon Con now?!!
The story begins during Detroit Maker Faire. I didn’t notice exactly when in particular, but at some point I stopped to refuel and noticed that hey, it sounds a little like an idling school bus. An idling pulsation that was steady, and which went away once I stepped on the throttle a little but which was noticeable when trying to accelerate at low speed. It gradually became worse and worse as the trip progressed, but I was at least able to make it back into town. While unsteady at low speeds, it was smooth on the highway despite noticeably lacking some power.
Thus began the teardown. I was thinking a fuel system problem, specifically perhaps a malfunctioning injector. Too bad the symptoms literally pointed to everything; from said injector or perhaps an ignition/spark plug issue, all the way up to blown head gaskets and cracked pistons. Give that I had some time after Detroit Maker Faire, I dove in and did some testing as well as replacement of parts I had on hand.
I started with the obvious – using a timing light to double check that the spark plugs were getting voltage. I also just went ahead and replaced the plugs, since the ones that were installed were “Original-as-of-when-I-got-it-running” crappy plugs picked up at Autozone in 2013. Nothing seemed out of the ordinary.
I next tried a vacuum test. It turns out you can deduce a whole lot about the state of an engine if you have a vacuum gauge and know a couple of other variables about the engine. It was easy to shove the gauge into the brake booster vacuum line and run it a few times. But to me, it showed nothing out of the ordinary either, besides the manifold vacuum being a bit short of normal.
Well, with a whole lot of physical things wrong with the vibrating metal bits of the engine seemingly ruled out, I decided to take an intermission to just also replace the fuel system parts.

The injectors are reasonably accessible, but to reach them, a few hoses, connectors, and surrounding components had to be disconnected. To not utterly fuck up on the assembly, path, I marked the steps with numbers. So clearly, if I have to do this again, I can just follow my own breadcrumbs!

In a “Well, I’m already this deep” moment, I swapped in a new ignition coil for the old one, because why not!

A kit of new Bosch spark plug wires also made it on. The ones in there were unmarked and of unknown vintage and quality, so why not!
All of this above effort, of course, did not affect the problem at all, which was persisting – not getting better nor worse, but staying just out of reach such that I could still trundle over to Harbor Freight but most definitely not to Dragon Con. Well, it was T-minus 3 weeks at this point, and that was not a preferred state of things…
One thing I noticed, especially during the latter half of the Detroit trip, was how much more quickly it was losing oil. Specifically losing – it wasn’t burning, but just puking everywhere out of every opportune area. For instance, this is what the oil cap area and valve cover looked like after a trip to Home Depot or something.

That oil vapor also looked really suspicious, though the Internet seemed to suggest some amount of vapor is normal. Regardless, the “oil being forced out of places” scenario seemed to support the crankcase being pressurized abnormally, since it is supposed to be constantly evacuated by the PCV System. The problem being “just” the PCV valve seemed unlikely, because why would it only run badly in one cylinder? I double checked and cleaned the PCV valve anyway.
The rabbit hole was beginning to get a bit deeper.
I borrowed a compression testing gauge to check those numbers. Really I should have done this first, because
- 182 PSI
- 180 PSI
- 32 PSI ಠ _____ ಠ
- 180 PSI
The number 3 cylinder showed very little compression. No matter what, at this point, the head had to come off. I pinged the good folks at Smooth Automotive (within hobbling distance, and with whom I’ve done plenty of business already) to get an assessment – yes, head gasket failures into oil passages (hence the crankcase) can happen, but it’s more likely to be between cylinders 2 and 3 (which was ruled out, because cylinder 2 had good compression) or into a coolant passage, upon which I would see effects in the cooling system or engine butter, neither of which were present.
What it effectively meant was that I was at minimum needing a head gasket and at most…. there’s no bottom to the rabbit hole until it is reached!
With Dragon Con departure being now 2 weeks away, I decided to throw it in, and let them work their professionlulz magic. You see, a more sane person would PUSSY OUT rent a car, perhaps, but that ruins more than half the point of the trip for me, so I was willing to play my Automotive Wheel of Fortune game for now.

I got to watch the process firsthand and pester them with “Ooh, what does this do?” questions. Here is the single overhead camshaft in all its glory. They got it to this stage within… oh, like half an hour. Gee, it’s almost like you guys do this every day or something. For instance, I didn’t even know that the giant octopus of wire harnesses and throttle cables just came off as a single block to be set aside.

Oh god. The head came off. WHERE IS THE HEAD? WHERE DID IT GO?

Right here. I can’t explain why there’s exactly 1 white valve, but everything else has been leaking oil into the cylinders – Mikuvan is well known for an occasional small smokescreen on a cold start, a classic sign of worn out valve guide seals.

Here is a “literally, leak-down test” in progress. What it showed was that cylinders 1 and 4 were well-sealed, cylinder 2 and 3 were less so. The difference between 2 and 3 is that this photograph was taken the day after, and according to them, cylinder 3 was gone within a few minutes. With cylinder 2 showing good compression when I tested, cylinder 3 became the culprit.

And there it is. At the end of it all was destroyed piston ring lands. This was unfortunate, because it took the better part of a week (of on-and-off work – I’m clearly far from the only customer) to get here, and now many parts need to be obtained. Besides the obvious such as new gaskets and seals, and a timing belt set, I needed at least 1 new piston and ring set. Nobody in their usual parts supplier lineup had any. I would not have expected any different, really, because who the hell stocks parts for an obscure model of 1980s van that was mostly sold in California?!
Fortunately, Rock Auto had 1 full kit of pistons in stock. I will forever love Rock Auto, because this post has been a rolling advertisement for them (all of the parts I replaced myself came from them at some binge-purchasing point…)

And here they are!
We decided to only replace piston #3 for now. The cylinder wall did not exhibit scuffing or other damage (….somehow), and since all the other cylinders showed good compression, and time was of the essence, it was the quickest way to get rolling. If the cylinder wall itself was damaged, that would have been the end of the game, and I would have better spent my time welding up a mounting cage for a Siemens 1PV5135 motor. Besides, now that I have witnessed this whole process, I can do it all myself! Muahahahahahaha. That will end splendidly.
None of it ended up being exceptionally difficult, but just in areas I had never been and did not want to waste time fucking around before a major trip. The pistons are easily accessible with the oil pan and cylinder head removed – the “big end” bolts are in the open, and they pop out from the top.
While this work was occurring, the cylinder head was also being rebuilt by an associate shop specializing in engine block and cylinder head operations, Arlington Automotive Machine. New valve guides and seals, reground valve seats, and new hydraulic valve lifters were in order since all of the (original?) ones had long died (This manifested itself in the classic “tappeting” sound when the engine hadn’t yet warmed up).
All told, this adventure cost me $1700 not including parts. But the end result not only worked beautifully, it also sounded way, way better. It also revealed where all the exhaust leaks were, because now that the engine was properly running and the valves were actually stiff and responsive, the rustiest parts of pipe and the most weathered of gaskets began giving way! Yay!
and we haven’t even left for dragon con yet
It’s Tuesday afternoon, September 1st, and it was time to leave for Dragon Con. Cynthia and I packed everything up and rigged Chibi-Mikuvan to the roof.

An old heater hose explodes before we made it to the highway. Oh, right, the water pump was also replaced as part of a front-end operation (“When you’re down this deep…”) and the newly healthy engine and increased coolant pressures made the old pipe very sad. That is a photo of the broken portion of the pipe drooling coolant, which I took from underneath on the side of Memorial Drive in Cambridgeshire.
I hobbled back to Smooth Automotive running air-cooled half the way since the coolant loop bled out very quickly. I was horrified at the prospect of potentially cooking my BRAND NEW HEAD GASKET to overheating like…. 2 days after getting it done, so when possible, I shifted into neutral to coast, and gently revved the engine to fan itself. This hose was in the rear heater core loop, so the quick hack applied was to bypass it entirely. I plan on un-bypassing it soon, since fall is approaching.
Next, somewhere in southern Connecticut, I lose the speedometer. Something felt a little weird, so I look down and was pretty sure I was not going 0mph.

What the f….
That’s the speedometer cable I’m holding, which attaches to the output of the transmission through a little worm gear. It has a collar which screws onto said attachment point. This collar seems to have loosened up and gradually backed itself out.
This is the only photo I have of the process…

No, I didn’t cut off the cable. The driving spline portion which mates the two haves is probably still hanging out on I-95 somewhere, but in essence, it’s a small metal key that fits into the slot in the cable end and has a mating slot in the transmission end. Just a simple peg with two keyed portions. So what piece of material did I have which could approximate the key?
I purchased those jigsaw blades on a whim from some hardware store years ago and they’ve been sitting in the center console since. It turns out the steel stock they’re made from is a perfect fit width and thickness-wise to act as the speedometer cable key.
So I broke off a chunk of jigsaw blade, dipped it in motor oil for lubrication, shoved it in there, and went on my way with a speed reading again. Maybe I was actually worse off for this, because I definitely drove with more care when I didn’t have a direct speed readout.
Fortunately, all seemed uneventful for the rest of the trip until I got close(ish) to Atlanta – around “late South Carolina-ish”, I started getting some intermittent power loss at high revs on the Interstate.
cue ominous music
Being extra paranoid, I scheduled a check-in with Suwanee Auto Repair, which appeared to be very reputable for my area, with focus on the fuel system since that’s what it felt like (highly scientific terms here…) They reported no abnormalities with fuel pressure, injectors, and filter, and also recommended I get some water remover for fuel (e.g. HEET) in case there was water contamination in the fuel system. With nothing else presenting itself locally, I was comfortable driving back up to Boston, but with one catch – I’d return to the I-95 route which I had sworn off, because it was much closer to civilization in general and I had possible bailout points and friends with trucks along the way. Just, you know, paranoia. Just because the van is working, it doesn’t mean everyone’s not out to get you.
The order of events on September 8th was:
be south of Richmond, VA
> can’t rev past 4,000
be nearing Richmond, VA
> can’t rev past 3000 or go past 55mph
be in Richmond, VA
> stall out in the middle of town for a good 10 minutes
gently hobble towards Advance Auto Parts
> barely keep up with 25mph local traffic, limited to basically high-idling
Something was not happy. Falling back onto the symptoms I knew well from last year, I was still 99.95% convinced it was a fuel system problem. But swapping in my “crash kit” fuel filter – which I now keep a spare of in the back at all times, because fuck the world – didn’t resolve the problem at all. It would simply come back after less than a mile. Something was causing a severe constriction in the fuel feed, worse than last time. And like last year, I couldn’t cross-debug anything else that was wrong, the ECU blinked no Hobbyking-esque codes, and even calling up Frank at Smooth Automotive for some heartfelt remote diagnostics ruled out anything else. Once again, I was stuck in Virginia with a van of dubious functionality. And a town ending in “burg” was nowhere to be found, so what should I do!?
As I was low on fuel at this point anyway, I decided to grab a gallon or two more, in case I had to hobble to a shop or to a hotel. I didn’t want to get a full tank, in case I had to drain it at the side of the road.
> runs beautifully
This got me thinking. Something about just getting gas caused it to start running again. But not all the way – I could still barely rev past 4,000 RPM. Whatever is upstream of the fuel filter is causing the problem. It dawned on me that it might be the fuel pump itself, but I replaced that in 2014… before the Dragon Con 2014 trip which ended in me feeling gassy. But the fuel pump itself has a intake filter on it, the little sock-looking thing filled with fuel-resistant teddy bear plush.
I still am wondering why there is a filter on my filter and why these two filters can’t be 1. the same one and 2. outside the fuel tank. But the bottom line then was that I had to drop the fuel tank to investigate. Dusk was settling, and I faced a choice between finding a shop which could look at it ASAP or winging it to at least Washington D.C. where I had some cohorts summoned. The area of north of Richmond I was in (Google Maps tells me it’s called “Glen Allen”) was healthy with automotive services, but they were all booked and busy – the earliest opportunity being the next day, with no guarantees.
Therefore, I made a betting-man’s decision to try and drown whatever was causing the blockage with fuel. I went back to the same Shell station and filled completely up. I even rocked Mikuvan left and right by pushing on it while filling up, which probably made me look like a lunatic to everybody else. All to try and dislodge any material that was hypothetically in the fuel pump intake sock.
Using this witchcraft, I was able to cruise to Baltimore without significant trouble keeping up with traffic. By the time I got past Baltimore, the issue had begun to return, so I stopped to top off again. The problem was that the clog was clearly pulling itself back together quicker than I could run through fuel – which, with restrictions to begin with, I was getting spectacular gas mileage. This was utterly unsustainable – I was going to have to drain and waste a full tank of gas in the near future if this kept up, and if that is the case, I’d rather lose 1 day and have the fuel tank totally cleaned and inspected.
I decided to call ahead to my dad, who luckily lives in New Jersey right now,and explain to him slowly how his son has insisted on getting in trouble with his old broken truck again. The plan was to coast fashionably into New Brunswick and find a shop in the morning after some sleep. Driving 50 to 55mph on the New Jersey Turnpike is one of those things I strongly prefer not to do again.

In the morning, I rolled into E-G Tire & Auto Center in Dayton. The E-G part stands for Edison Generator, which is a way more badass name – I asked why the business changed names, and it seems that the owner simply spun off the car repair business when he sold Edison Generator-the-business-that-does-electrical-stuff. I’m quite fond of “old style” company names, because fuck stupid postmodern one-made-up-word startup names, and power to Big Chuck’s Robot Warehouse & Auto Body Center.
Oh, luckily they’re a tire shop too, because on the way there, this happened.

Welcome to New Jersey. Fuck you and don’t come back.
This was about 70% my fault and 30% Fuck You; I’ve gotten a bit careless with shaving curbs in Boston and Cambridge, admittedly, but New Jersey-class curbs are made of sharp stone mixed with some domestically-produced Fuck You. In fact, this happened across the street from E-G, but because it’s New Jersey, the nearest way to turn around to get to them was a mile away. Not wanting to risk driving and damaging the rim, I had to mount the spare tire in clear view of the tire shop that’s going to fix it.
In fact, they recognized Mikuvan by make and model, from my pre-arrival call, and had actually been watching wondering why I was just parked across the street highway whatever New Jersey calls its roads where you cannot physically ever make a U-turn.
E-G was a nice and friendly place to hang out while they dropped the tank and had a look. In fact, the chief tech’s son was a huge BattleBots fan, so I got to provide my first random celebrity moment, I suppose? No, that did not discount my labor rate.
Here is the fuel pump intake sock as-extracted…

You can’t really see it here, but if I squeeze the little bag, the whole thing turns black and it feels very, very mushy and most definitely not like a synthetic fuel-resistant teddy bear. This part was replaced, along with the main fuel filter again, just in case – they are fairly cheap, and as long as We’re This Deep and very paranoid….
By 3PM on the 9th, I was back on my way again.

I decided to save the old intake sock as a memento piece to my statistically improbable luck with fossil fuels. Here it is cut up to reveal the inner layers!
The observant might be wondering why Suwanee Auto Repair didn’t catch this as a problem. While I think they could have dug deeper or performed a more thorough test, I really only gave them Friday before Dragon Con to do so. With the understanding that I needed it back by closing time, they did not inspect the fuel tank because I asked specifically to check the filter and everything forward of that (e.g. injectors) – since that was what bit me in the past. Good quality repair work always takes time, as my experience with Smooth Automotive showed. Unless you literally know exactly what is going down, it is better to let theprofessionals you hire do their work thoroughly. If I had been wrong about the fuel pump intake, then my trip to E-G would also have been frivolous (minus the dose of good ol’ New Jersey Fuck You).
So that’s the story of how I made it back into town with 3 winter tires and 1 dorky all-season, an accidentally-mandatory engine rebuild, a piece of jigsaw blade embedded in an improper location, and a refreshed fuel system! Now that everything works incredibly well, I’m back making midnight speedruns to Chinatown! going to New York Maker Faire this weekend. All said and done, this trip cost a little north of $2100 for all the servicing and repairs needed.
See you at the side of the Milford service plaza on 95!


