Operation IDIocracy: Tackling the Inevitable; Vantruck’s Disassembly

I have to do this sooner or later, right?

After the BattleBots 2022 season was all over in October, I took a bit of a slump away from #OperationIDIocracy and also just working on stuff in general for a little while. The warm fall days were soon going to be replaced by cold, moist, and dark winter, my least favorite season by a strong margin. I spent a few weeks just going to meetup and shows, as well as tidying up this here website (the obvious flurry of activity in October – November 2022 is a telltale sign I ran out of other things to do).

In retrospect with all that went down… maybe I should have accelerated the schedule before the winter ugggghhhh kicked in, but at the time, I wanted to avoid the dreaded project car fate of being burnt out by your own project car.

I decided that Thanksgiving weekend of 2022 would be Vantruck’s last hurrah before it’s laid up for its RCOH and mid-lifecycle update. With the engine built and mated to the transmission already and as many parts in house as I knew to order, I had to pull the band-aid off.

Here we go! Bright and early on Black Friday, I started pulling everything out of the bed. The toolbox was unloaded onto some carts, and I also removed the big bathtub (and subsequently sold it – I didn’t like how much water it collected and would rather invest in a spray-in liner). The fuel filler hoses were unscrewed from the fender wells.

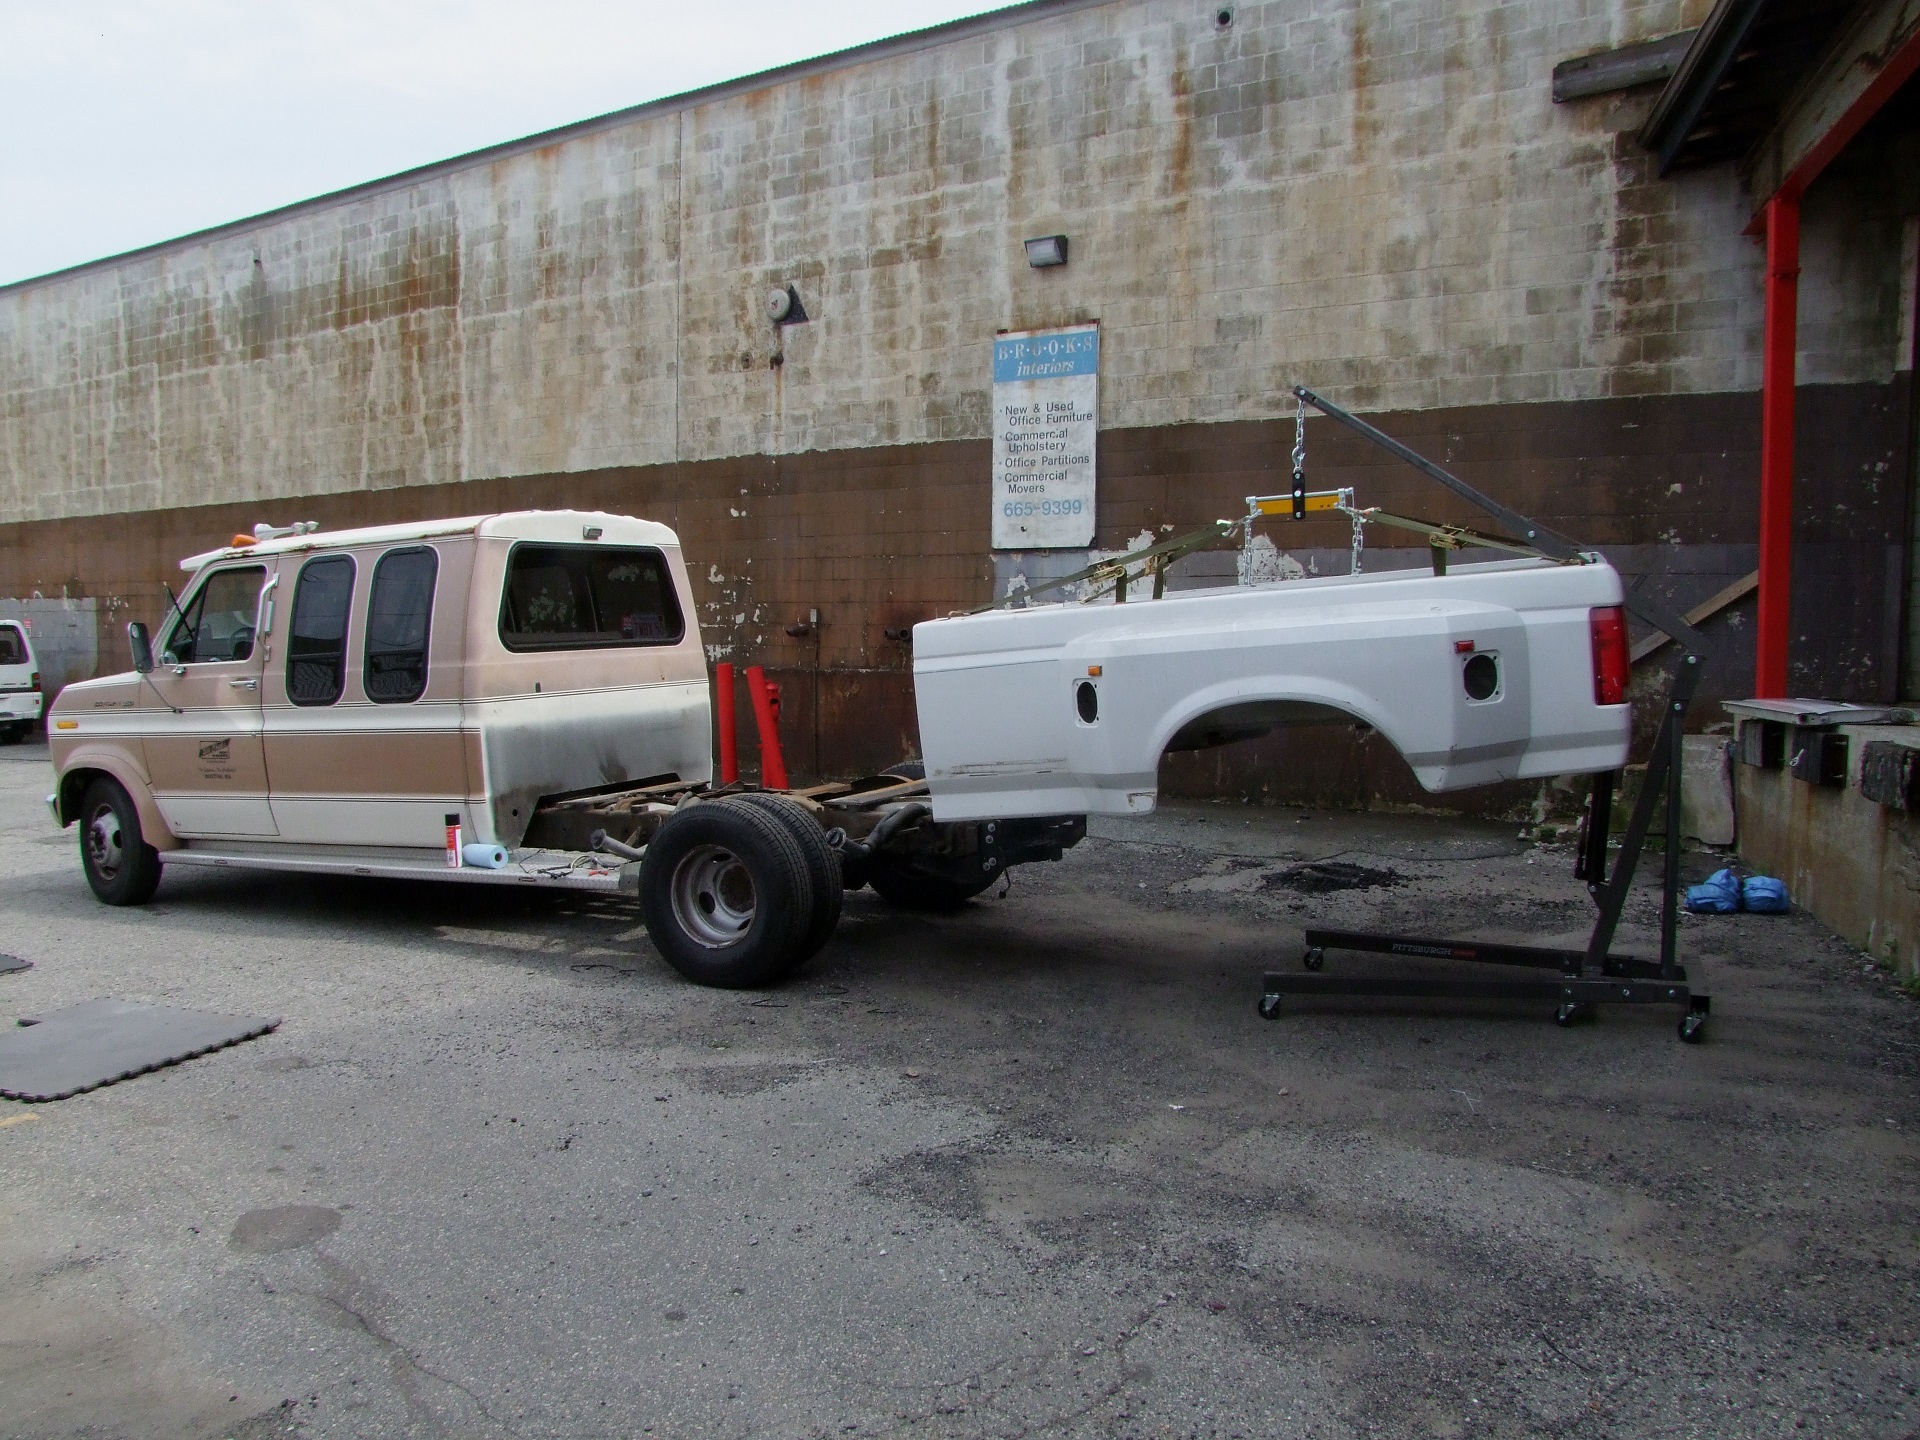
After the Glorious Van Butt (oh crap, i never posted about that) comes off and the bed bolts are removed, I rigged up the extra long #OSHACrane arm again for the purpose it was built… all the way back in 2017!

To pull the engine from Snekvan, I turned it into something I called Econospoon, but it worked the same still: Two long ratchet straps were slung over it in an X shape. The arm was made long enough to reach the center of the 8 foot bed from the back.

Then I just lift it upwards with the crane and drive off! I landed it on the previously-built bed dolly with some collected help, and we pushed the bed away.

Vantruck was taken to its somewhat-temporary-ideally-not-final resting place, where it remained until The Big Funny happened. Considering I left it taken it apart for all of December and January like this, with parts scattered everywhere… Yeah, I deserved that.

Really, I was now just going scorched-earth and removing everything in sight. The first thing to come off is the FITech fuel injection gear, which I planned on reselling. This canister is the good ol’ “Fuel Command Center”, which yours truly popped apart and documented a hack for when it was causing problems. It’s been running ever since then, with no problems at all.

I had no system or science to this dissection process. I just removed everything that the tool I was holding in my hand could loosen or unscrew, then grabbed a different tool and started that process again. Needle nose pliers? Sure, those work for hose spring clamps, screws and nuts under 1/4″-20 in size, and vacuum line retainers too!

The thing with these old “analog emissions” engines, as I called it, was the miles of hoses and vacuum lines they all came with because of tightening emissions regulations after the 1970s predating computer-controlled closed loop fuel injection by a hot decade or so. The commonly termed “Malaise Era” was when a lot of these big American engines became encumbered with vacuum-powered thermostats and surge valves and ported one-way turboenculabulators and the like. One of my remarks when I heard the 460 only made ~220 HP in this time was something to the effect of “Never have I heard of so little being done with so much”

Vantruck’s EFI retrofit made almost all of these slowly deteriorating hoses and valves unnecessary…. not that I think any of it was working to begin with. Besides what I removed during the FITech install in 2017, it was all left in place at the time.

One thing I could not wait to get to was a chance to basically start over from scratch on the Ford Spaghetti OEM wiring. Not only that, but Vantruck being an aftermarket-finished vehicle means the Ford Spaghetti got some special meatballs connected to it too, all over the place. The wiring on this thing has always been a disgusting mess, not that the others were better or anything.

In fact, working on the wiring for the many IDI ven has traumatized so much that I vowed to create a near-OEM grade integration for the diesel electrical system. That is an entire side quest to write about, something I began sketching out around this time as the L.E.W.D (Legacy Electrical Wiring Distribution) harness.

I’ve knocked the front off now (ouch, those rust holes on the front right fender sill plate) and am removing the transmission and oil cooler hoses.

I planned on reusing the external transmission cooler, but the 7.3 IDI will have its own oil cooler already, so this part won’t make it back on in the interest of minimizing unnecessary hosiery.

The 460 radiator is big, but not as big as the IDI radiator! The brackets were pretty rust-welded to the sheet metal, and I broke the bond by raising it with a jack. I’m planning to clean up and re-coat or rustproof Bracketry as I need them on the reassembly path later.

The big 460 sits rather low in the chassis. For some reason it was never apparent to me, but I guess I just never looked at it in the disassembled state. I started removing the accessory drives and deeper-buried fluid lines at this point.

I found a funny failure mode when I removed the ignition control module – the entire potting/sealing compound had detached from the module. In one piece. It was literally just sitting there under it. Protecting nothing in particular from the elements. The module underneath clearly showed some corrosion of the casing, and who knows what else.

I’m not sure if this was part of the cause of Vantruck’s slightly funny running and bad attitude when it was raining or wet, but I’m also not saying it wasn’t aliens.

Pretty much everything’s gone from the engine side of things, so I dove under to release the Gear Vendors unit, which I’ll also sell. With the planned 4-speed transmission install, I didn’t see a point in running a “double overdrive” which I’ve heard some people do.

I’ve never actually removed the exhaust pipe from Vantruck before, and didn’t see a way to remove it from the top side, with how the manifold extended under the cabin sheet metal. Well, with enough extensions and swivels, anything is possible from the underside, I suppose!? This is the passenger side, where everything comes really close to the frame rail. The driver side was pleasant in comparison.

One of the very last operations was to release the main engine mount bolts located on the engine cross-member.

With the last hoses removed and transmission linkage released as well, only gravity held the 460 and C6 transmission in.

I had built up around me an enormous pile of Van Paraphernalia. No other way to explain it! I was hoping to sell all of this soon to a single party if I could help it, alongside the engine and transmission. After all, these are all parts from a known running truck.

On the next episode, I’ll demonstrate a rigid pull of the 460 and C6 together, without separating them, from the van chassis….

Operation IDIocracy: THE TESTENING – Bench Run of the IDIot

When we last left off, it was 2 weeks before Dragon Con 2022 and I was hell-bent on getting the engine run on the stand and then packed away while I take an Overhaul Intermission. I wanted to make sure that as many subsystems were tested as possible. Part of those was the coolant loop.

What I didn’t want to do was hook up the radiator, with its 2 inch diameter hoses. Getting a few feet of that stuff to put it nearby was going to be really expensive, and all I wanted to do is make sure the whole coolant loop can fully purge itself with the thermostat cycling. It didn’t need to reach full flow.

So I made these … reducer fittings. They’re 3D printed from regular ol’ ABS. One end goes into the 2 inch and 2.25 inch radiator hoses, the other end is for 3/4″ diameter coolant hose. This reminded me a lot of making Anderson SB350 to XT-60 adapter cables or something. But, hopefully, with the whole system only running idle flow, it’ll be fine.

I hooked just the water pump up using a short belt I had which literally happened to be the right size. I’m pretty sure this is supposed to be a drill press belt or a lawn mower belt.

The test setup is shown here. I did not trust hanging the whole engine off just the stand, because these things shake the entire van when they power up and shut down. The plan was to spoon the crane into the stand, using it to unload the stand a little using the hoisting points on the intake manifold. This way, the crane is taking up some of the weight, spreading it across broader points of contact with the ground, and also countering the torque of the rotating parts from another point.

The electrical setup was very simple. These things only need the fuel shutoff solenoid held on to run, so I rigged a random E-Stop button into that circuit. The roller limit switch controls the starter motor. So basically I unclick the E-Stop and wham the limit switch to crank it.

There is no glow plug circuitry installed. Yes, I was going to Spicy Start my freshly rebuilt engine.

The rest of the test setup included a fuel pump running from a jug (the whole feed and return circuit is shown here with the black hoses) and a bucket full of water.

After some initial cranking to purge the air out of the injection lines, we’re ready for takeoff.

Starts out a little rocky as expected for maybe having some residual air in the fuel system, but otherwise it settled into idle smoothly. To be fair, this was the second run – after the first, I decided to mount the OEM exhaust pipe so as to keep the massive smoke cloud away from me just a bit.

I realized quickly the water pump setup would never prime if the reservoir was lower than it was, so I had to hang the bucket from the crane arm. In real life, the radiator water level is always above the pump.

I let the thing run long enough to hear the cold idle circuit shut off – this adjusts the timing slightly and lowers the idle RPM by letting the injection pump rest at a lower hard stop point.

It would be a long time before the thermostat opened enough to let everything purge out. A big surge of rusty water – emblematic of Snekvan’s neglected cooling system and me letting the whole thing sit for months – let me know that the water was now flowing.

The hilarious thing was that on one of my subsequent test runs, the battery clamp just straight up melted apart. These starters demand almost a thousand amps as they turn the ridiculously high compression over. This single little battery was not thrilled about it.

So what lessons were learned?

First, that I didn’t use NEARLY ENOUGH silicone. I think they assume you just buy the entire cartridge gun or something, because it began leaking oil from literally everywhere along the oil pan. The front and rear covers, in particular, seem to need GOBS of the stuff.

I’m used to depositing silicone in little 1/8″ wide weenie beads for Mikuvan, but you can clearly see those beads were BARELY making contact with anything!

So I had to undo both front and rear covers (involving removing the water pump again) and absolutely CRAM IT FULL of silicone.

(Check out that cavitation damage on the front cover plate, by the way. It’s not deep, but this is one source of problems that EOLs these engines. The cavitation will eventually erode through this plate and cause coolant to enter the crankcase)

Same process repeated for the rear cover. This involved disconnecting the engine from the stand and hoisting it with the crane. Glad I took the time to set that up, I suppose.

I also made minor adjustments in the seal positioning to get them to line up better with the end of the crankshaft. I think the seals I ordered might be a little different than the OEM design, since they stuck out in different ways.

Lastly, the engine was clearly not timed correctly – I just let the injection pump lay where it fell, when there are (at minimum) marks you have to line up. That is an operation I’ll leave for later, since you’re supposed to do it with the final fuel pressure as well.

At this point I had the setup pretty well tuned. A small, less than 1/2 second puff of the Spicy Air and it would light right off with barely one full turn of the crank!

This is the resulting poo water from letting it warm up. It looks like there’s chunks of something floating in it… I changed this water out twice before going “eh, it’ll deal”; on a scale from 1 to Flint, Michigan, it maybe ranked somewhere around Newark, NJ. It went from fresh black tea looking to just a little bit brown.

The IDIot Gurney

With a few days remaining before Dragon Con, I decided to go ahead and construct some infrastructure to make my life easier when I perform the install.

Most people install the transmission and engine separately, but I was daft enough after seeing how they came out such that I wanted to install the whole thing in ONE piece, instead of dealing with aligning them in-situ.

That will take some creativity, but more importantly, I had to assemble the engine and transmission first, and do so in way that I can then grab the assembly at its barycenter later on. I decided to make a small but heavy duty cart that cradles the engine and transmission. Here’s how that went down.

I started with some 2×10 wood arranged in a V-block shape. The IDI engine mounts are 90 degree inclusive on their mounting faces, so they will rest on the V.

Next is a frame made of 4×4 lumber and some of the highest capacity urethane casters Harbor Freight offered. The combined transmission and engine was going to be almost 1400 pounds. These casters combined aren’t rated for that, but I figured that they could probably tolerate some overloading and I was just needing the engine to be somewhat mobile so I could get it out of the way. Not like it had to be in service and rolling around a factory floor.

The width of the cart was dictated by how far in I could push the crane and still safely grab what I believe was the balance point of the engine + transmission assembly.

The wheels are bolted in with 3/8″ lag screws. The frame itself is held together with 8″ long lag screws driven into the ends!

My plan was to hoist the engine onto the cart, level it with the crane or a jack, and then build a rear support for the block.

To do this, though, I had to wrong-way scissor the engine stand and crane again. This arrangement was certainly a little precarious.

… Maybe a little too precarious. While shoving the thing forward one last time, I made the mistake of applying the force too high up on the crane body, and watch the whole thing very slowly tip its way onto the cart. No damage or anything, but it was like one of those “slow disaster in motion” videos!

Welp.

After repositioning things, I got the engine swung into a central position in the V-block and began levelling it with the floor jack.

I secured two 4×4 posts using screws driven in at a 45 degree angle to support the outer reaches of the exhaust manifolds.

The next day, it was transmission time. I read that you had to fill up the torque converter beforehand or it’ll take forever and ever to fill the transmission (as the oil pump has to otherwise do it for you). There’s a removable plug on the side of the torque converter to do this filling through. I pumped the transmission fluid salvaged out of Snekvan (and just about everything else I had with a C6/E4OD) right back into here. At the same time I went ahead and filled the oil pan itself as well, by pumping in through the dipstick hole.

I didn’t fill it much, because I didn’t want things to potentially leak out as I was manipulating it into Vantruck later (it’ll need to be highly angled forward and backward to wiggle in). But it should be enough to prevent a dry start.

I went ahead and mated the engine and transmission with the mounting bolts, then measured how far the tail housing was off the cart frame.

Some quick action with the miter saw later and the rear support is done. I’ll take some measurements of this thing and maybe back-CAD or back-document it later for everyone else’s amusement.

And here we have it. In one photo, both of my terrible time-consuming, money-burning, expensive facility-requiring hobbies.

Oh yeah! While I was on the woodworking binge those few days, I also whipped together a future Vantruck bed carrier cart. I won’t have the luxury of an all-concrete surface any more like the ol’ Vape Shop parking lot, because the Robot Trap House driveway is rather hilly and everything else that surrounds it is grass or dirt.

As a result, I made this cart with big pneumatic wheels so Vantruck’s bed can be craned onto it and then I can roll it into the back yard or something. This will come in handy in a few weeks/months time.

With Dragon Con 2022 having come and gone, and Overhaul’s 2022 season updates in full swing, Operation IDIocracy would pick up again near the end of Fall with some more infrastructure work and then Vantruck’s final disassembly…