Upgrading the 100mm Skatemotor for Chibikart

The “skatemotor” design that ended up in the RazErBlades is kind of abysmal in terms of performance. They were wound with maximum torque per amp (Kt, the torque “constant”) in mind, but the result of winding so many single turns on the stators is that their winding resistance was very high. There weren’t many amps to be had afterwards. I pulled the left skate back out to measure the resistance of the motor, and it was about 1.28 ohms. Entire, single digit ohms. It just meant that I was losing one watt for every amp that was going through them. Since the DEC Modules were limited to 10 amps per motor and the system was 22.2 volts, I was losing potentially more than half of the maximum power to winding resistance.

Clearly this was not going to be acceptable if I was going to run them at 32 volts. The skatemotor windings were single turns of 24 gauge wire – not very conductive by high powered motor winding standards – and 36 turns of it per tooth came out to a torque constant of about 0.25 Nm/A. I aimed to hit this value again, but with bigger wire for less resistance.

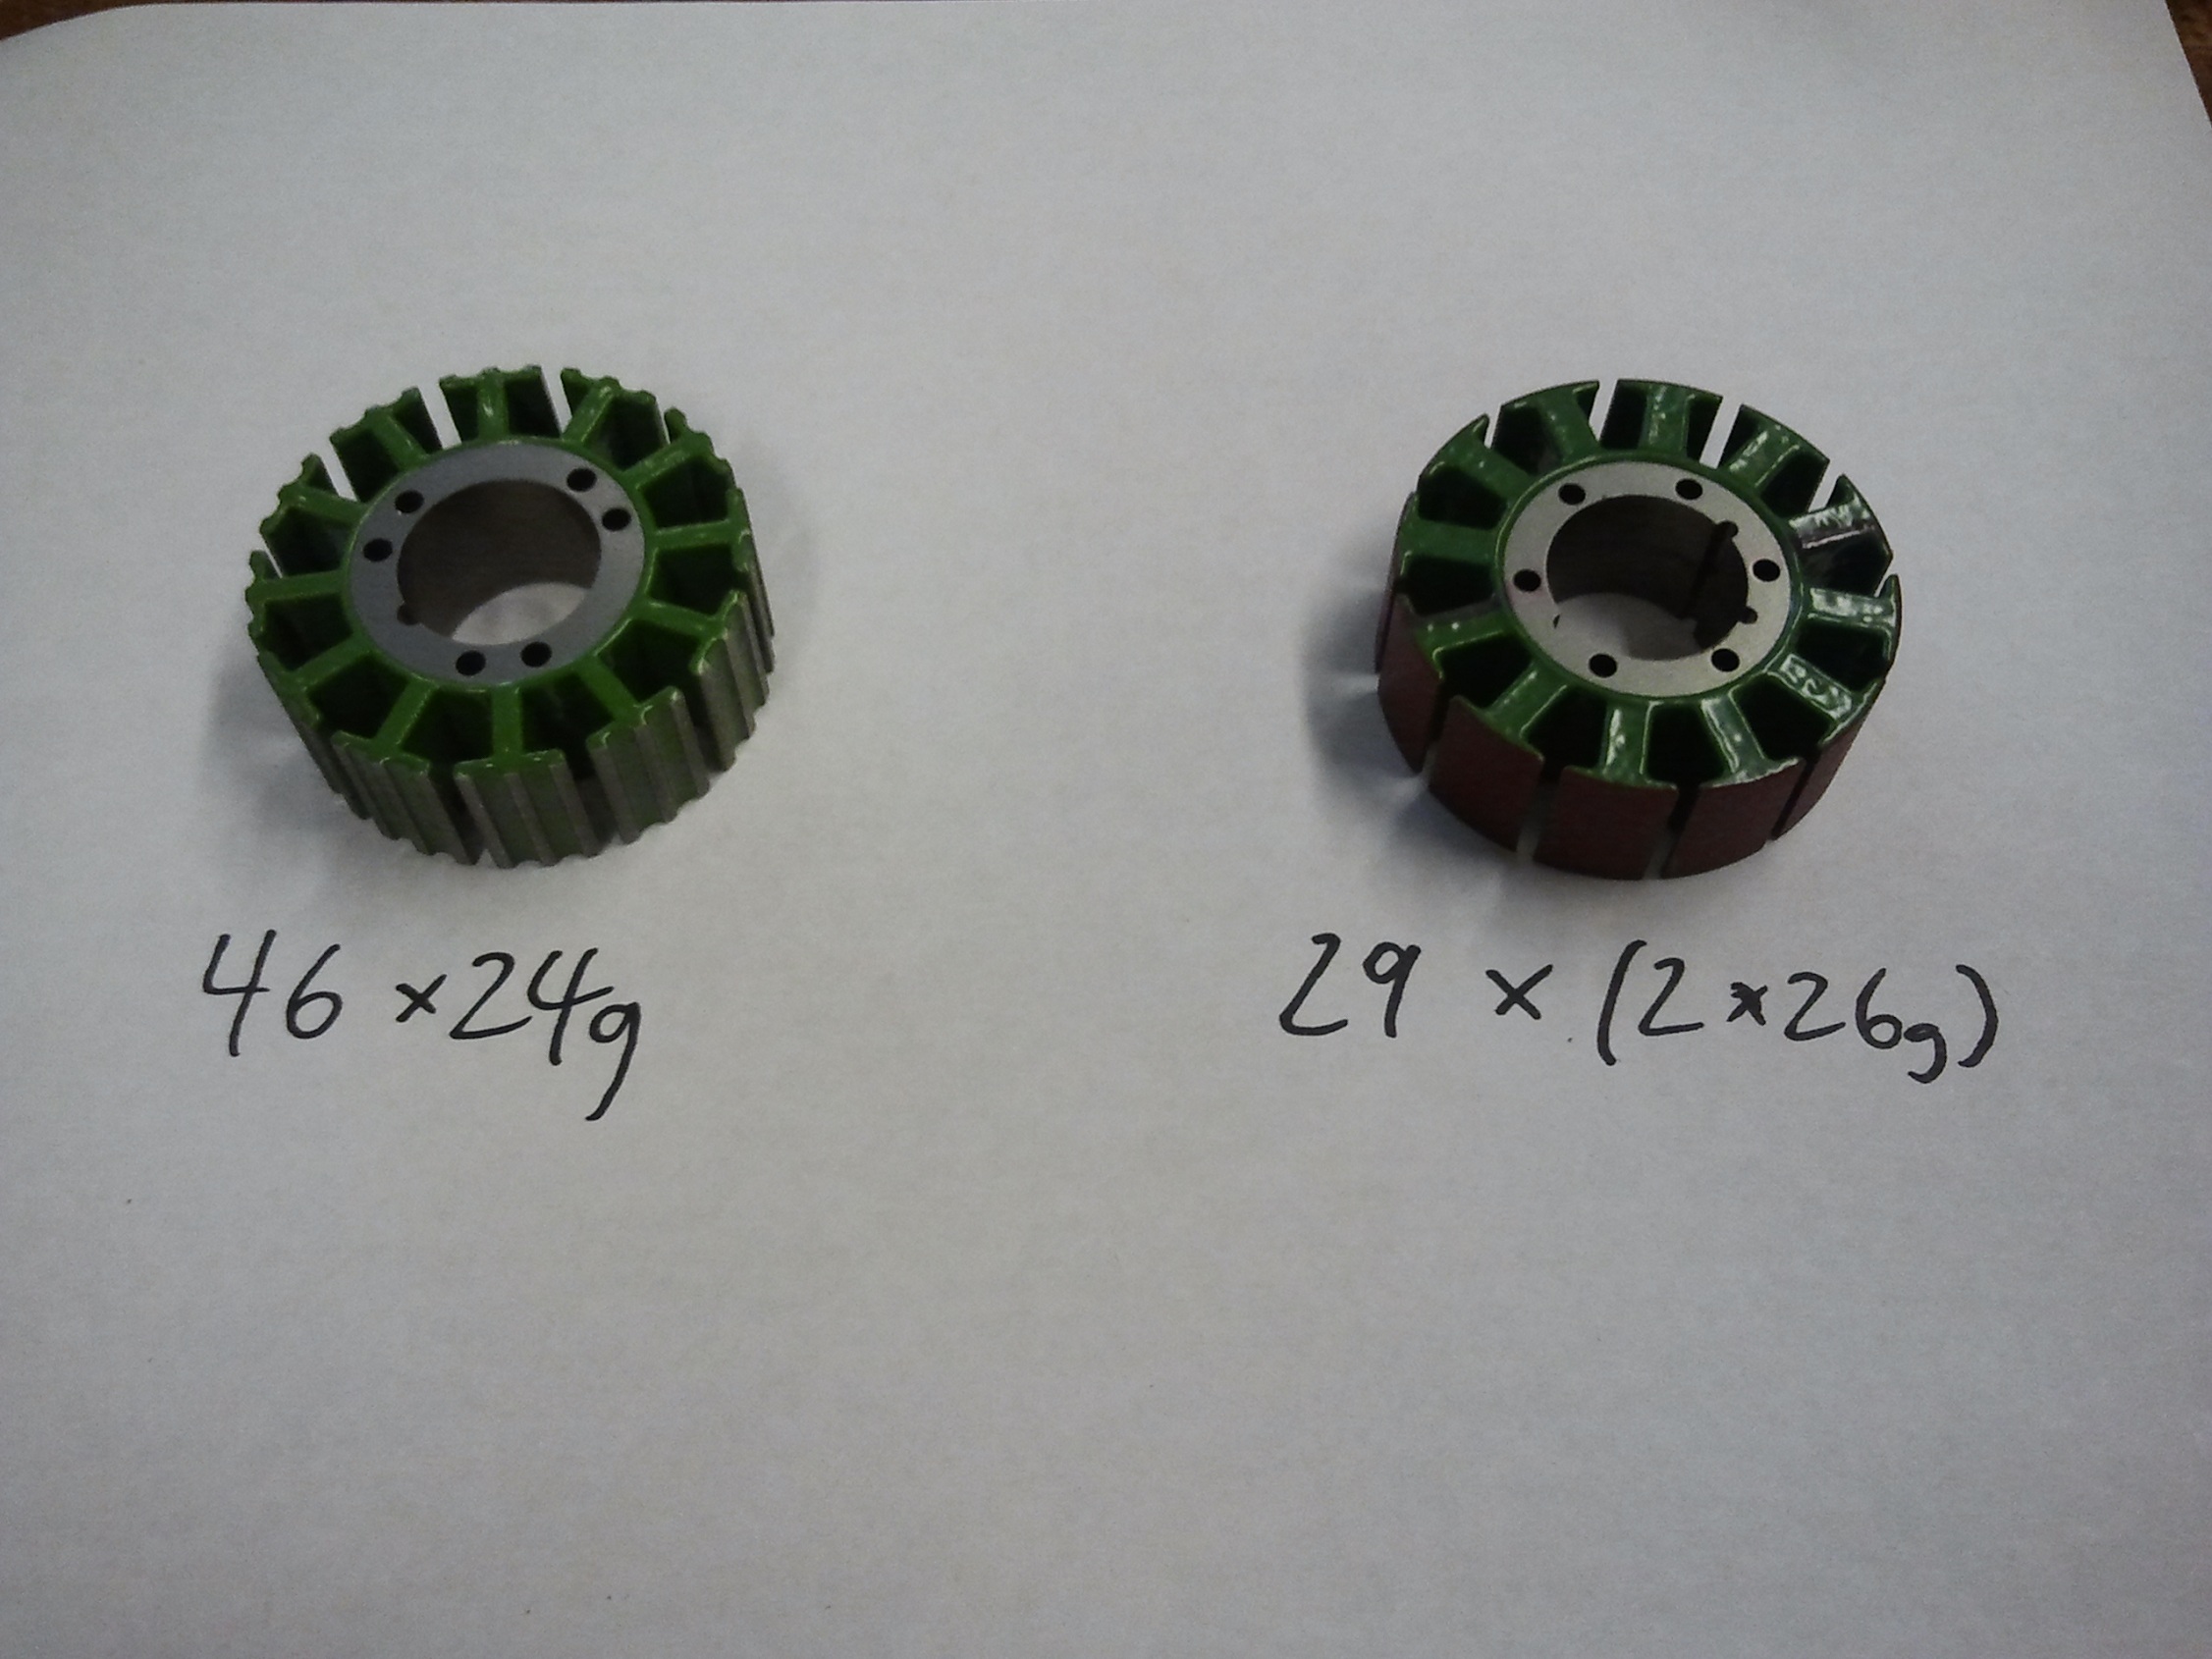
First step was to check out what copier motors I already had. I picked my favorite part numbers – RK2-0614 is on the left and RH7-5219 on  the right. I didn’t get pictures of the ‘before’ windings, but they were sufficiently dense to make me wonder if they were hand-wound. Given that these are all made in China anyway, it wouldn’t be surprising. The right one was particularly interesting, since it already used multi-wire parallel windings, and is actually the same tooth geometry that I used in the skatemotors originally. The left one has narrower teeth – potentially detrimental for high torque production since the small cross section of iron may saturate if I put too many turns on it. Only a pass with FEMM will tell me for certain.

Because I had four of the left (RK2-0614) and only one of the right, the choice to design with that one in mind was clear. I began running some rough numbers on just how many turns of larger wire I can reasonably stuff into the much wider slots. 36 turns of #24 AWG wire fit into the right with a fair margin, and I discovered that I could reasonably get about 30 turns of single #20 wire or doubled #24 wire into the slots. That would be really Adrianing it and being super-clean, too.

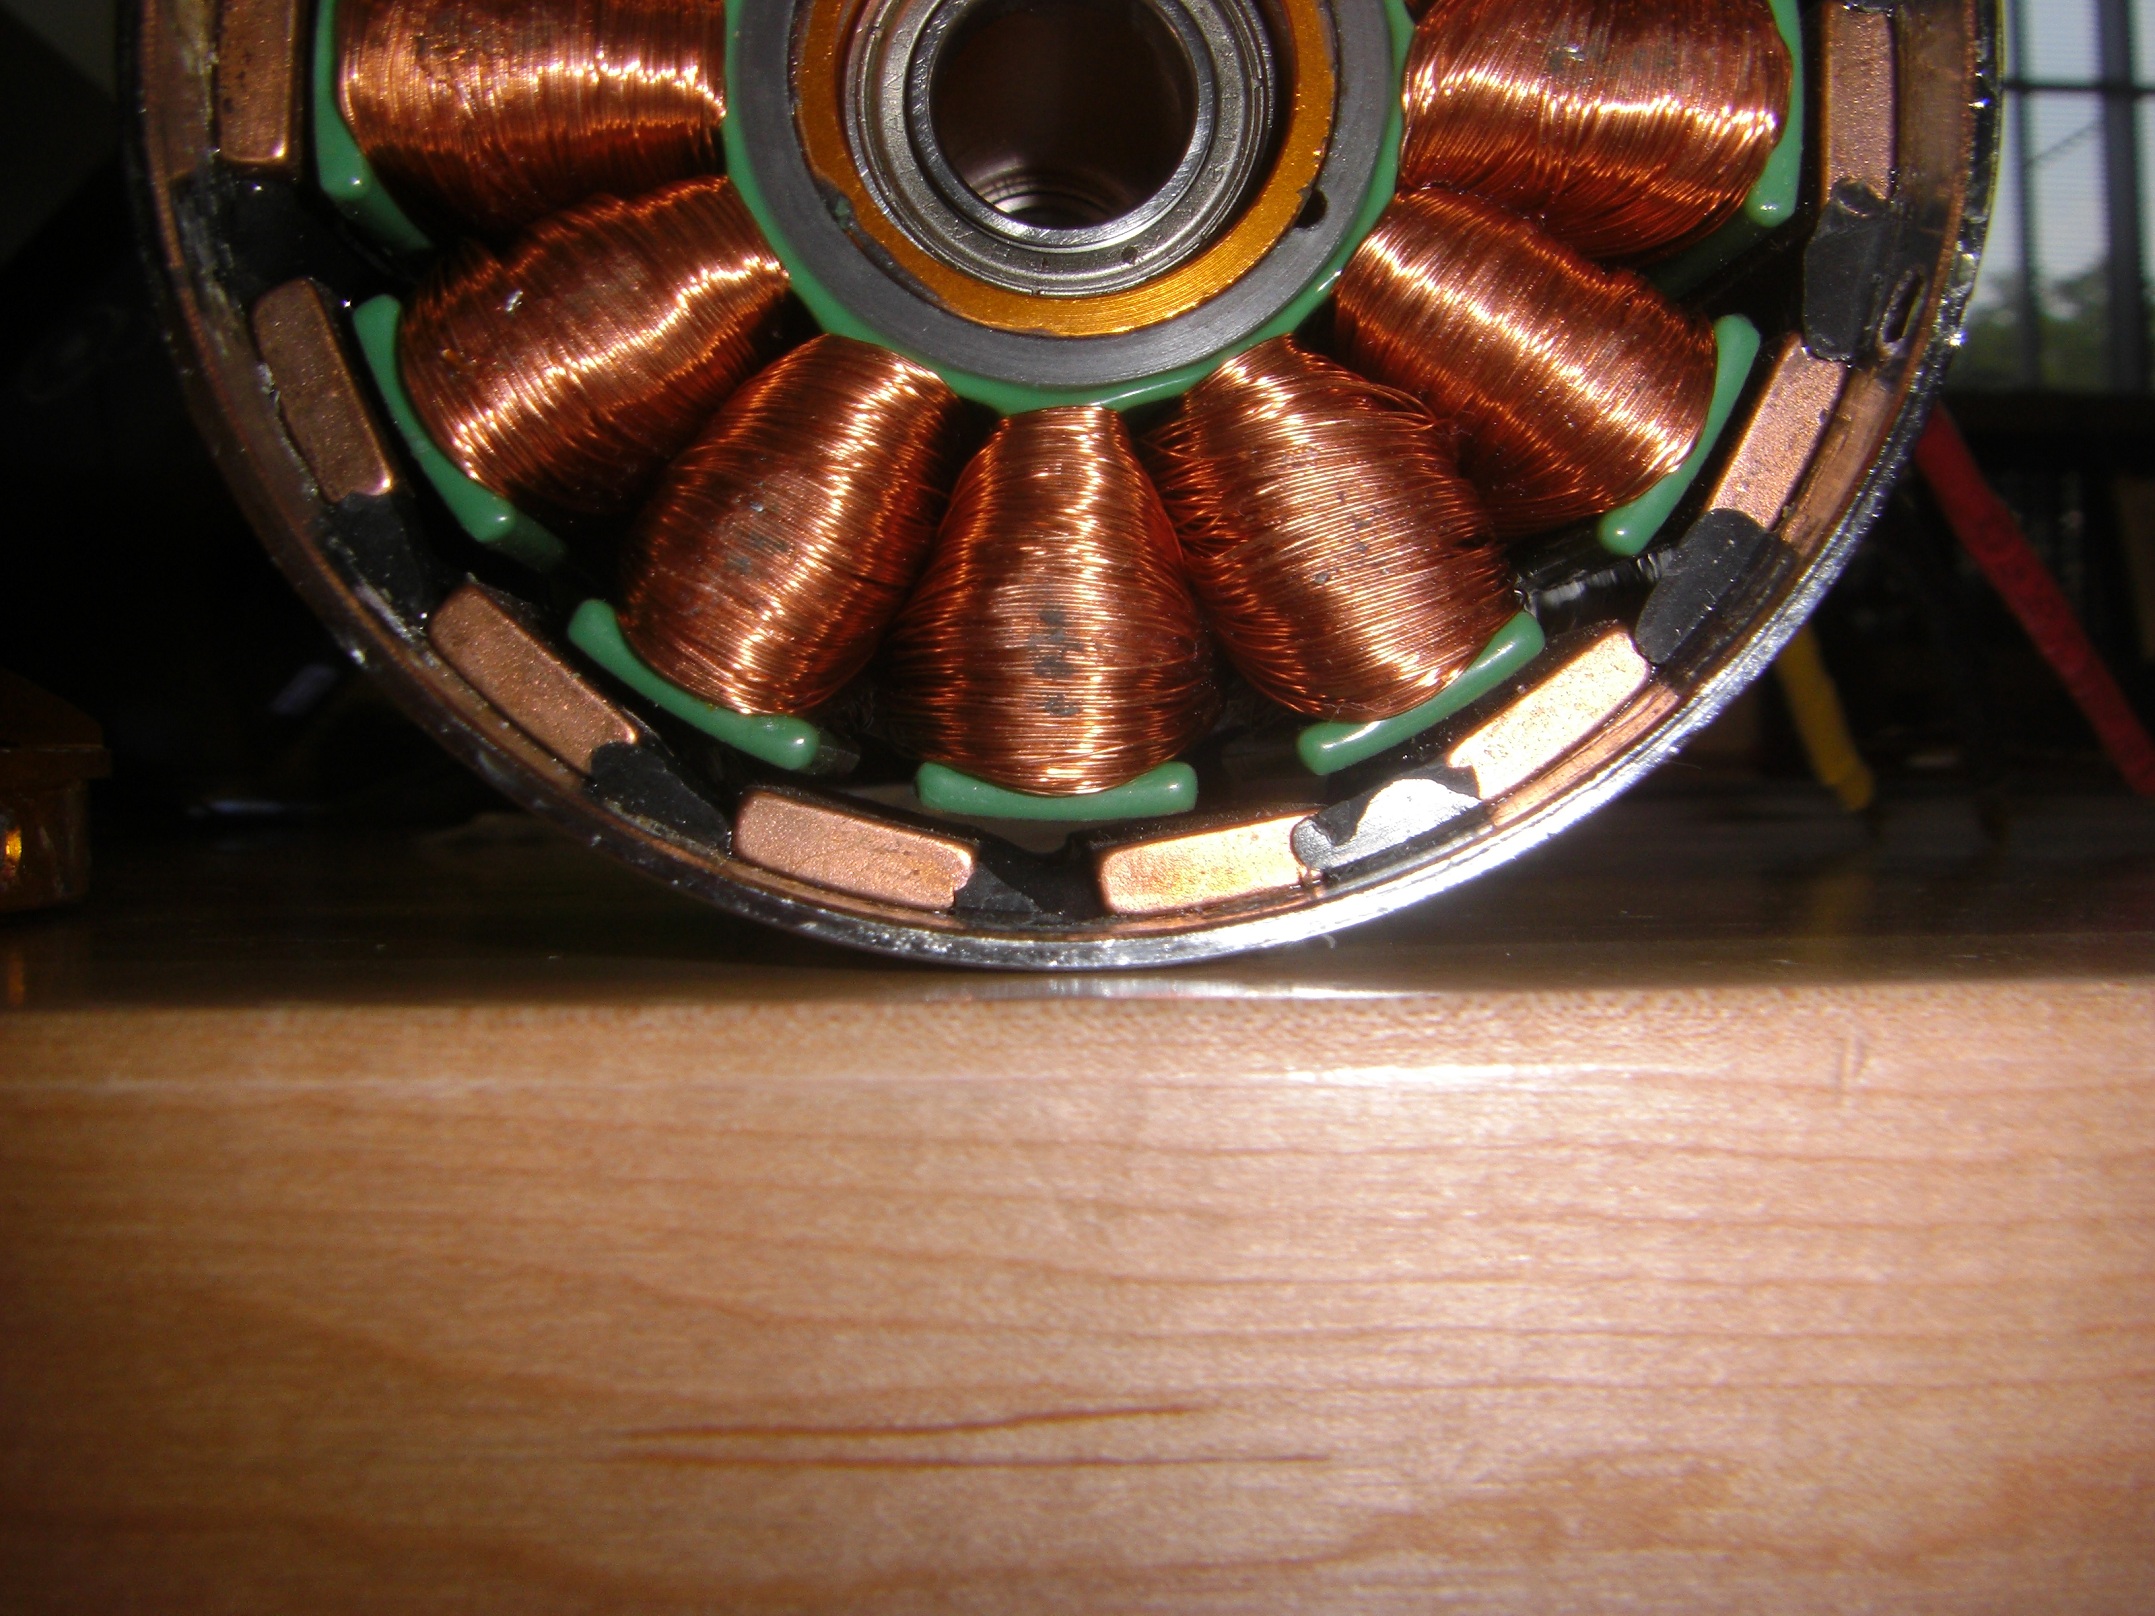
RazEr rEVolution was wound with double #22 wire, but making sure the wire laid flat and didn’t cross over eachother was difficult to keep track of, and by the end I was running out of patience. When the wires crossed, the advantage of packing is lost – as a result, the sides of the windings tended to be much fatter and messy than the ends.

The converse tactic to being careful in laying the wire strands adjacent to eachother to maximize packing volume is “Hobbykinging it”…so called because…

That’s 8 turns? Yep, that is the inside of the typical 80mm “melon” motor. Those things are wound with something like 90 parallel strands of very fine wire each maybe the width of a hair or so – possible #40 AWG or equivalent. Smaller wire is much more flexible and packs relatively easily, and to a degree you can get better results by packing more parallel strands of a smaller wire together.

There is a limit, however – the smaller the wire, the smaller the copper-to-insulation area gets. Even those 90 strands of #40 wire can only amount to a ~#20 gauge equivalent. In terms of circular mils of copper area, the former is (cite) 9.65 * 90 = 868 circular mils, and the latter single 20 gauge wire is still over 1000. I bet I could put several parallel #20 wires in a melon rewind and get even less resistance in it, because the larger copper wire is still enclosed by the same thin layer of insulation.

But the main reason they do it is for ease of winding – bigger wire is tough to form and bend, while a billion small strands can be wound by anyone, and in a production system which involves low skilled migrant workers the task must be accomplishable by anyone.

…including me!

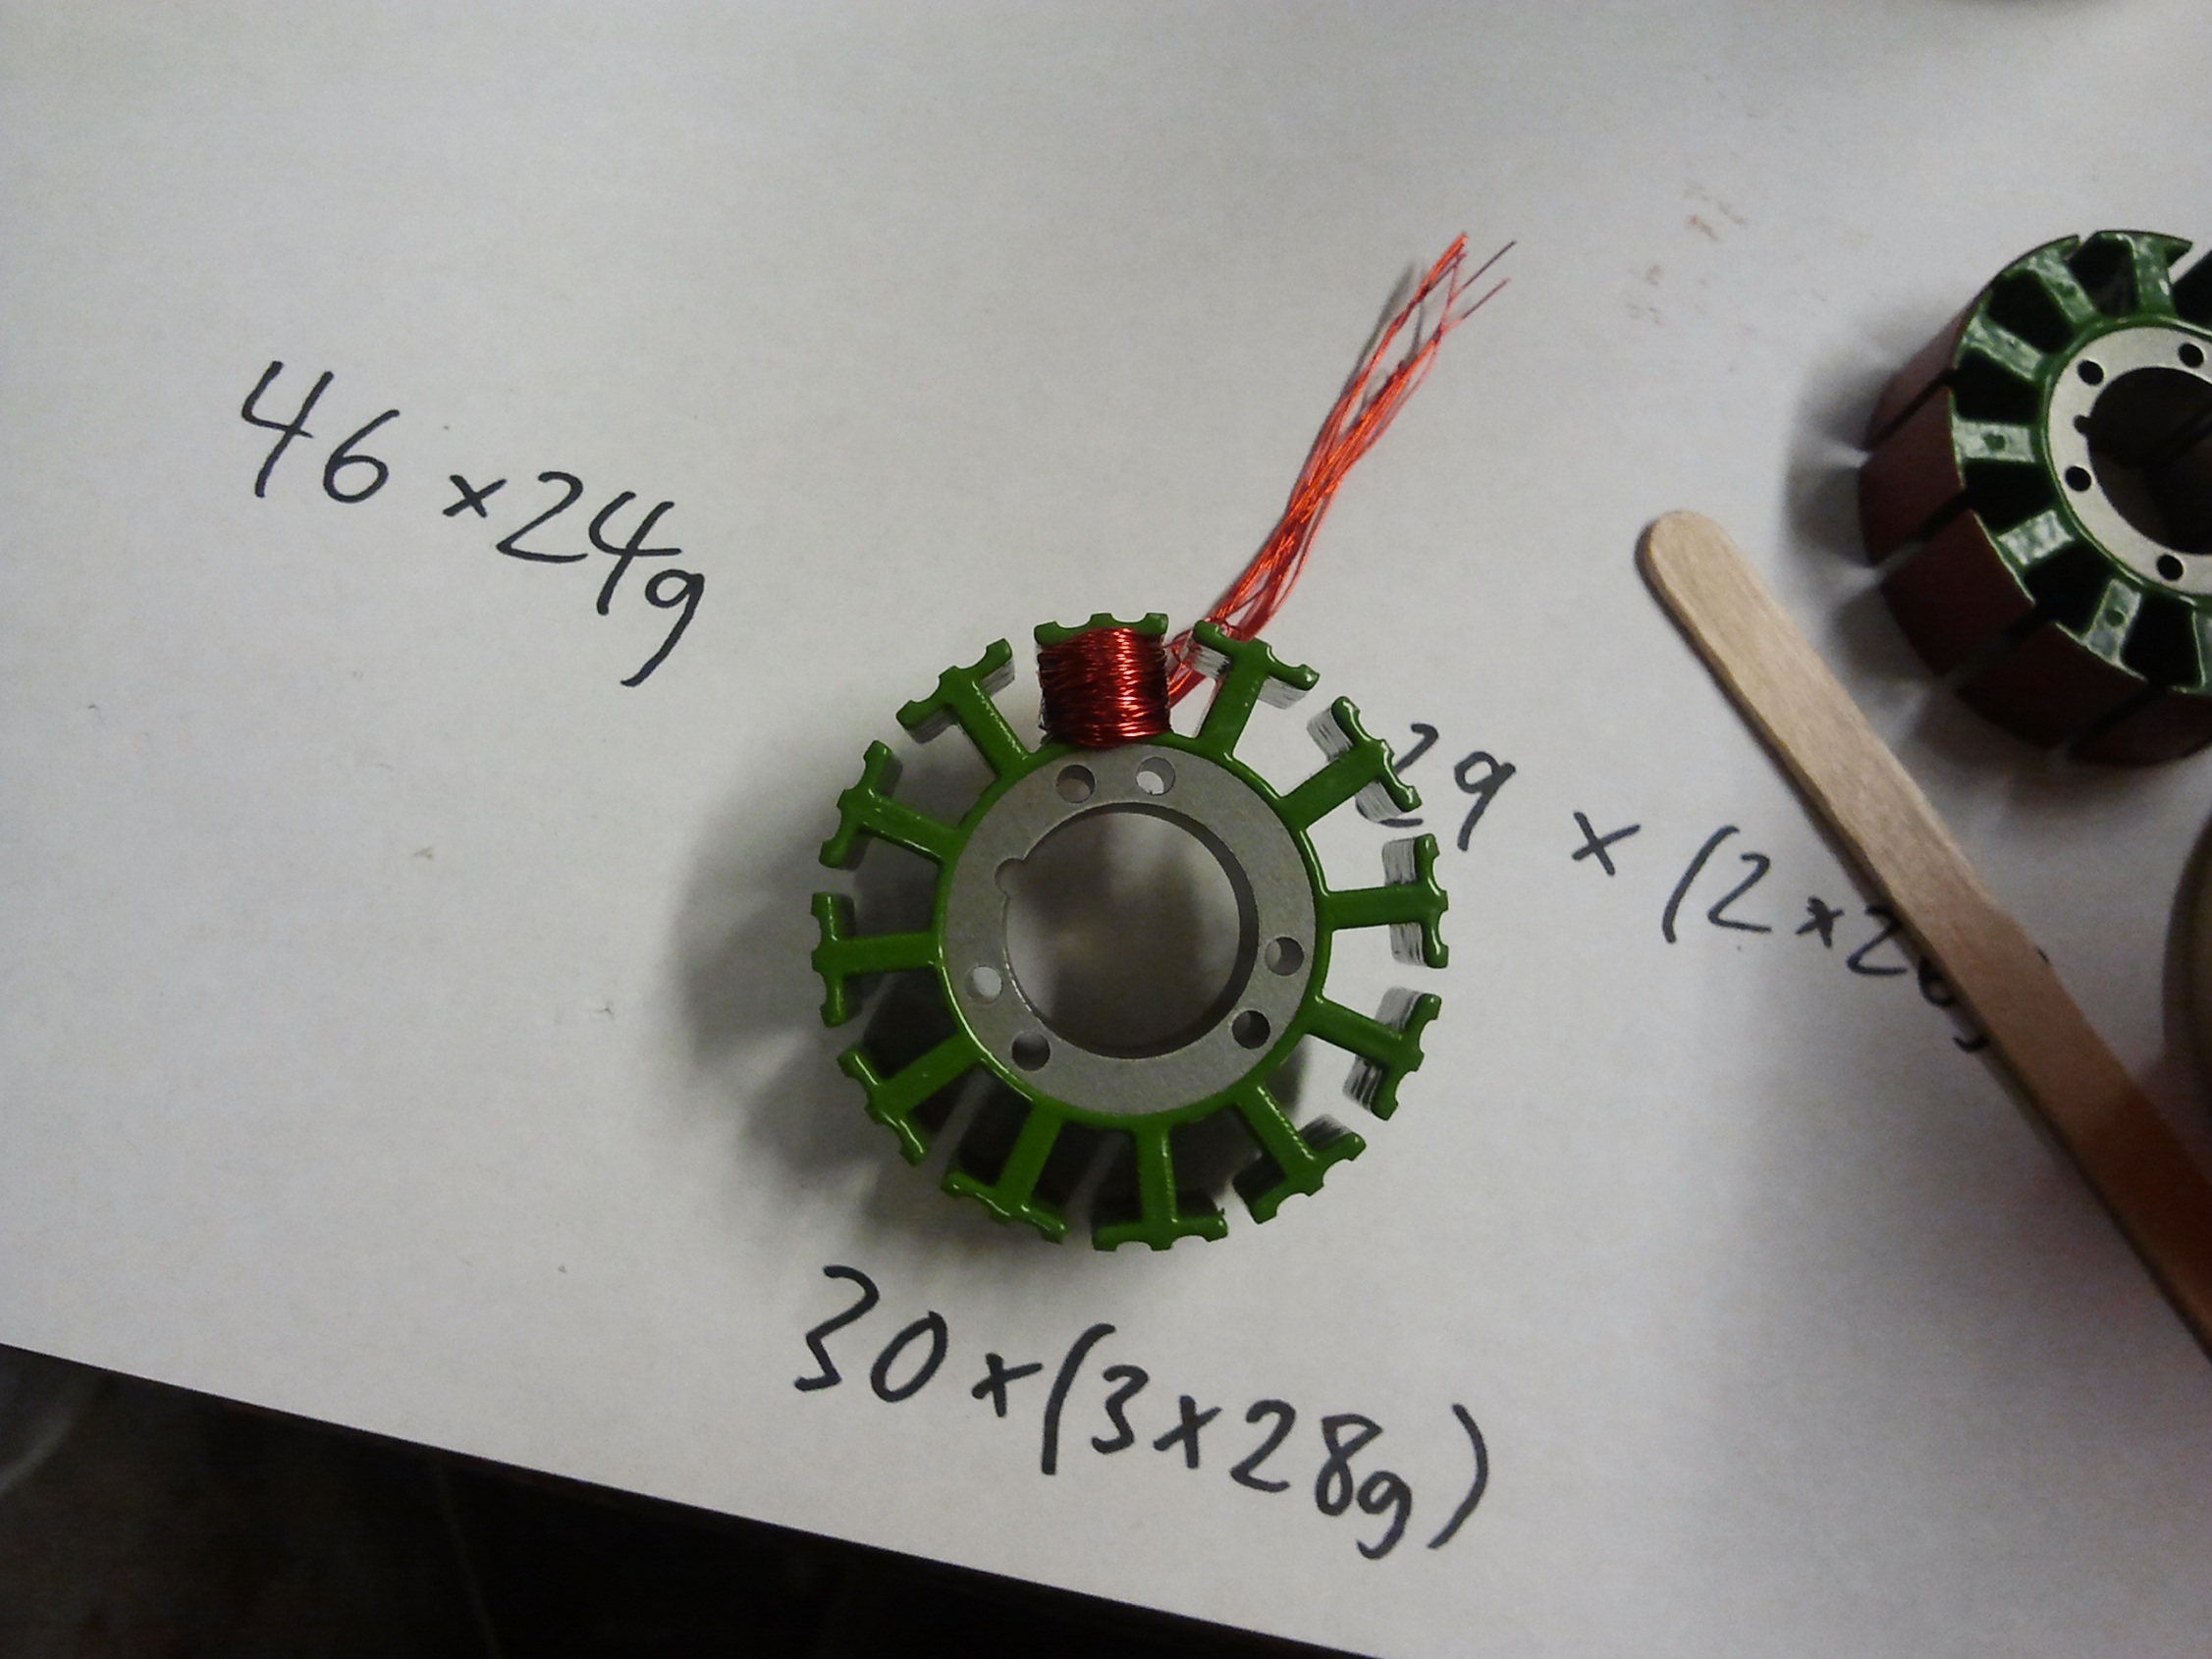
I tried a hex-28 gauge winding here, and I like it alot. Through some crafty decision making, I decided that six strands of #28 wire was a place to start with polystrand winding experiments. That, and MITERS has a 20,000 mile spool of #28 wire, or so it seems. Six parallel strands of #28 yield an equivalent of #21 wire, which is certainly a step up from #24 – a doubling of copper area.

I loved how easy this was to wind. All I had to do, really, was pull tightly, and the wire would just flatten and spread itself. As a result, that is a full 36 turns of hex-28 (so that caption is completely and utterly inaccurate). While I finished 30 turns successfully, the last layer ended on the outer diameter of the stator, and so I carefully wound back towards the inside diameter again, stuffing more turns on. A run through with a popsicle stick flattened the sides well enough that the whole coil seems to pack neatly under the teeth.

I strongly approve. Hex-28 is probably going to be the winding of choice for Chibikart’s 100mm skatemotors…. not just because we have like 20,000 miles of it. I swear. 36 turns would yield essentially the same back-EMF constant, so what I get is a torquier and more efficient motor since it can suck down more amps (more torque) but not heat up as much (less resistance losses). The resistance of that one coil with excessively long pigtails is about 51 milliohms. Four of those in series make a single phase, and eight of them make for one set of powered windings (two phases are switched at any one time in a conventional BLDC motor), so the total “line to line” resistance of the motor will hopefully be only 0.4 ohms! That means for the same amount of resistance heating, I should be able to stuff 1.8x the current through: sqrt( 1.3 ohms / 0.4 ohms) since dissipated power is proportional to current squared.

At this point, I’m just waiting on parts. I’ve ordered all the magnets, just 20 x 5 x 2mm bricks for now, from superdupermagnetgeorge. I’ve also went ahead and ordered some spare 98mm skate wheels since I’m sure if this thing actually works I will instantly drift and brake the current skate wheels into dust very quickly.


Hub Motors on Everything: ChibiKart

The year of the tiny, chibi, and cute projects continues!

So here’s the backstory. I’m sitting on top of a veritable mountain   pile small cardoard box full of 100mm-class hub motor parts that I commissioned on a whim last fall to test out the workflow on mfg.com, of being even lazier than I am already and hiring my machining work out to shady Chinese backwater CNC machine shops (because those exist). I discovered that Chinese job shops seem to be every bit as legitimate as American ones, and will definitely hold the tolerances you are not used to holding for your own parts made with your own drawings. And even though the pricing is inexpensive for such machined parts, I am still just hiding several hundred dollars of shiny precision machined electric motor parts in a box.

Not very productive – I’d rather that money be either put into builds or making me more of itself. That doesn’t mean I’m going to start selling motors left and right just yet – I have none of the other support parts at the moment, including important aspects of a wheelmotor such as the wheel – right now, I’m still just carving the center out of 100mm skate wheels. Add to that the amount of actual completion detail that needs to go into a motor such as proper windings and termination, rotor magnets (those things are getting expensive) and possibly even sensor boards and Hall Effect sensors (which would need to be designed, sent for fabrication, and assembled), all of which comprises several hours of manual work, and the case is still not very strong for my immediate entering into the dubious market of small personal transportation implements. Yet. Product development takes real time commitment, something which I have yet to convince myself is worth pursuing.

But to counter that, I am more inclined now to take custom commissions than I was before, like for your Air Trek skates or electric suitcase or nanosegway or whatever. The main reason is that I lied just a little above – I do have a potential source of stators for both the 100mm-class “skate motor”, and the 125mm wheel Razor scooter sized motor. The stator, as I’ve explained before, is pretty much the hardest thing to get custom made for you if you are buying in volumes with less than like six figure units, and it’s harder than I thought to just “buy a few” stock/premade ones. However, this part investigation is still forthcoming – the other reason is that I’ve found several “islands of stability”, or at least islands of reliable part numbers, in my everlasting quest to catalog the stator sizes of all extant copier motors. Yes, that document exists!  Use it for your own hub motor building endeavours.

I’ve literally spent hours sitting on eBay hunting for new part numbers to buy and catalog. Tearing motors apart to make other motors is not a mass production method, but for my one-offs, it’s an acceptable compromise. This means that I also have an asston of random copier motors hanging around, several of which have stators which fit the original 100mm skatemotor design, and I would be totally unsurprised to learn that all my random eBay binging has resulted in more sunk money.

Poetic waxing aside, the combination of too many motor parts and too many random stators means that I need to build something to use them. I’ve pretty much made a pledge to not build any vehicle that is not propelled by hub motors from here on, since doing otherwise would mean I put off development of the motors to something reasonably resembling a product even more, while my surplus parts continue to build up.

Chibikart

Here it is!

…well that’s not very exciting.

This thing is already going to be comically small – that frame rectangle is only 30″ long by 18″ wide – with even more comically small wheels. Coincidentally, 30 x 18 is the exact dimension of the front half of tinykart. Part of this build is also fueled by go-kart envy. Ever since the venerable LOLrioKart was officially decommissioned, I’ve not had a four wheeled rideable object. Two tracks is kind of okay, but not really quite the same. But for me to just build a copycat kart is not very enlightening. Thus, Chibikart.

Four wheel drive, maybe four wheel steering (those corner pods are symmetric in case I pursue it), and really really small.

…and possibly with only slightly more horsepower than the Razerblades, since I’ll literally be using the same kind of motor.

Alright, maybe now there is a better sense of scale. That seat is not a couch or bus seat or something, but a riding lawn mower seat from Surplus Center. Yep, this contraption will be on the same length scale as Amy’s profoundly awesome SAM, but definitely a bit longer.

The seating position right now is “legs out” with a front bumper or other structure out beyond the 30 x 18 and the foot pedals, and a steering linkage vertical immediately next to the front 80/20 bar. During this session, I discovered how pleasant CADing with 80/20 extrusion was. After I figured out, of course, that there were only two narrow perpendicular faces on each side to constrain to.

The pedals are generic Chinese electric kart pedals, sold around the Internet using some form of the name “Simple Hall Foot Pedal” or similar. I’ve yet to receive the ones I ordered, but luckily TNCScooters had reasonable dimensions on their drawings (interpolation, estimation, and “screen calipering” aided in completion of the CAD model too). One of them will have a linkage extension to actuate cable brakes – the actual mechanical braking method is yet to be designed, and might just end up being scooter fenders with rigged cable linkages. Hey these are scooter wheels.

I’ve made a few changes here. First, the pedals have been moved inboard. I’ve decided on a significantly more “cab-over” driving position, again similar to SAM (but not QUITE that much…). The steering linkage will be planar and located below the main frame rails. Overall ground clearance is slightly under 1.5 inches – the wheels are not mounted on center in the 80/20, more like 3/8″ under, but the linkage will take out some of that.

Through careful ergonomic studies involving sitting on a block of foam  on the floor of MITERS, I added the foot brace bar that crosses in front of the pedals. In practice I’d put most of my weight on that and be able to tap the pedals instead of hovering over them while trying to hold your leg steady.

Most of the front end mechanicals are done now. I added a reverse cowcatcher/bumper/whatever it is – either way, makes the thing look a little less hilarious. There’s some mechanical design (read: lengths of 80/20 to copy and paste) still to come such as the seat mount proper and battery/controller/electronics mounts, but I will hold off until the parts arrive.

What’s going to be powering this thing? The orange battery is an A123 special that will remain generically orange and prism-shaped for the time being, since I’m fairly certain it’s Not Supposed to Exist Yet. Bottom line, the vehicle will have a 32 volt (10s LiFe) electrical system, a fairly chunky battery.

Powering the motors will be four of my most favorite alignments of Chinese manufacturing probability, 350W class Jasontrollers! I’m taking a major risk by going all sensorless with this thing, but the Jasontrollers have proven themselves in being able to start high torque hub motor vehicles. I’m hoping that with four of them there’s never going to be a “twitching equilibrium” moment. The downside is no regenerative braking (and no, the E-STOP wire doesn’t count – tried that already on Melonscooter, almost died), but someone has the ability to fix that if only he’d write a startup routine, right?

Chibikart will be a test to see if the skate hub motors can push any reasonable power. Combined with the Jasontrollers, they will hopefully form a reasonable system which in my mind is more product-able than just discrete parts alone – because what the heck are you going to do with just a motor can or a raw unwound stator?

If it turns out they don’t – well, who knows, maybe I’ll just stuff them back in the RazErBlades somehow, or build an updated version of them – after all, they needed more power.