It all started with a timing belt inspection.
With almost 230,000 miles on the clock now starting from its 151,000 mile humble beginnings, Mikuvan is essentially a cultural institution in my sphere of influence. It’s just assumed to always be around, and it really has been a relatively (emphasis on relatively) pain-free experience. Originally a hare-brained experiment in what if I built myself an electric car, which I swear to all of the gods who made themselves known these past 2 weeks will still happen, it means I’m physically coming up on service internals I never imagined I’d have to deal with again, because… .and I quote myself out of context from 5 years ago, “It’ll probably last like 10,000 miles if that”.
I can’t find the damn figure on this website, but I know I said something like it.
Well, almost 80,000 miles later, here I am. Since the “Great Accidental Partial Engine Rebuild of 2015“, I’ve actually barely gone inside except to feed its increasingly untenable thirst for motor oil. That, believe it or not, was itself over 50,000 miles ago too (I have the service papers from that still – 178K!). The past abonormally-cold winter finally pushed a number of wear components over the edge, it seems, and I wound up after the cold season with an almost two-stroke-esque oil consumption level of < 400 miles per quart and a complementary vape cloud per start. So you know something like this was coming anyway, just a matter of when and how.
(Oh yeah – I made a number of other deferred-maintenance level repairs when it got warmer, but those will need to be handled separately now!)
We begin on the night of June 28th.
I was to leave for a weeklong southern-fried van adventure covering most of the Blue Ridge Parkway and Skyline Drive, and diving back to Atlanta through the Smoky Mountains forest roads, part of which I ran after Dragon Con 2016. Essentially wandering down in a casual manner for no good reason besides to be not in Boston, because every opportunity I have, fuck this place. The startup’s hardware status was finally to the point where I felt comfortable leaving it to the other members of the company (a story still building up which I owe everyone… put it on my I swear to God list); I’d already punted, up to this point, several of my usual trips because you don’t leave your hardware before it launches, like the opposite of a ship’s captain but with equal amounts of dodging icebergs.
So naturally, having experienced basically no van trouble in 2.5 Dragon Cons (my benchmark for “It Has Been ____ Days Since an Injury” of vans), it was almost a given that I’d make trouble for myself! Gee, I haven’t looked at the timing belt in a whole bunch of miles – let’s see how it’s doing.

Yup, that there’s a timing belt. Hmm, it looks physically in good shape, but the tension is a little out since it’s worn down. So, how do I tension this thing again? Let’s not go back home to bring out the manual, or go upstairs to read my own damn blog post, and instead just take my best memory-stab at it.
You may be wondering How I ended up in this position why I chose to perform what to normal people and sensible mechanics is highly invasive, expensive, and complex engine surgery the day I was to leave for a multi-thousand mile road trip. Don’t question me – and if you did, I wouldn’t have a good answer. All I can say is since we did it the first time, I was confident I could get in and out in around an hour.
That was only a little wrong – there were a few stuck bolts in the way, which caused the procedure to take until after nightfall. Uh oh.
Alright, let’s see, how do you retension this thing? A quick gander at the online Ukranian-hosted rebuild manual gives me…

Cool, I’ll just loosen the tensioner and breaker-bar the crank pulley to move the timing belt 2 tee…. oh, shit, there’s no spring, that’s right. Mikuvan didn’t come with a tensioner spring – we always set the tension manually, and this was relayed to my van salon when they did the Great Accidental Partial Engine Rebuild. So they didn’t unbend some Smart Car’s front suspension to wind me a new spring either.
I immediately skipped several teeth on the belt. It was then that I realized I was probably not going on my trip.
A sensible person would probably just Uberlyft home and try again during daylight, but I was already invested deeply into this rapidly sinking venture. Nope, I was gonna drive home tonight. I know this damn thing inside and out. I built it. I summoned it back into existence. So I stuffed the belt back on!
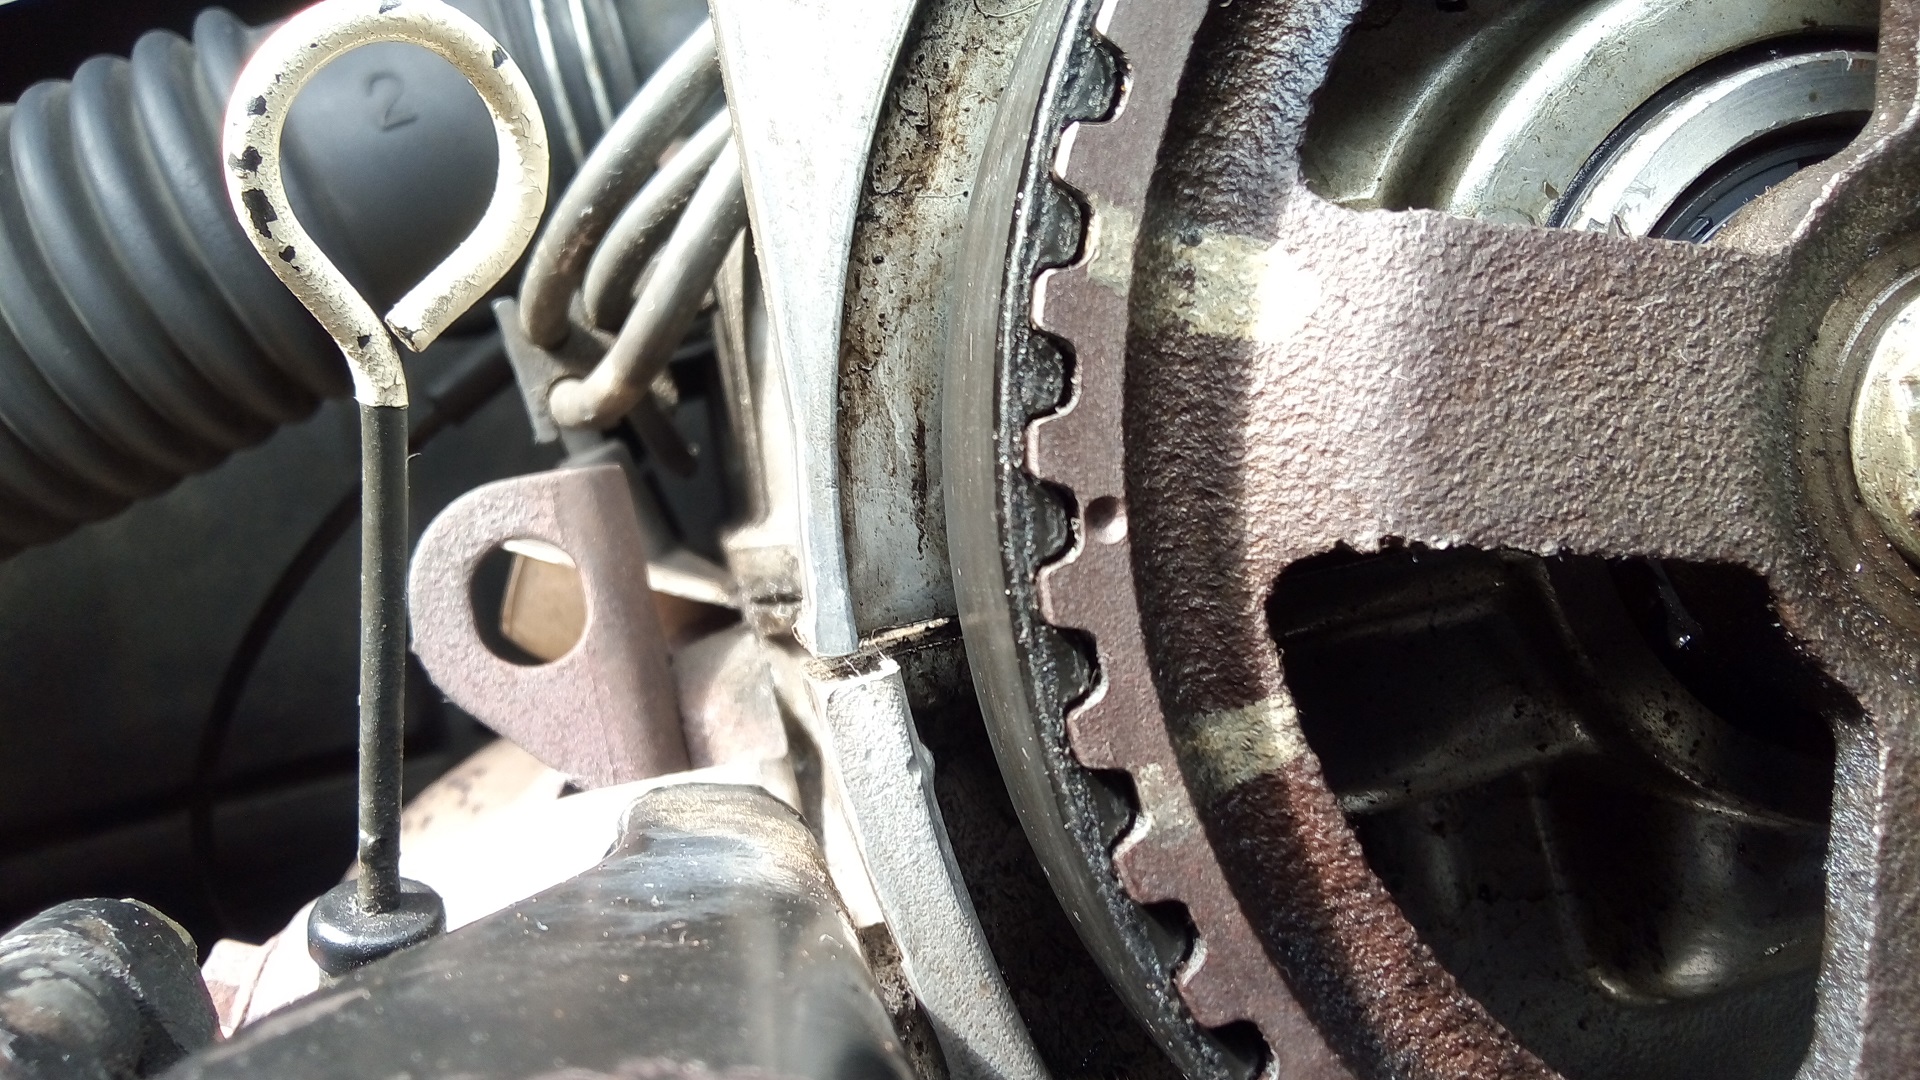
….and, in the dark, proceeded to misalign the timing belt by 2 teeth. Great! Non-interference engine, let me just pop it back over, right? An afternoon’s work to dig back in, right? Looks like I just aligned the mark we made a long time ago instead of the (impossible to see in the dark) factory-stamped timing dimple, right?
Sadly, the damage was done. The timing was artificially advanced by the belt misalignment, causing massive and horrible pinging (pre-ignition) as soon as I gave it any load; which only happened when I goosed it to get onto the main road. It idled and crawled slowly out of the side roads fine, which gave me a false sense of security. I tried to limp it back as gently as possible, sounding like a diesel school bus the entire way. It’s interesting to think that if I had gotten it a tooth off the other direction, the timing would have been artificially retarded, yielding just horrible gas mileage and less power…..which I might have just wrote off as “eh, it always does that I guess”.
That’s it; I cooked my own goose. Until a lot of money was spent or time was used up, Mikuvan was down, possibly for good. With compression lost between two cylinders, it was clear that at least the head gasket was gone in that area, with possible piston and cylinder wall damage which often follows bad pre-ignition under load.
Let’s summarize the failure chain:
- I insisted on pressing forward with a complex and involved repair in the dark
- I checked neither my own documentation on the repair, nor the factory service manual for the entire service procedure, relying on memory of something I did over 5 years ago.
- I then proceeded to mis-remember the hardware configuration and performed a service procedure incompatible with the state I had left the engine in.
- Not stopping there, I tried to remedy it also in the dark, mis-recognizing an alignment feature.
- I also didn’t use a timing light or tool to verify that the timing was still correct – doing so would have immediately shown me that the timing was too far out of line.
The God-King had betrayed a fatal flaw, hubris; easy to taunt, easy to trick.
And so, on the morning of June 30th, when I was supposed to be carving up the Shenandoah Valley, Operation BAD TIMING II: THE SOUNDTRACK began. This was going to be deep.
It took me a while to decide to take on the task myself – I had an entire spreadsheet of options, from trying to source a junkyard engine, to buying an entire parts van (I had been stalking this Craigslist post for a non-running but good body condition Mitsubishi cargo van – the seller had sent me photos of it previously but I declined due to the price at the time), to just asking my van salon for an estimate “Make it Happen™”.

It was a hard decision, but performing this operation was to be a soul-searching mission for myself.
- If I was so bad at paying attention to detail and glossing over important information to get myself into this position, what does that say about my leadership role at a company I co-founded to the people working for it?
- Could I reasonably scope my work each day, seeing as how I can no longer just rail on a project until it’s done because of the need to ensure the continued operation of the company and development of our hardware? This might be the newest thing for me, honestly, having to adhere to a regular schedule not just for myself, but for other people. I wanted to limit myself to only thinking and working on it during weekends and after the business day – vaguely defined for us, but still a block of time when everyone’s around – was over.
- Will I be thorough in all the operations I needed to do to bring the engine back from an unknown damaged state, not skip steps unnecessarily and take shortcuts which will bite me in the ass? Will our hardware be subject to similar requirements!? How would I even know what thorough engineering and design is if I never do it myself?
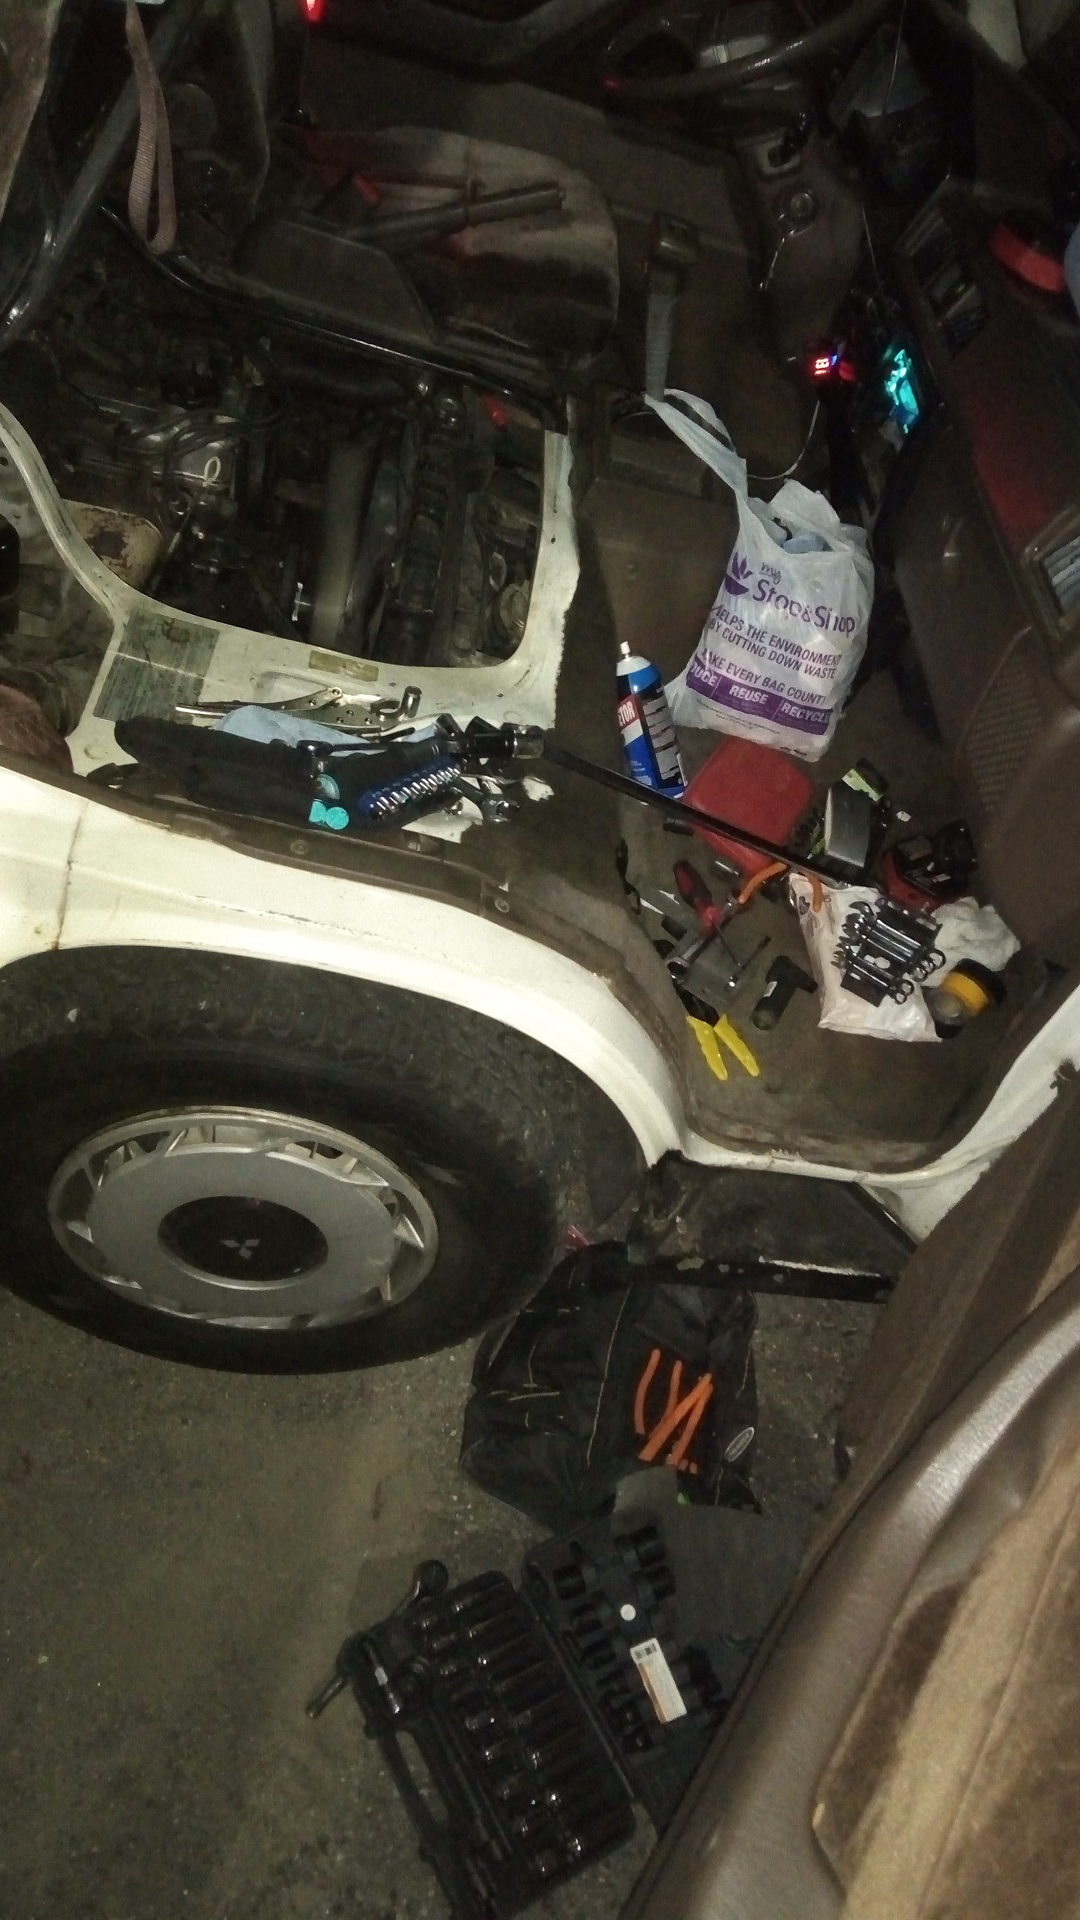
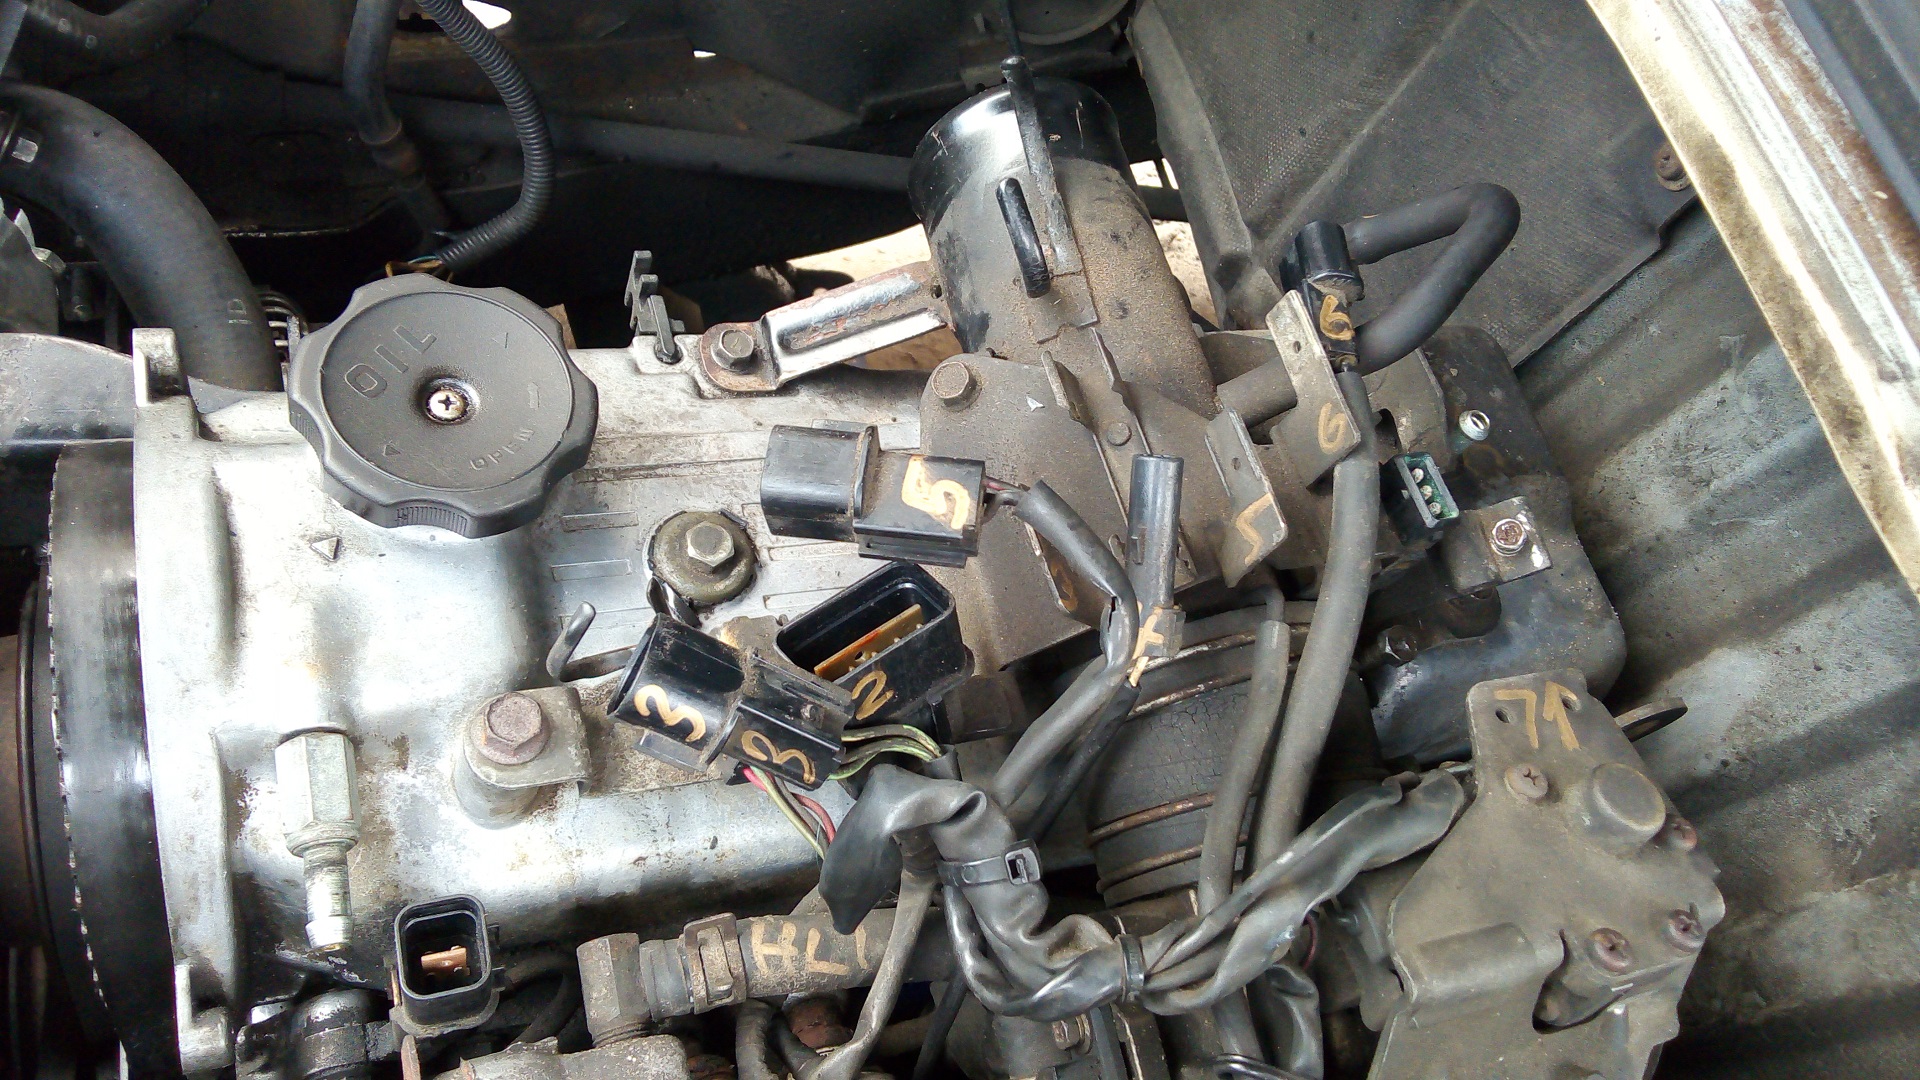
Okay, enough mangsty philosophy. Time to mark all the connectors of the ECU harness and little hoses and start stripping things down. My goal was to get to the head gasket itself by the end of the weekend.
By the way, if you ever need to rebuild a Mitsubishi 4G64 SOHC 8-valve engine in a truck/van application, here it is in all its gory, bloody detail. There’s quite a lot of English-language information for the JDM/international Delicas, but actually not much information for those who own the USDM vans since they are substantially different. Since I’ve been saved by my own blog posts a few times, consider this also an entry into the annals of “how to unfuck your van” for the owner community.
I marked literally everything. I had watched some of the action when the guys at Smooth Automotive were taking the head apart, and they said to me that really if you look at it, everything goes together in one way only. Yeah, sure, all the connectors are unique and they have logical wire lengths which can put them only in a few spots. But there’s a lot of them. That’s scary. I never touched Mikuvan’s engine harness for this reason, because at the root of things I’m still not a car guy by historical experience. Honestly, it took a year of wrenching on vantruck to get me to this point where I just sighed and said yeah, it’s just like the FiTech rig but spread out over a few cables.
Really, it wasn’t so bad after that.
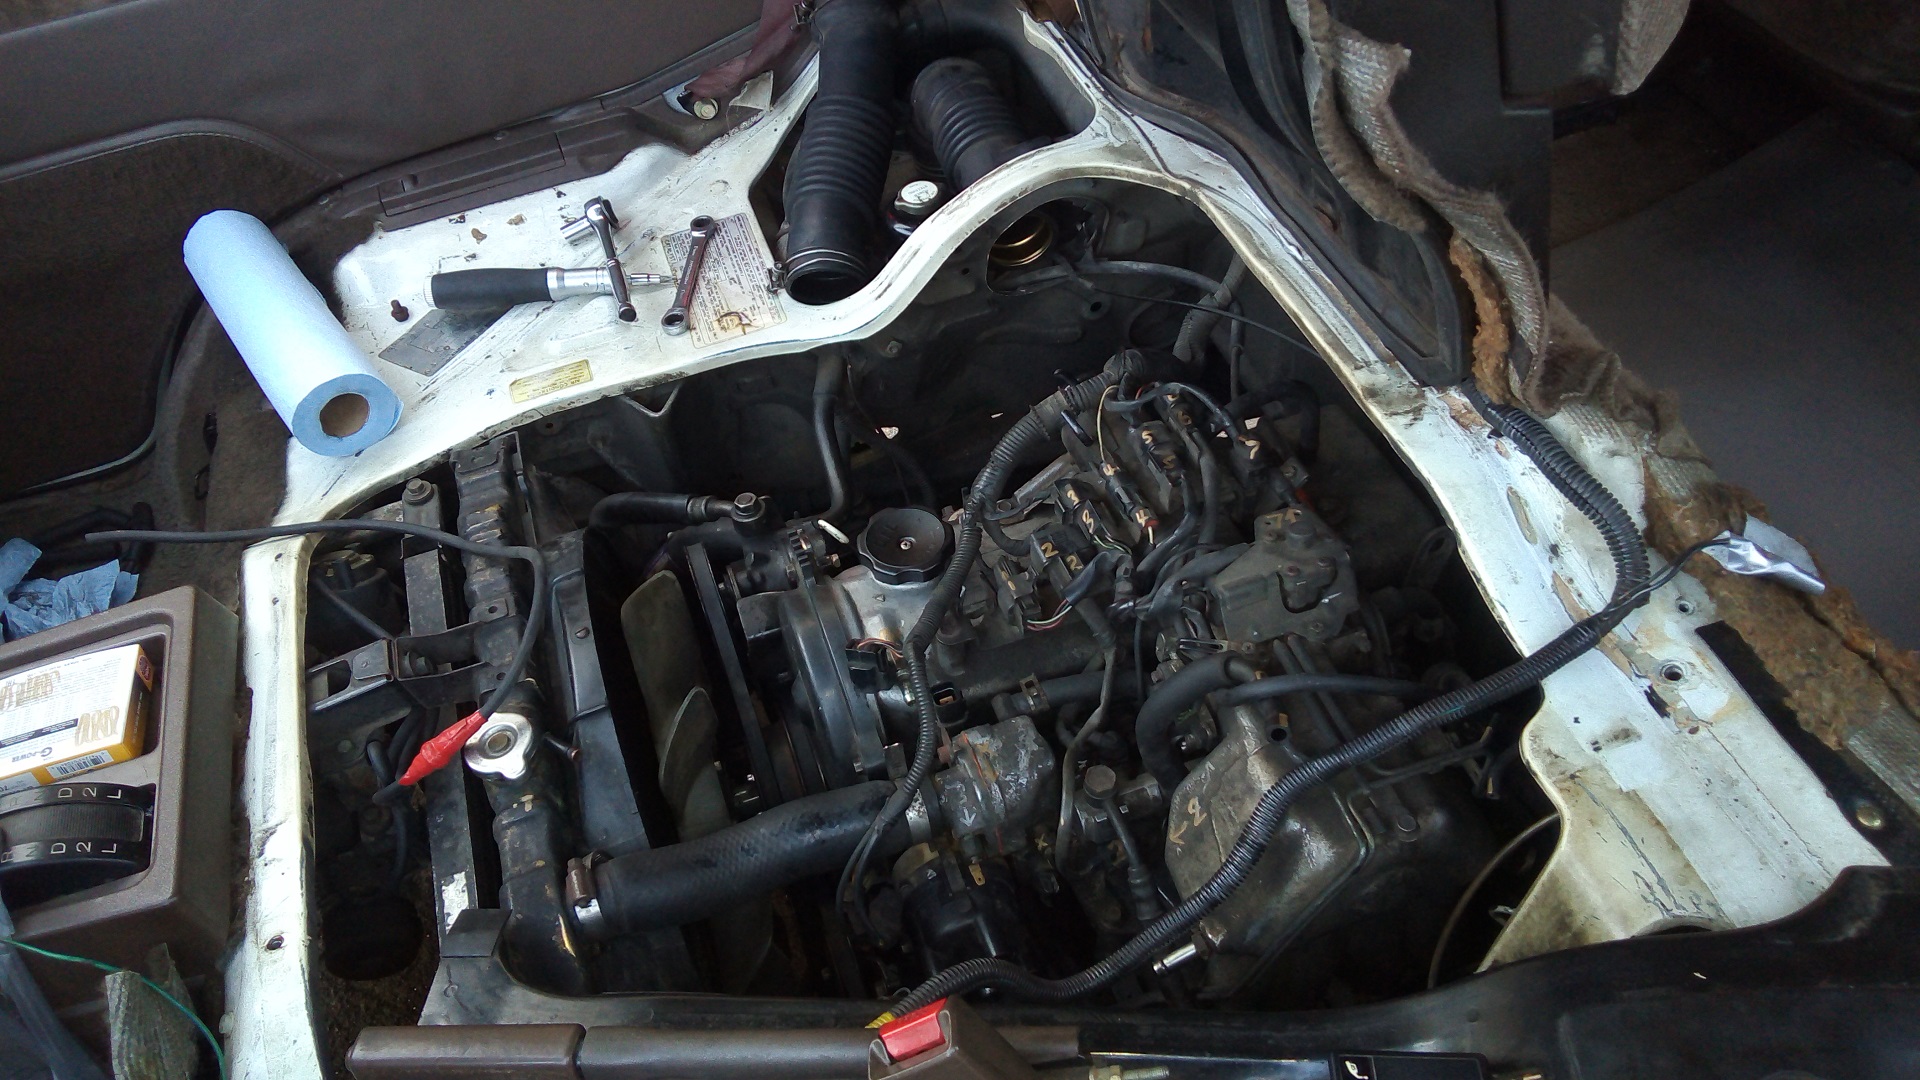
It was in doing a lot of this that I finally recognized where a lot of the EFI-related parts on Mikuvan were, which I learned on Vantruck performing the EFI conversion. I had only otherwise inklings that yeah there’s a throttle position sensor and idle air control servo and breather tube and manifold absolute pressure sensor and eeeeeeeeeeeeeeeehhhhhhhhhhhhhhhhhh. As it turns out, too, it does actually have a EGR valve – I had assumed the California emissions versions did but Federal did not, because the EGR valve was always shown in the manual in isolation, and when I felt around the area of the head I thought it was in, it wasn’t there, so I wrote it off as nonexistent. You’ll love where it actually was.
It actually only took an hour to get to this point. after pushing the connectors aside, disconnecting the throttle and transmission cables, and removing the multi-purpose brackety thing on top of the valve cover. A real mechanic would laugh, but remember, I erred on the side of cautiously labelling and marking (and taking photos!) for reconstruction ease later.
I also went ahead and removed the exhaust manifold, which was 1. cracked severely, and 2. took another half-hour of gently massaging and milking stuck nuts and bolts. Any antiseize lube I put on those threads has long evaporated.
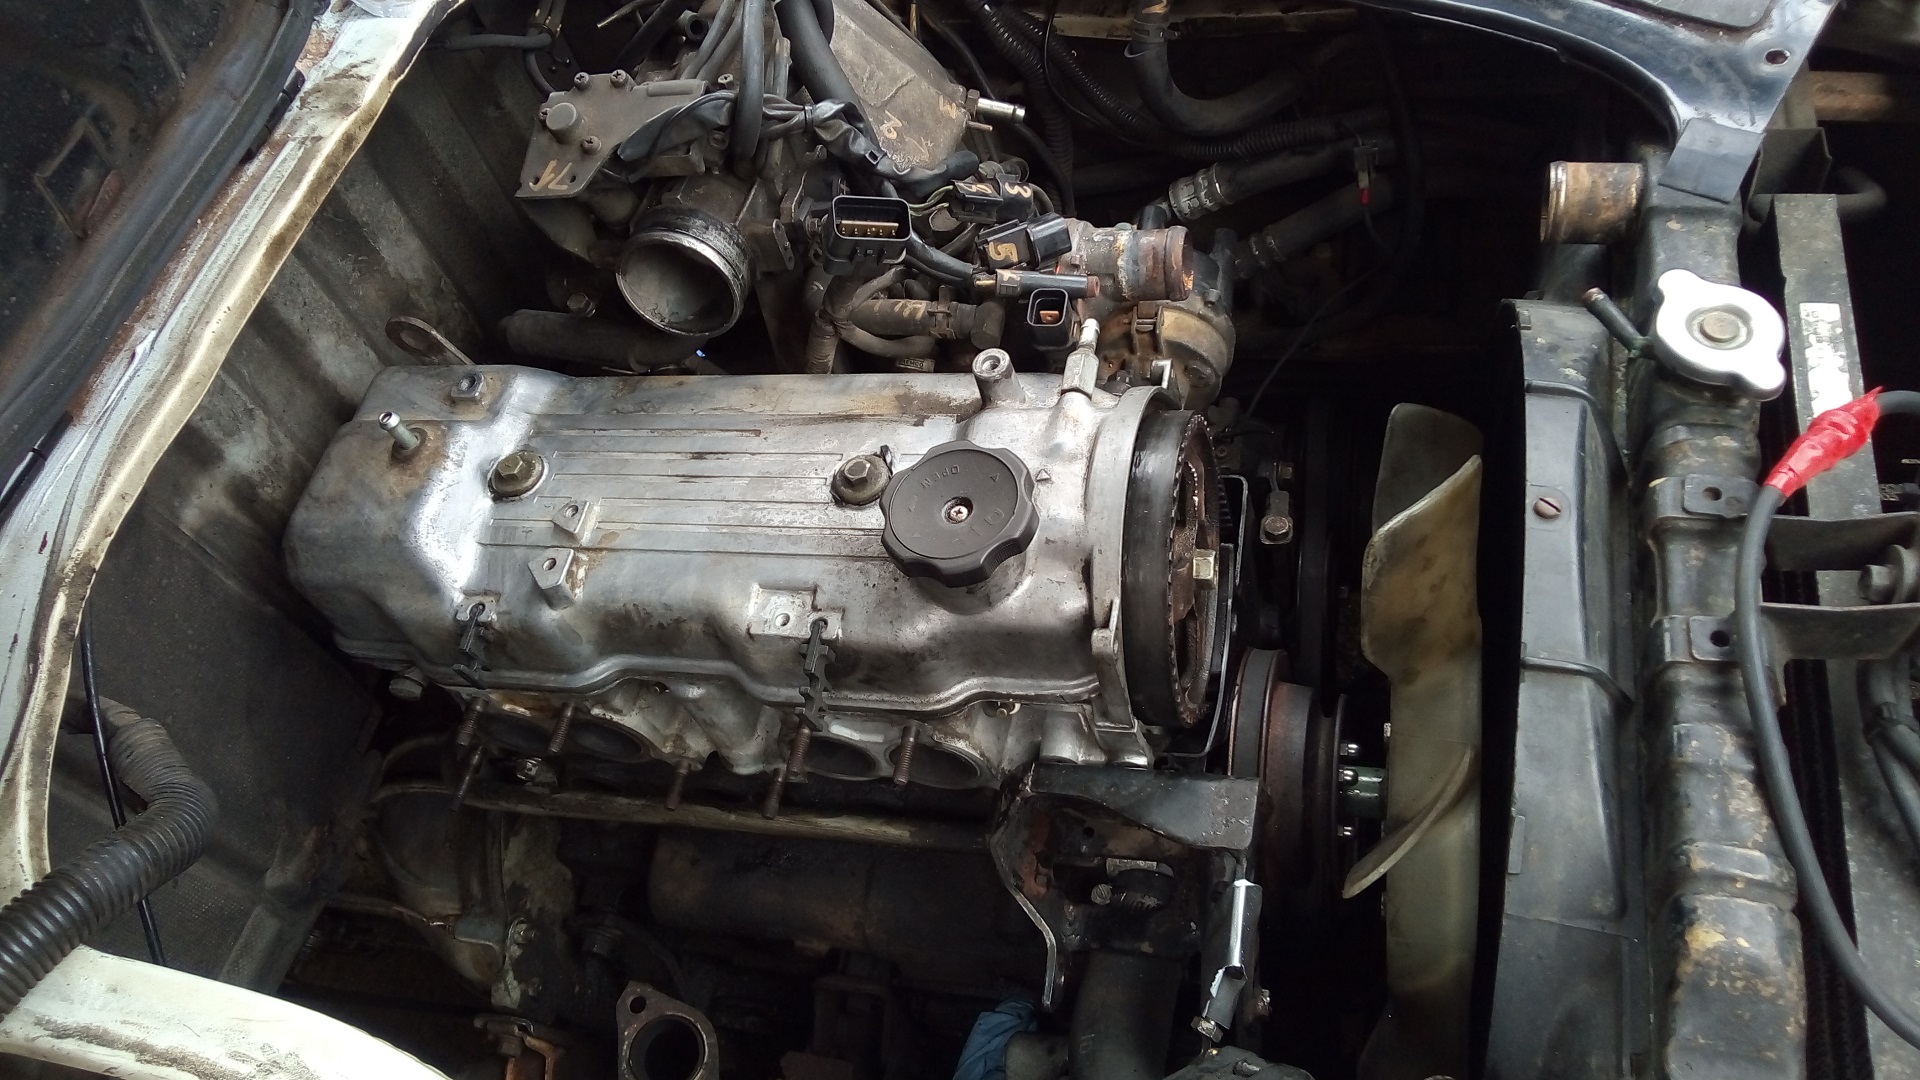
The valve cover comes off after its two bolts are loosened. Most of the gear up here looks relatively new (since Great Accidental Partial Engine Rebuild, or GAPER….what an unfortunate acronym… involved a head rebuild) despite the operating condition of the engine since I pretty diligently perform oil changes and whatnot.
How do you change oil on an engine which eats a quart of it every few hundred miles? Well, you keep it topped off and after 5000 or so miles, you do it anyway. Just adding more oil all the time doesn’t make existing grunge go away .
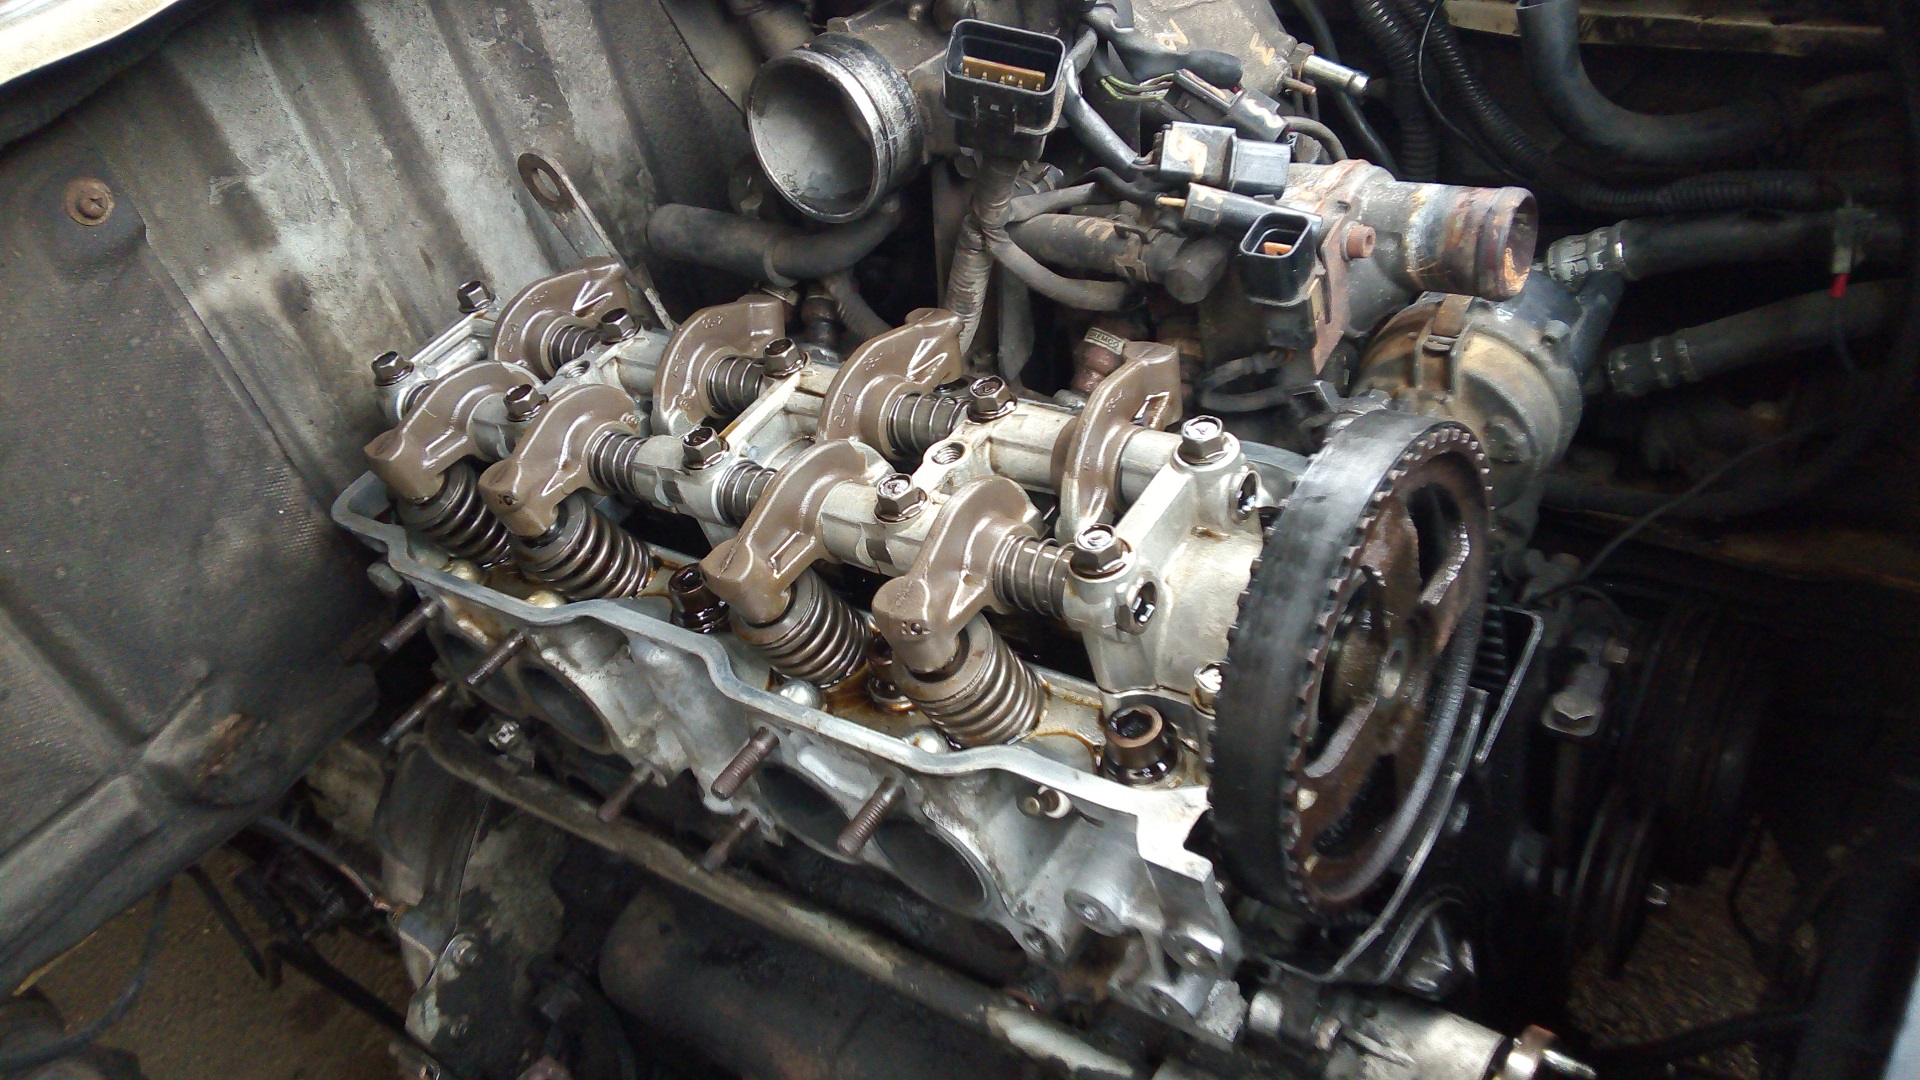
Ten giant socket cap screws later, and the head is ready to come off! This is the only place I’ve found on the whole powertrain which uses socket hardware. I wonder why? They’re M12 fine-thread screws with a 10mm socket drive.
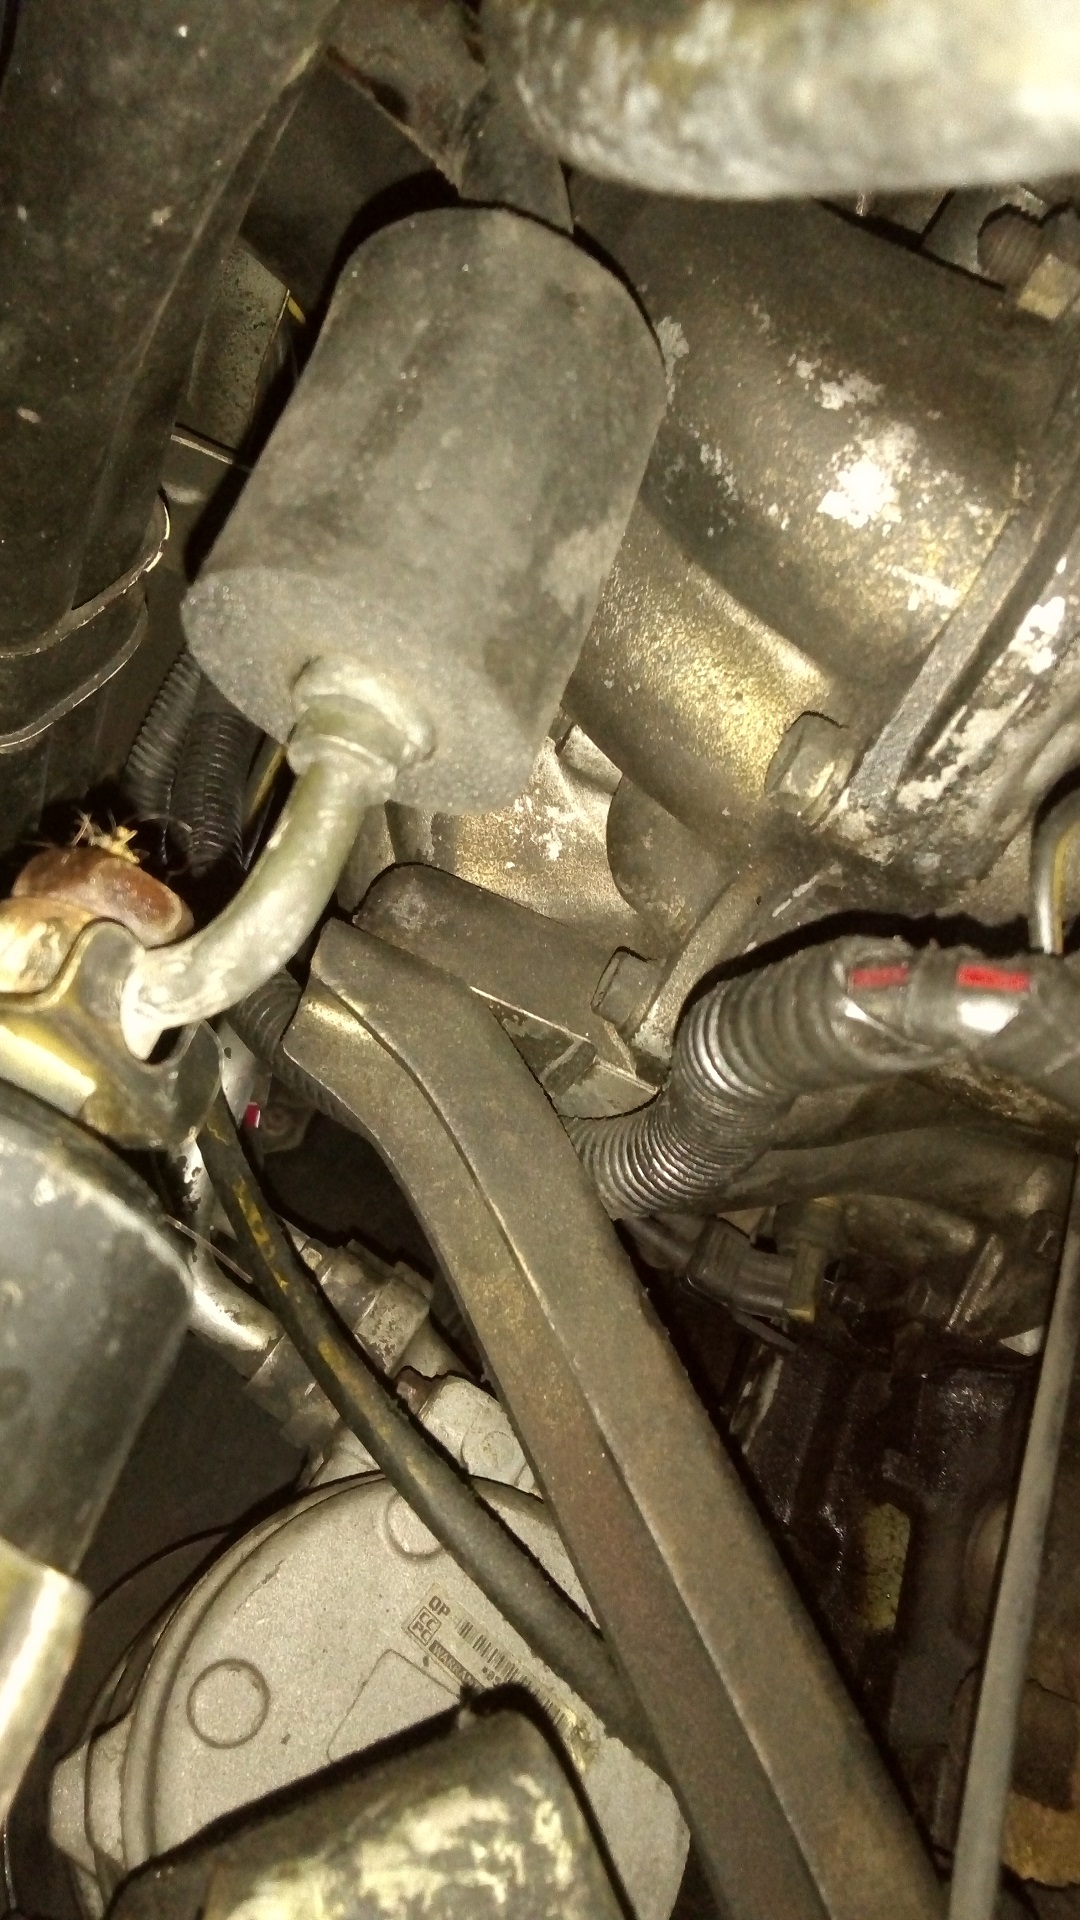
Actually, wait up. There is a Bracket of Irritation directly under the intake manifold, seemingly there to give it more support, which is NOT DOCUMENTED in the USDM factory manual, as far as I can tell!
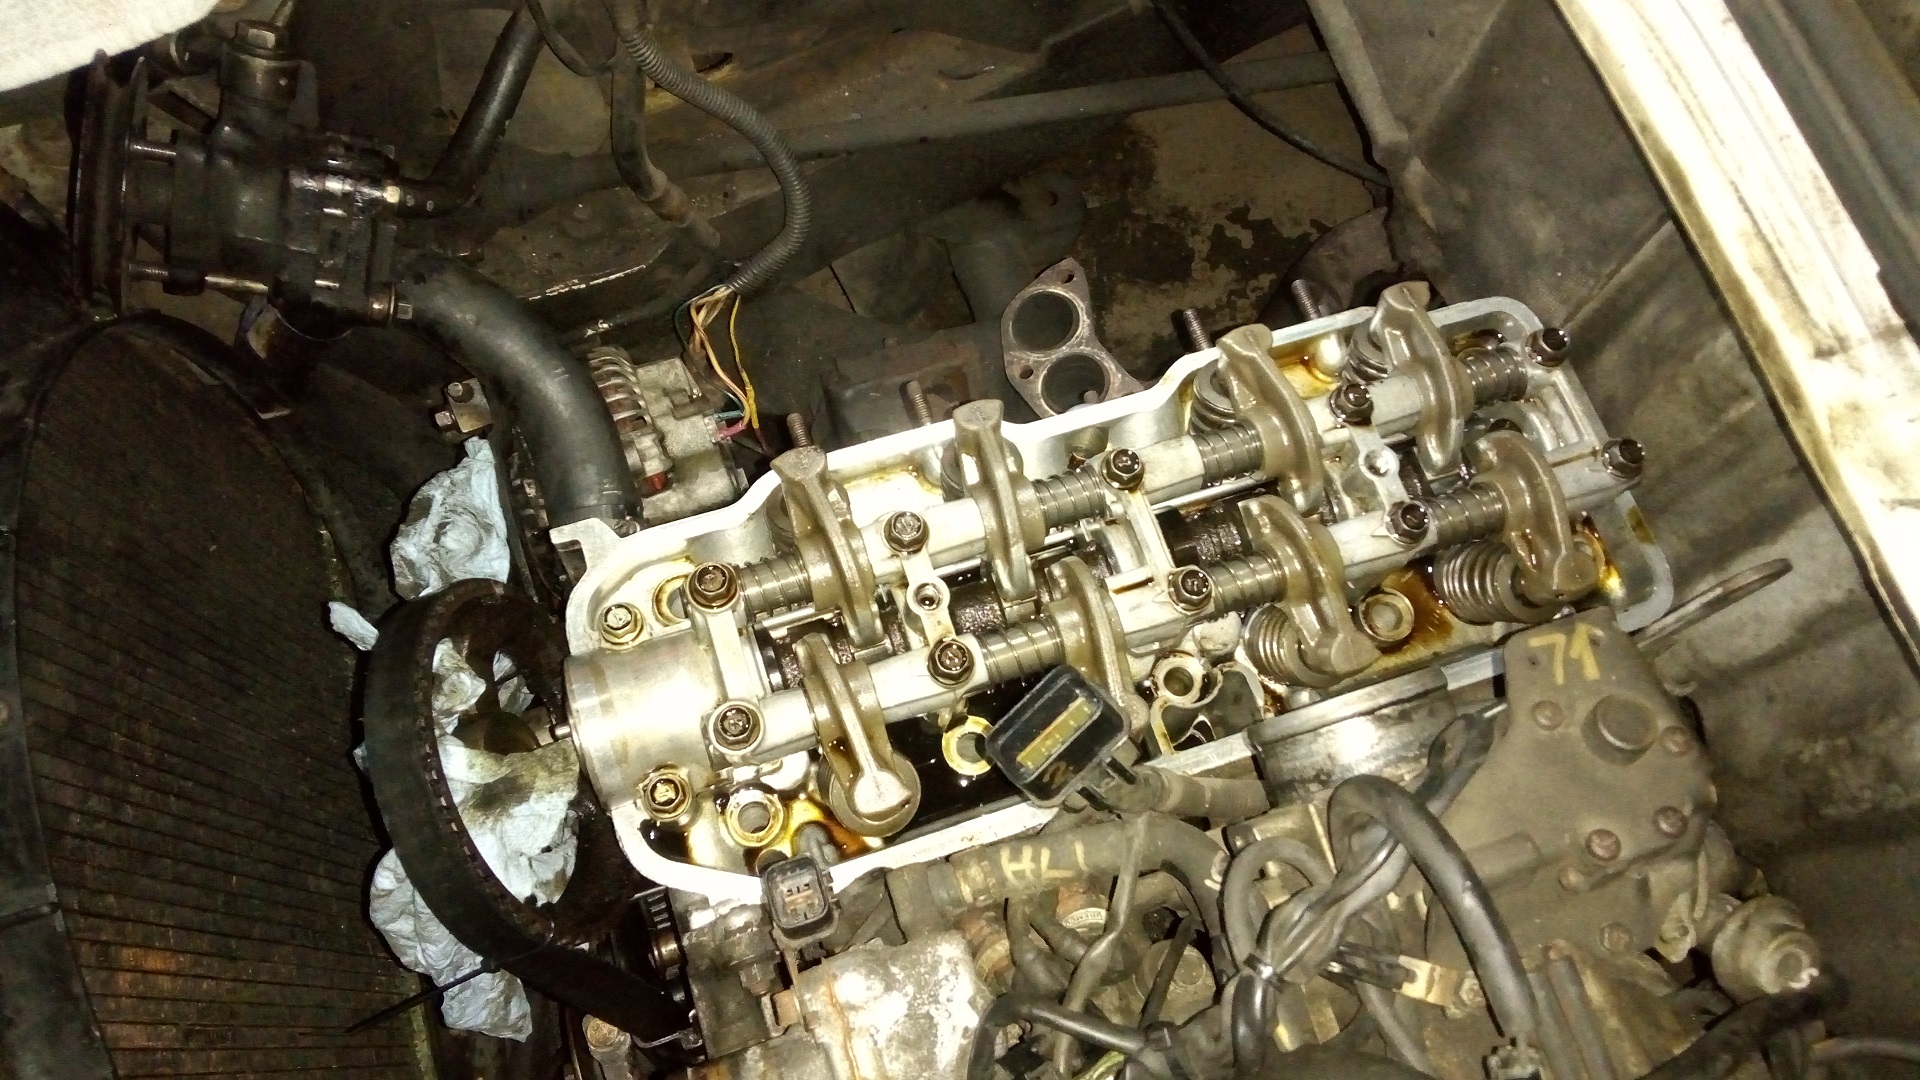
It took 10 minutes of gently prying at the head before I finally figured out that something was causing it to spring back each time. This 14mm-drive, M10 bolt is accessed from underneath and behind the suspension/engine mounting member. Just stick your arm behind the driver’s side wheel and poke it upwards past the fuel filter.
(Remember: I have no lift or hoist system, or even a garage. I’m on the ground in a gravelly, disintegrating parking lot with jackstands only as a means to lift the whole thing. This is literally “How to un-fuck your van in the most painful, laborious fashion possible”)
Alright, now the Bracket of Irritation is free. It’s time to yank the head assembly off and…
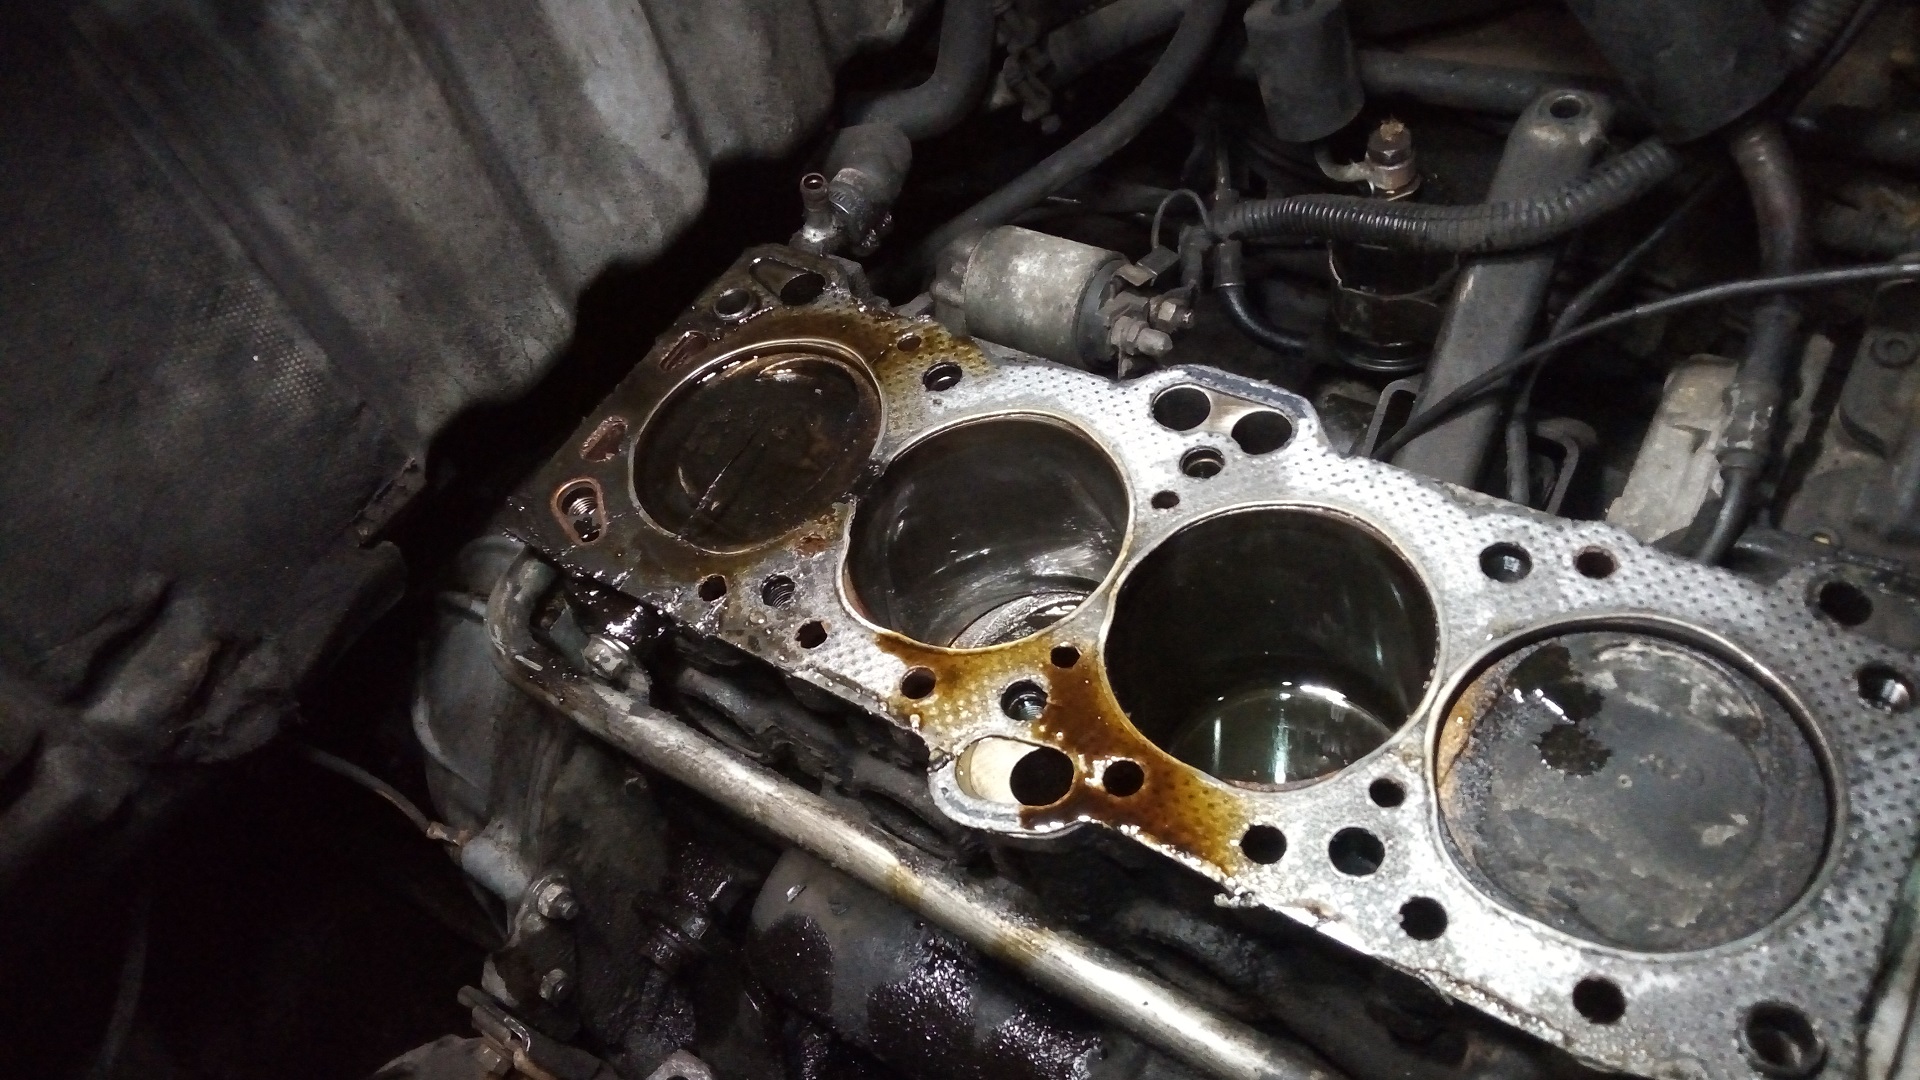
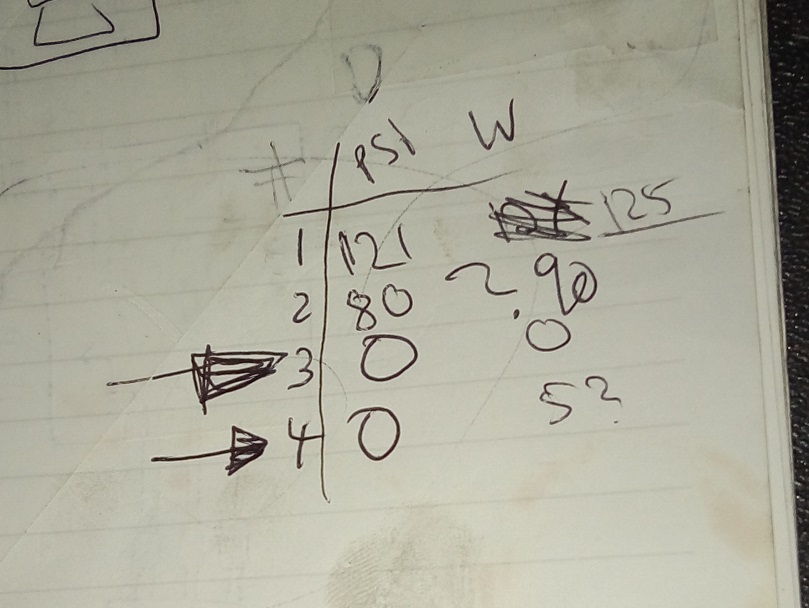
Yup, that’s a head-gasket alright. As I suspected, it blew out between cylinders 3 and 4, most likely as a consequence of severe pre-iginiton under load.
I’m not just out to stuff a new one on and call it a day. I’m told that once an engine fails due to pre-ignition, everything inside is suspect, from pistons to rings to bearings. It was on the docket while I was deep, brah to go ahead and pull the #3 and #4 pistons associated with the failure plus #2 which showed low compression and inspect them thoroughly. The worst thing would be to bodge it back together then have pistons implode later.
#1 still showed factory-spec compression, so I decided from the get-go to leave it alone. This actually means I can use my leftover 3 pistons from the GAPER (…what an unfortunate acronym again). I ordered a new set of both crankshaft and connecting rod bearings just in case.
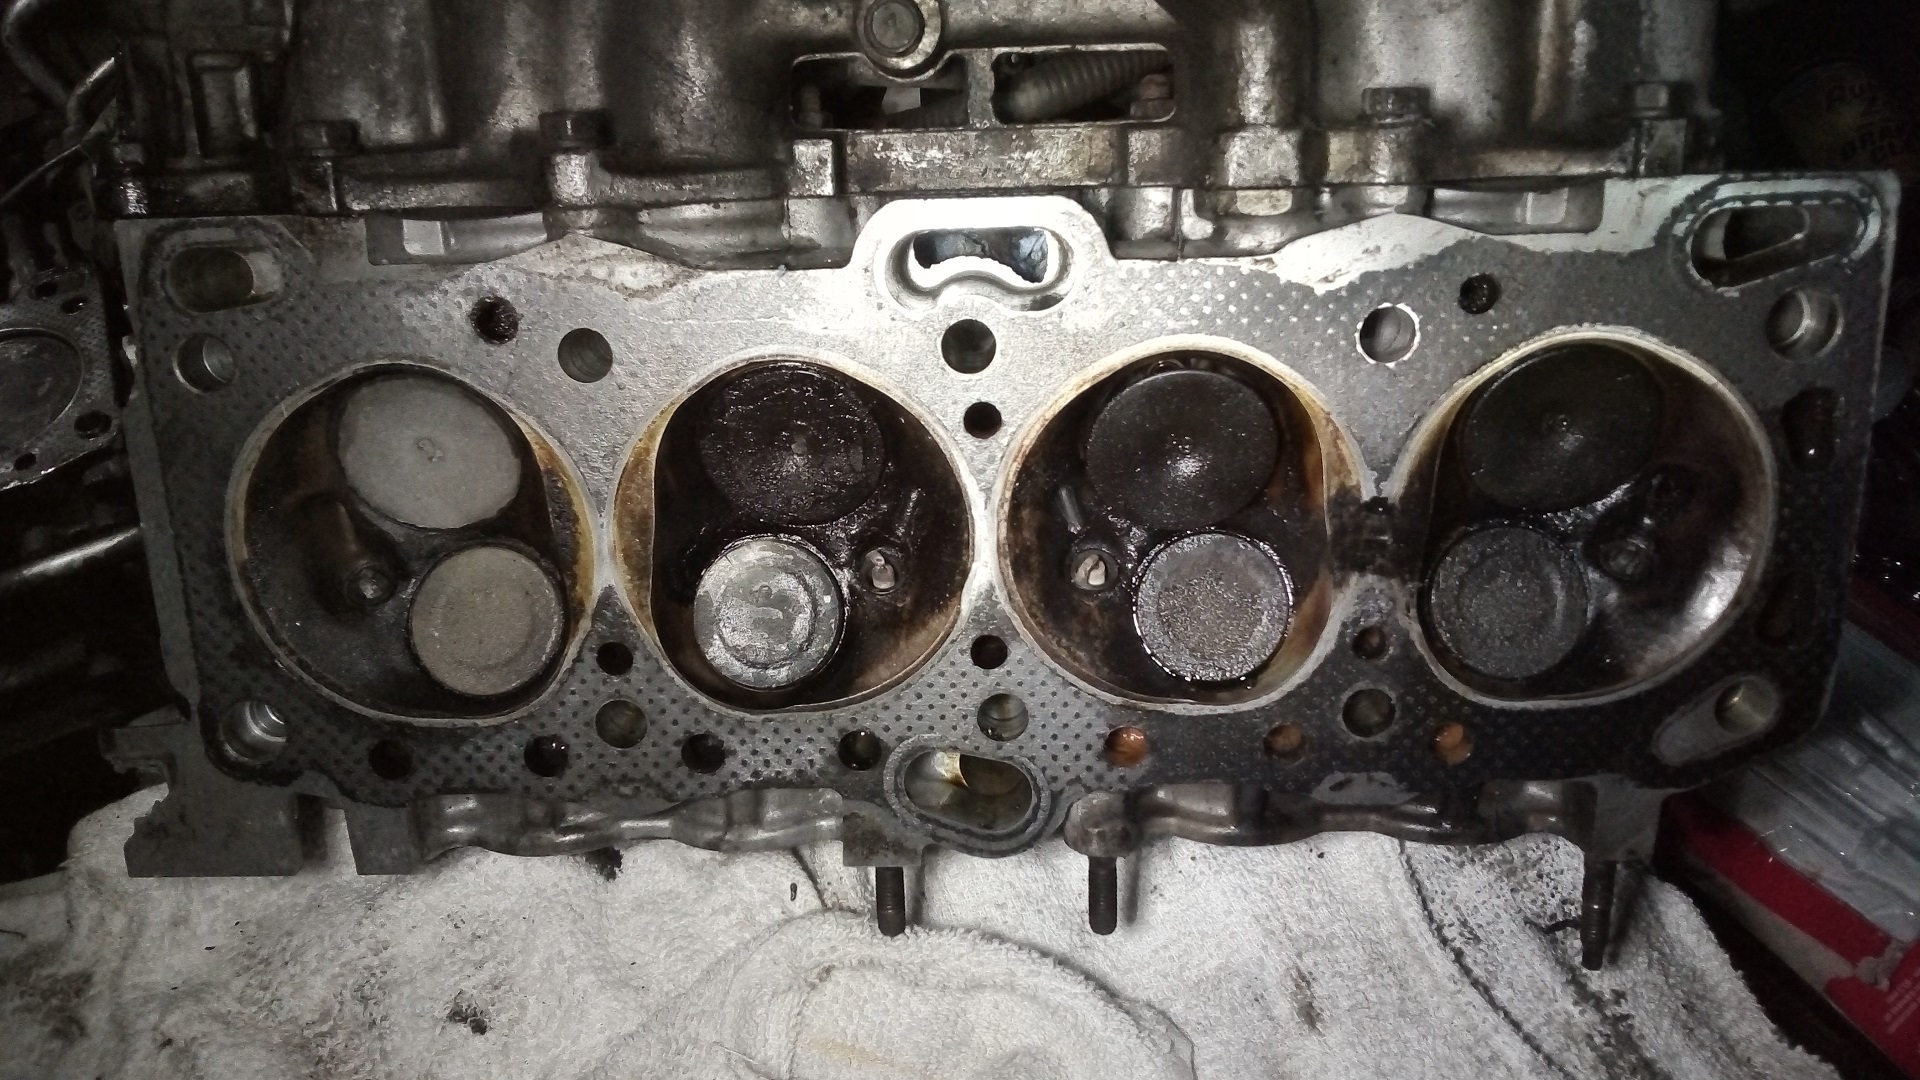
It seems that cylinders 2-4 have also been burning oil for a while, with #2 being the worst. I suspect it began in earnest late last fall into winter (which was a fairly unprecendented cold one) when I really started noticing smoking on cold starts. Yet this damned thing took me to Atlanta and back in January, and regularly got hooned around town thereafter and I didn’t even notice any power loss.
Call me silly for going back on my EV conversion word this many times and digging this deep in to ewwww, internal combustion, but something this hard for me to kill kind of deserves my best shot at getting it working again, eh?
So on the docket for this guy was cleaning the valves and seats (no regrinding or re-lapping, which I declared out of neckbearding scope unless I found serious damage) and new valve stem seals, which were clearly not very seal-y any more. I don’t know what a typical “old car rebuild” service interval is, but for the wear parts to let go after 50K is a little disappointing. However, I also don’t know what the gold standard of the time period was – maybe 50K per comprehensive service was actually phenomenal in the 1980s?
Nevertheless, it was time to clean everything up, scrape the old chunks of gasket off, and put the patient on the operating table.

Around this time, I found a resource which, if true, could be a boon to USDM van-mongers.

A complete Chinesium head assembly for the 4G64 8-valve SOHC? Sure, why not! These engines’ bloodlines made it all the way up to like, last year in a few Chinese car models, and still live on otherwise as industrial engines for forklifts and generators.
I was now determined to do my usual exploration of resources for the greater good of the community. It also offered me a backup solution (if true) in case my head repair failed or I discovered some kind of terminal damage that is beyond my skill and resource to fix correctly.
I hit the button on this order on Sunday afternoon, and soon, the thing was due in on Friday after July 4th. What’s actually going to be in the box!? Hell if I know – if I received a Chinese junkyard head that got run through a dishwasher, I was gonna be happy.
Coming up next: Diving even deeper into the valves and pistons themselves.


