This will be a really short update, since there’s not too much work left on Über-RazEr besides putting it together. Last time, I got the motor spinning by paralleling the two halves and running them on one controller. I’m now proud to say that the twin-DEC controller is also working. Not under load, mind you – that is testing to come.
Putting all my DECs on one board is akin to putting all my eggs in one basket, but these are some pretty hardcore eggs, so I think they’ll be fine. The carrier board is pretty much just there to route signals, as the DEC modules are more or less self contained. The inputs to the board are the hall sensors and their power (5 wires), a throttle (3 wires), and a… reverse switch. This might end badly.
Here’s the board after being prepped with headers and cables. A power-up test confirmed that I somehow avoided making solder bridges between my .01″-separated power and ground traces.
Finally, the test.
I initially powered everything off our variable power supply in the interest of not dramatically grenading the DECs with 40 volts of lithium batteries. However, the pulsed current draw of the motor was too much for the PS to handle – it flickered in and out of constant voltage mode about as quickly as the motor spun. This power instability likely contributed to a few DEC freakouts – which fortunately are soft shutdowns, not explosions like if I had made them.
Not only that, but a few times I slowed the motor too fast and the quasi-regenerative characteristic of the DECs caused the power supply to latch into shutdown.
So I threw it all into the wind and hooked up the 40 volt A123 battery. And here it is:
Excuse the less than stellar assembly alignment.
Anyways, that’s two controllers running 2 motors in electromechanical synchrony, all inside one wheel. Pretty nifty.
I recorded the no-load speed this time at 1,360 RPM, pulling almost exactly 2 amps no load, confirming the ~33 RPM/volt characteristic.
At this point, I think it’s safe to start packaging up the scooter. I’m very curious as to the ability of the hacked DECs to run under load.
No, I didn’t just 3d-print a whole scooter. But here’s a quick review of the past several days’ work on both rEVolution and Make-A-Bot.
razEr rEVolution
First off, I finally figured out what the hell was causing all my Hall sensors to blank once every turn of the motor. Originally, I had suspected a spurious short caused by some exposed connection on the 5 volt Hall sensor power lines rubbing the aluminum can, or something in that same genus. However, cross-checking the sensor current draw on a power supply showed that the blanking was actually caused by them losing power.
Uh oh. I pulled the motor apart, and as it turned out, the Hall sensor ground wire got mashed into the bearing when I dropped the stator into the can. It was technically severed, but the bearing closed the circuit so the sensors could be read anyway. At least, for 300 out of every 360 degrees or so.
That’s right. My motor was running its sensors through a bearing. Well that would explain its choppiness and propensity to sound like a moped with a badly tuned engine.
A quick reroute of the ground wire fixed all of that, and here’s a test spin of the Dual (non-)Interleaved RazErMotor using a small Kelly controller.
Yeah, so it sounds as rocky and off-center as most of my other hub motors. Blame my lack of patience in actually assembling the motor components. Otherwise, it’s also mounted solidly to a very hollow and lightly damped tube, which just makes it sound several times worse.
With the windings run in parallel (grouped as shown in the video), the motor came awfully close to scoring a perfect 1337 RPM at 40 volts, measured via LAZERTACH.
If only the battery had been a few millivolts higher.
Anyways, this translates into a “Kv” of only about 33 RPM/V, or 0.285 Nm/A in SI-world. I made an original prediction of 0.66 Nm/A in series connection (if the two half-motors were run as a regular dLRK type motor). In the parallel configuration, that number would be about 0.33 – which 0.285 is close enough to, since my prediction used the most generalized, ideal definition possible.
Next steps for RazEr include finally assembling the DEC carrier boards and then… well, making them carry DECs. Hopefully hotwired ones. As I discovered on the Citycar model, the DECs perform cycle-by-cycle current limiting, which effectively means the peak amps rating is not an average DC value – rather, it’s the amount of current it will try to clamp the motor phases to, period. This was a troublesome discovery for the CityCar model, and unfortunately could have been prevented if I had thought about what current limiting actually means.
I’ll have to see if the roughly 0.6 ohm resistance of each half-motor means that the most I can ever push into them is about 12 volts (I * R, or 20 amps * 0.6 ohms) – past which the DECs will just clamp. Now, of course, there is the option of just adding another current sense resistor to quadruple the original 10A limit… but that’s territory which can easily lose me an entire module in a split second if I’m not careful.
So who knows – maybe this is an opportunity to finally design the Melontroller.
make-a-bot
No, I haven’t waterjetted it yet. Quit asking.
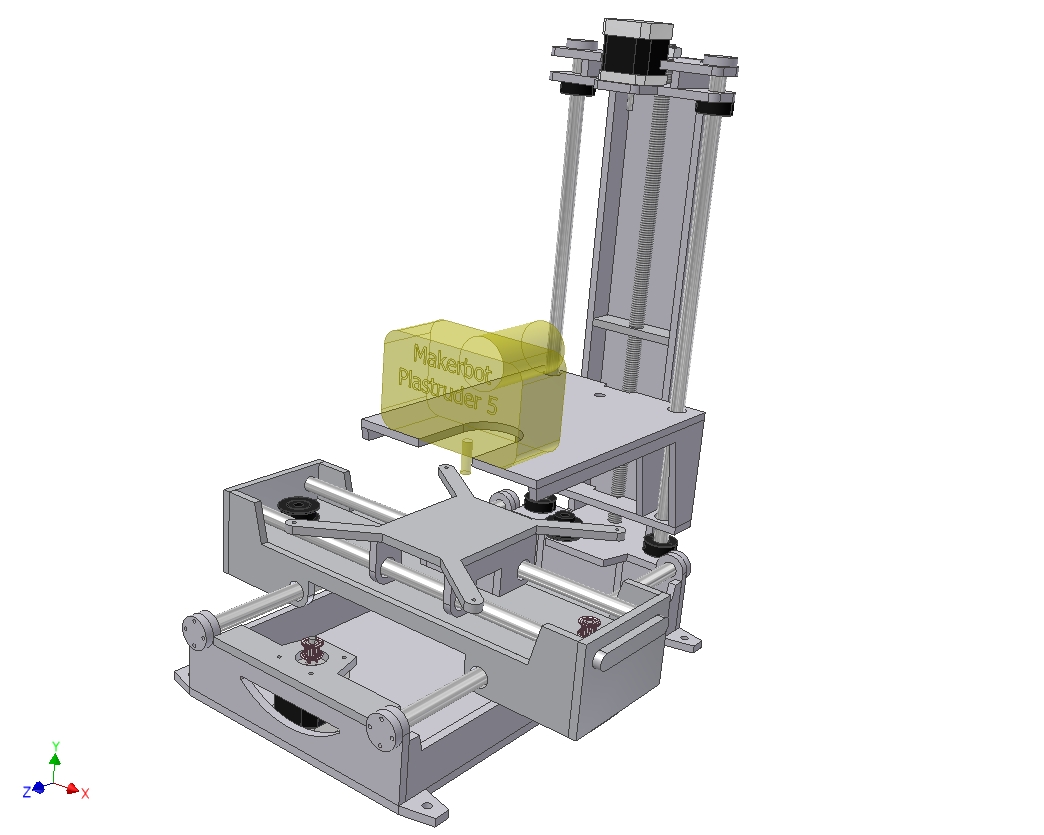
All the work on Make-a-bot so far has been in the CAD domain. I’m slowly filling out the basic geometric sketch presented last time with T-nuts and … you know, actual components.
I’ve added some more solid material to the Z-axis column. In retrospect, the original column idea was quick and easy, but I had qualms about its stability… as well as the fact that I designed it at like 5 in the morning. Things which I design during those hours almost never turn out right. Conceptually it’s sound, but solid mechanics will probably tell me otherwise once I build it.
As a result, I’ve added the Giant Aluminum Tower around the existing guide rod and motor mount. The GAT will be put in compression from the top using the threaded rod, and the guide rods will not be structural any more. At least, this arrangement should be more stable than the original plan.
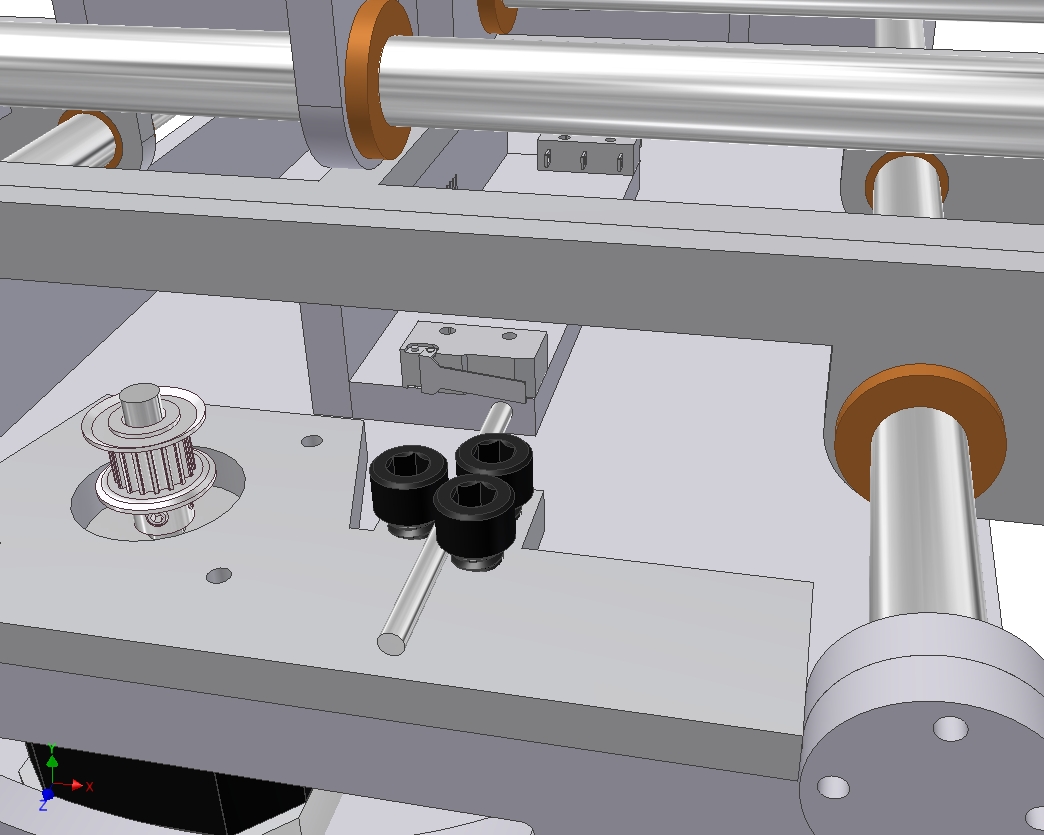
So now with the geometric structure complete, I can start filling in the details. Check out this Cleverly Engineered System for attaching the Y-axis limit switches!
I decided to keep a “flying limit switch” setup i.e. keeping them on the carriage instead of on the machine base because the front and back sides of the base are decidedly asymmetric – I wanted to keep the number of part variations down. Plus, I was going to need a wiring harness for the traveling Y-axis anyway.
The added bonus is that because the endstops have been reduced to a hardware problem, they can be adjustable. So, those three screws on the motor mount let me slide the rod in and out to engage the switch at whatever distance i feel like is appropriate at the moment.
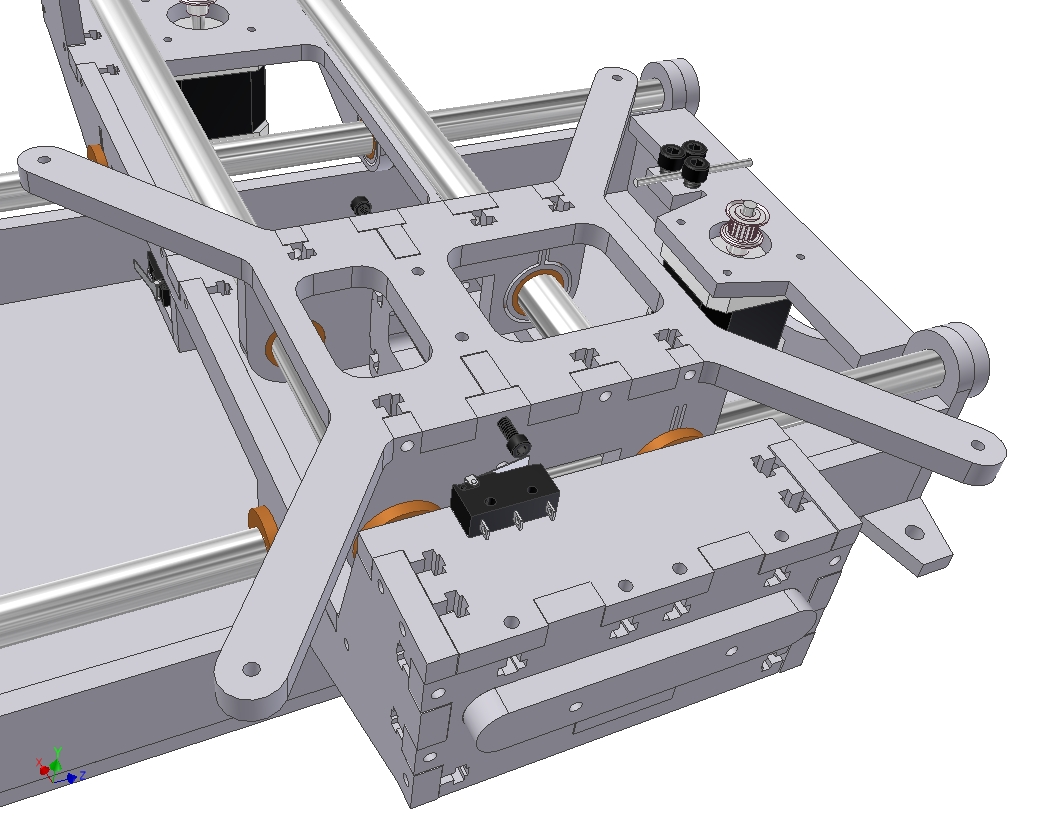
Taking a page from my engineering books, I’ve decided to put one half of each axis on flexure mounts. Each of those pull-tab-like rings is the new bushing mount for its quadrant. Therefore, the bushing is allowed to flex side to side very slightly to accomodate for misalignments in the guide rods.
In short, 3 points of contact fully define two objects with respect to each other. Adding a fourth is redundant, and unless they are all in the same plane, will cause problems. For a machine axis, this means binding, and that’s why many linear guide systems have only three bearings, or have adjustable ones.
Assuming I did this right, the bushing should be allowed to float side-to-side (i.e. in the direction of X for the picture shown) on the order of only a few thousandth of an inch or less. The flexure, being very short, will still support some of the vertical loads (in the direction of Z) of the whole system. Because only this side of the Y axis is flexure-mounted, there will not be slop in the X direction because of the fully constrained bushings on the other side.
If I did it right.
So now I’m starting to add the intricate T-nut work to the frame. These T-nuts are a departure from my usual style (flat bottom) and are more representative on what’s found on most other 2D-fabbed works in Makerdom.
The reason is that flat-bottomed T-nuts are very sensitive to hardware length tolerance. There’s nowhere for the screw to go if it is slightly longer than the design length, and it will just dig down into the material and defeat the purpose of having the nut there – if the nut is just pushing back on the material, that fastening location does not provide any fastening force.
The cruciform T-nut (Crüx-nuts? Jesus nuts?) allows for variations in screw length by letting the screw poke out past the nut. Now, I’ve never found my screws to be more than .01″ or so apart, but I’ve accomodated for up to 0.55 inch actual screw length on 0.5″ hardware here.
There’s also another Clever Limit Switch setup on the ends of the Y-axis carriage. Again, adjustable by turning the little cap screw that ultimately gets faceplanted into the limit switch.
Notice the X-axis carriage also having flexure mounted bushings.
For kicks, I dropped Cold Arbor’s assembly model in side by side. This machine is going to be pretty chunky. For reference, CA is 20 inches across the curved diameter and about a foot tall at the upper edge of the saw.
It’s definitely bigger than a Cupcake. So what’s the next size up, a muffin?