Long Live Mikuvan

In the past few days, basically from Sunday to Thursday, I’ve managed to put something like 150 miles on Mikuvan, which is no small feat for purely local – Boston, Cambridge, and associated suburbs driving outside of regular daily commuting. For me, the “daily commute” is something like 1.1 miles by scooter, so for the most part said driving consisted of helping friends move large objects – it being end-of-semester moveout season, picking up more cruft on Craigslist, and purposefully going way too far westwards just to grab lunch (I sincerely recommend Blue Ribbon BBQ in West Newton). And even participating in helping search for a stolen car, but that’s a story for another day.

All in the name of Science, of course – I’ve pretty much been doing all this just to observe the vehicle’s behavior under different driving conditions, ranging from highway to extremely low speed start-stop city driving, to the occasional stoplight pull which will remain undiscussed.

I haven’t been able to break it. For all intents and purposes, Mikuvan is a fully functional car. There hasn’t been any stalling or overheating, no more fluid leaks, no rough shifting or other transmission business. There’s quirks and worn parts typical of a car about as old as I am – the front blower is not functional and the power mirror (oh boy, power mirrors!) switch is also broken, and the air conditioning belt isn’t hooked up (and I’m sure the system is totally drained too). Plus, those rust patches.

The de facto beginning of summer was marked by the start of incessant rain, after which I assume it will actually get warmer. I took the opportunity to give the whole outside a proper washdown, aided by the rain. It had been living under a tree for a month or more, so there was tree drippings and bird shit everywhere, and other environmental deposits.


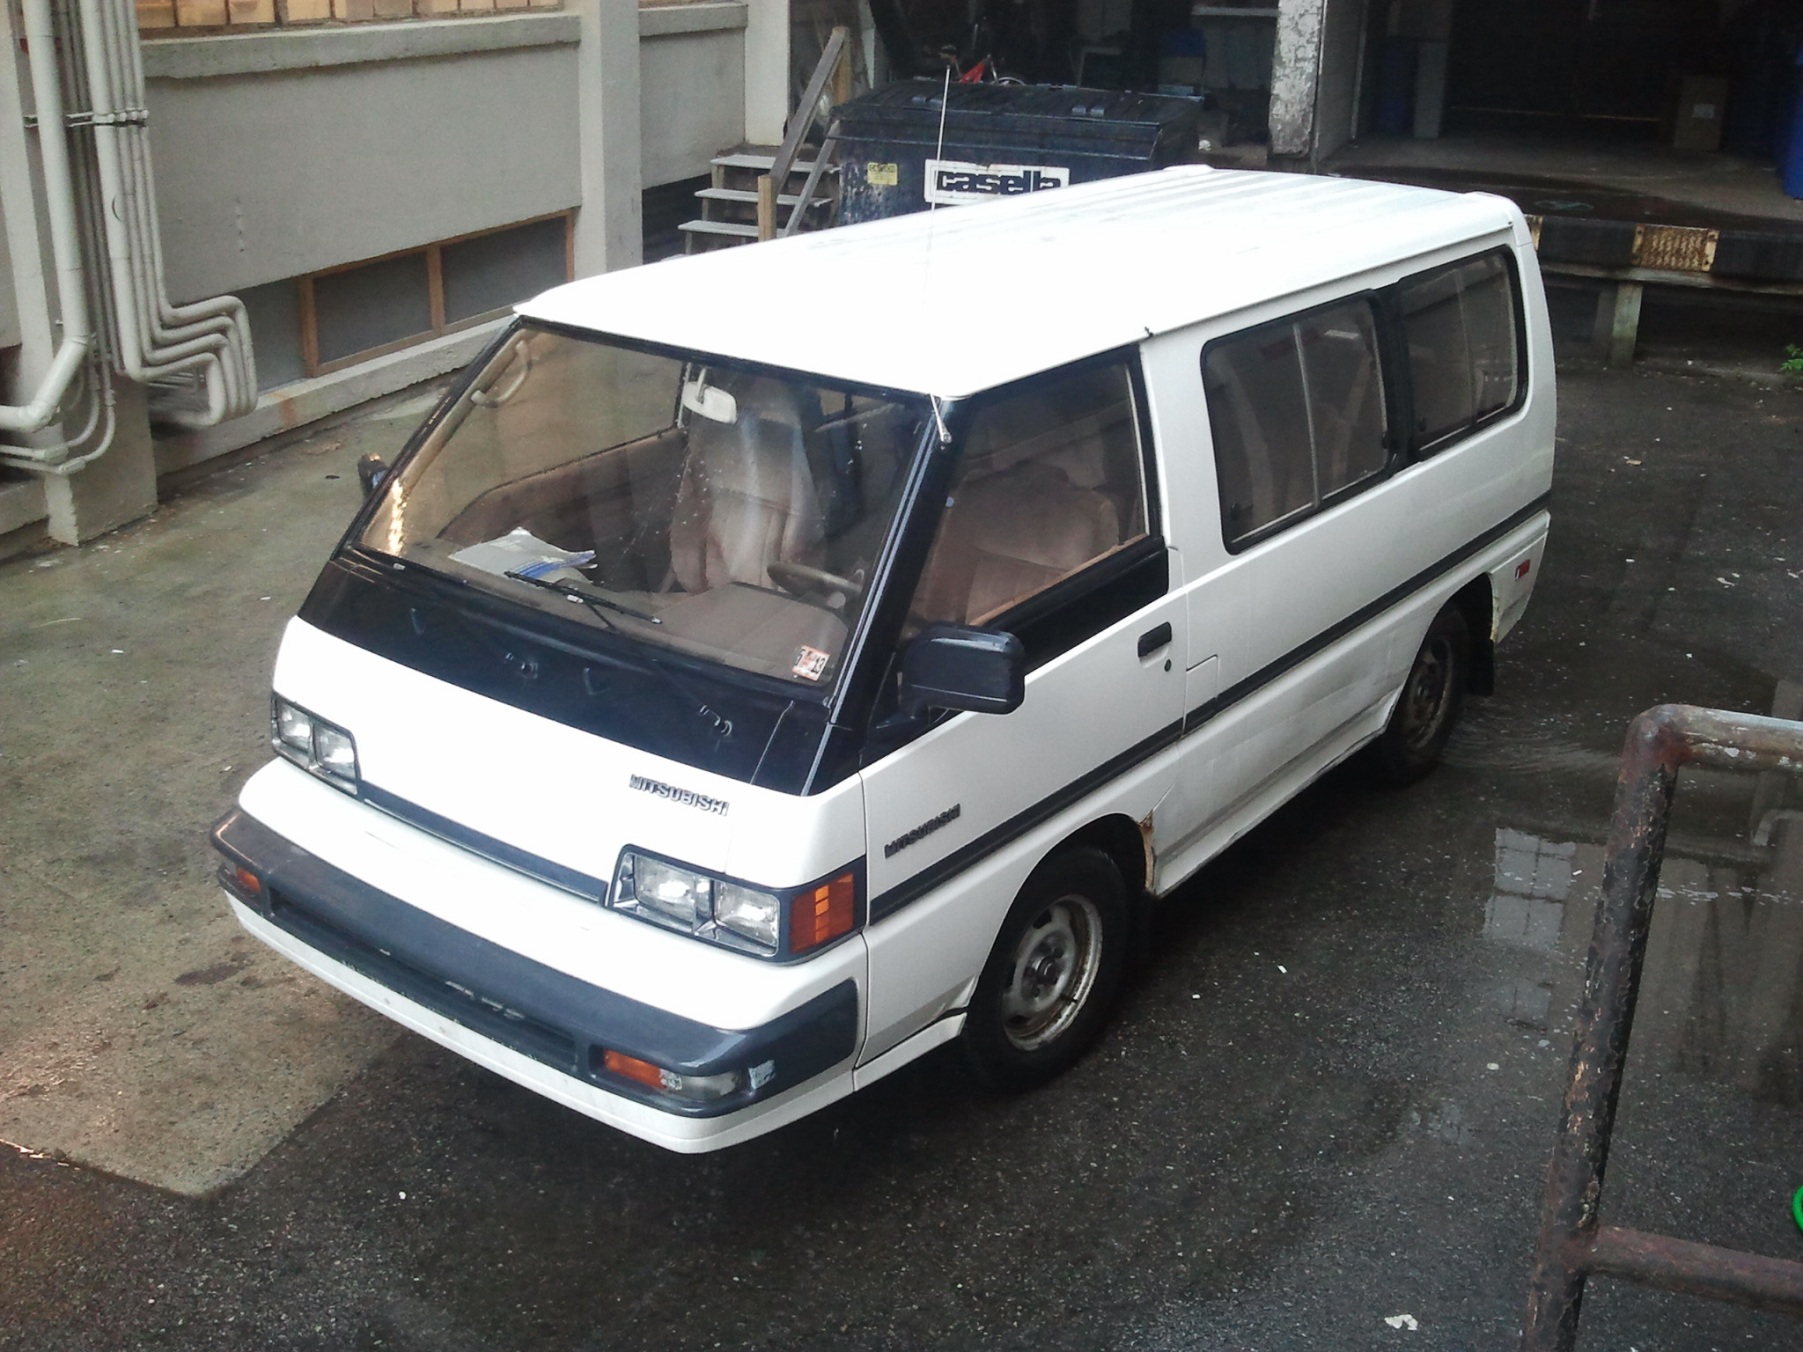
Lookin’ pretty good. I got rid of most of the grunge from the presumed side-swipe damage on the left lower bodywork also.

One of the nice features of the great N5x building complex, where MITERS and other shop-nests are, is that there is a two-post auto lift installed in the area where the automotive racing teams (FSAE, Solar Car, et. al) work out of. Many students have used it in the past for wrenching on personal cars, and I now join those ranks:

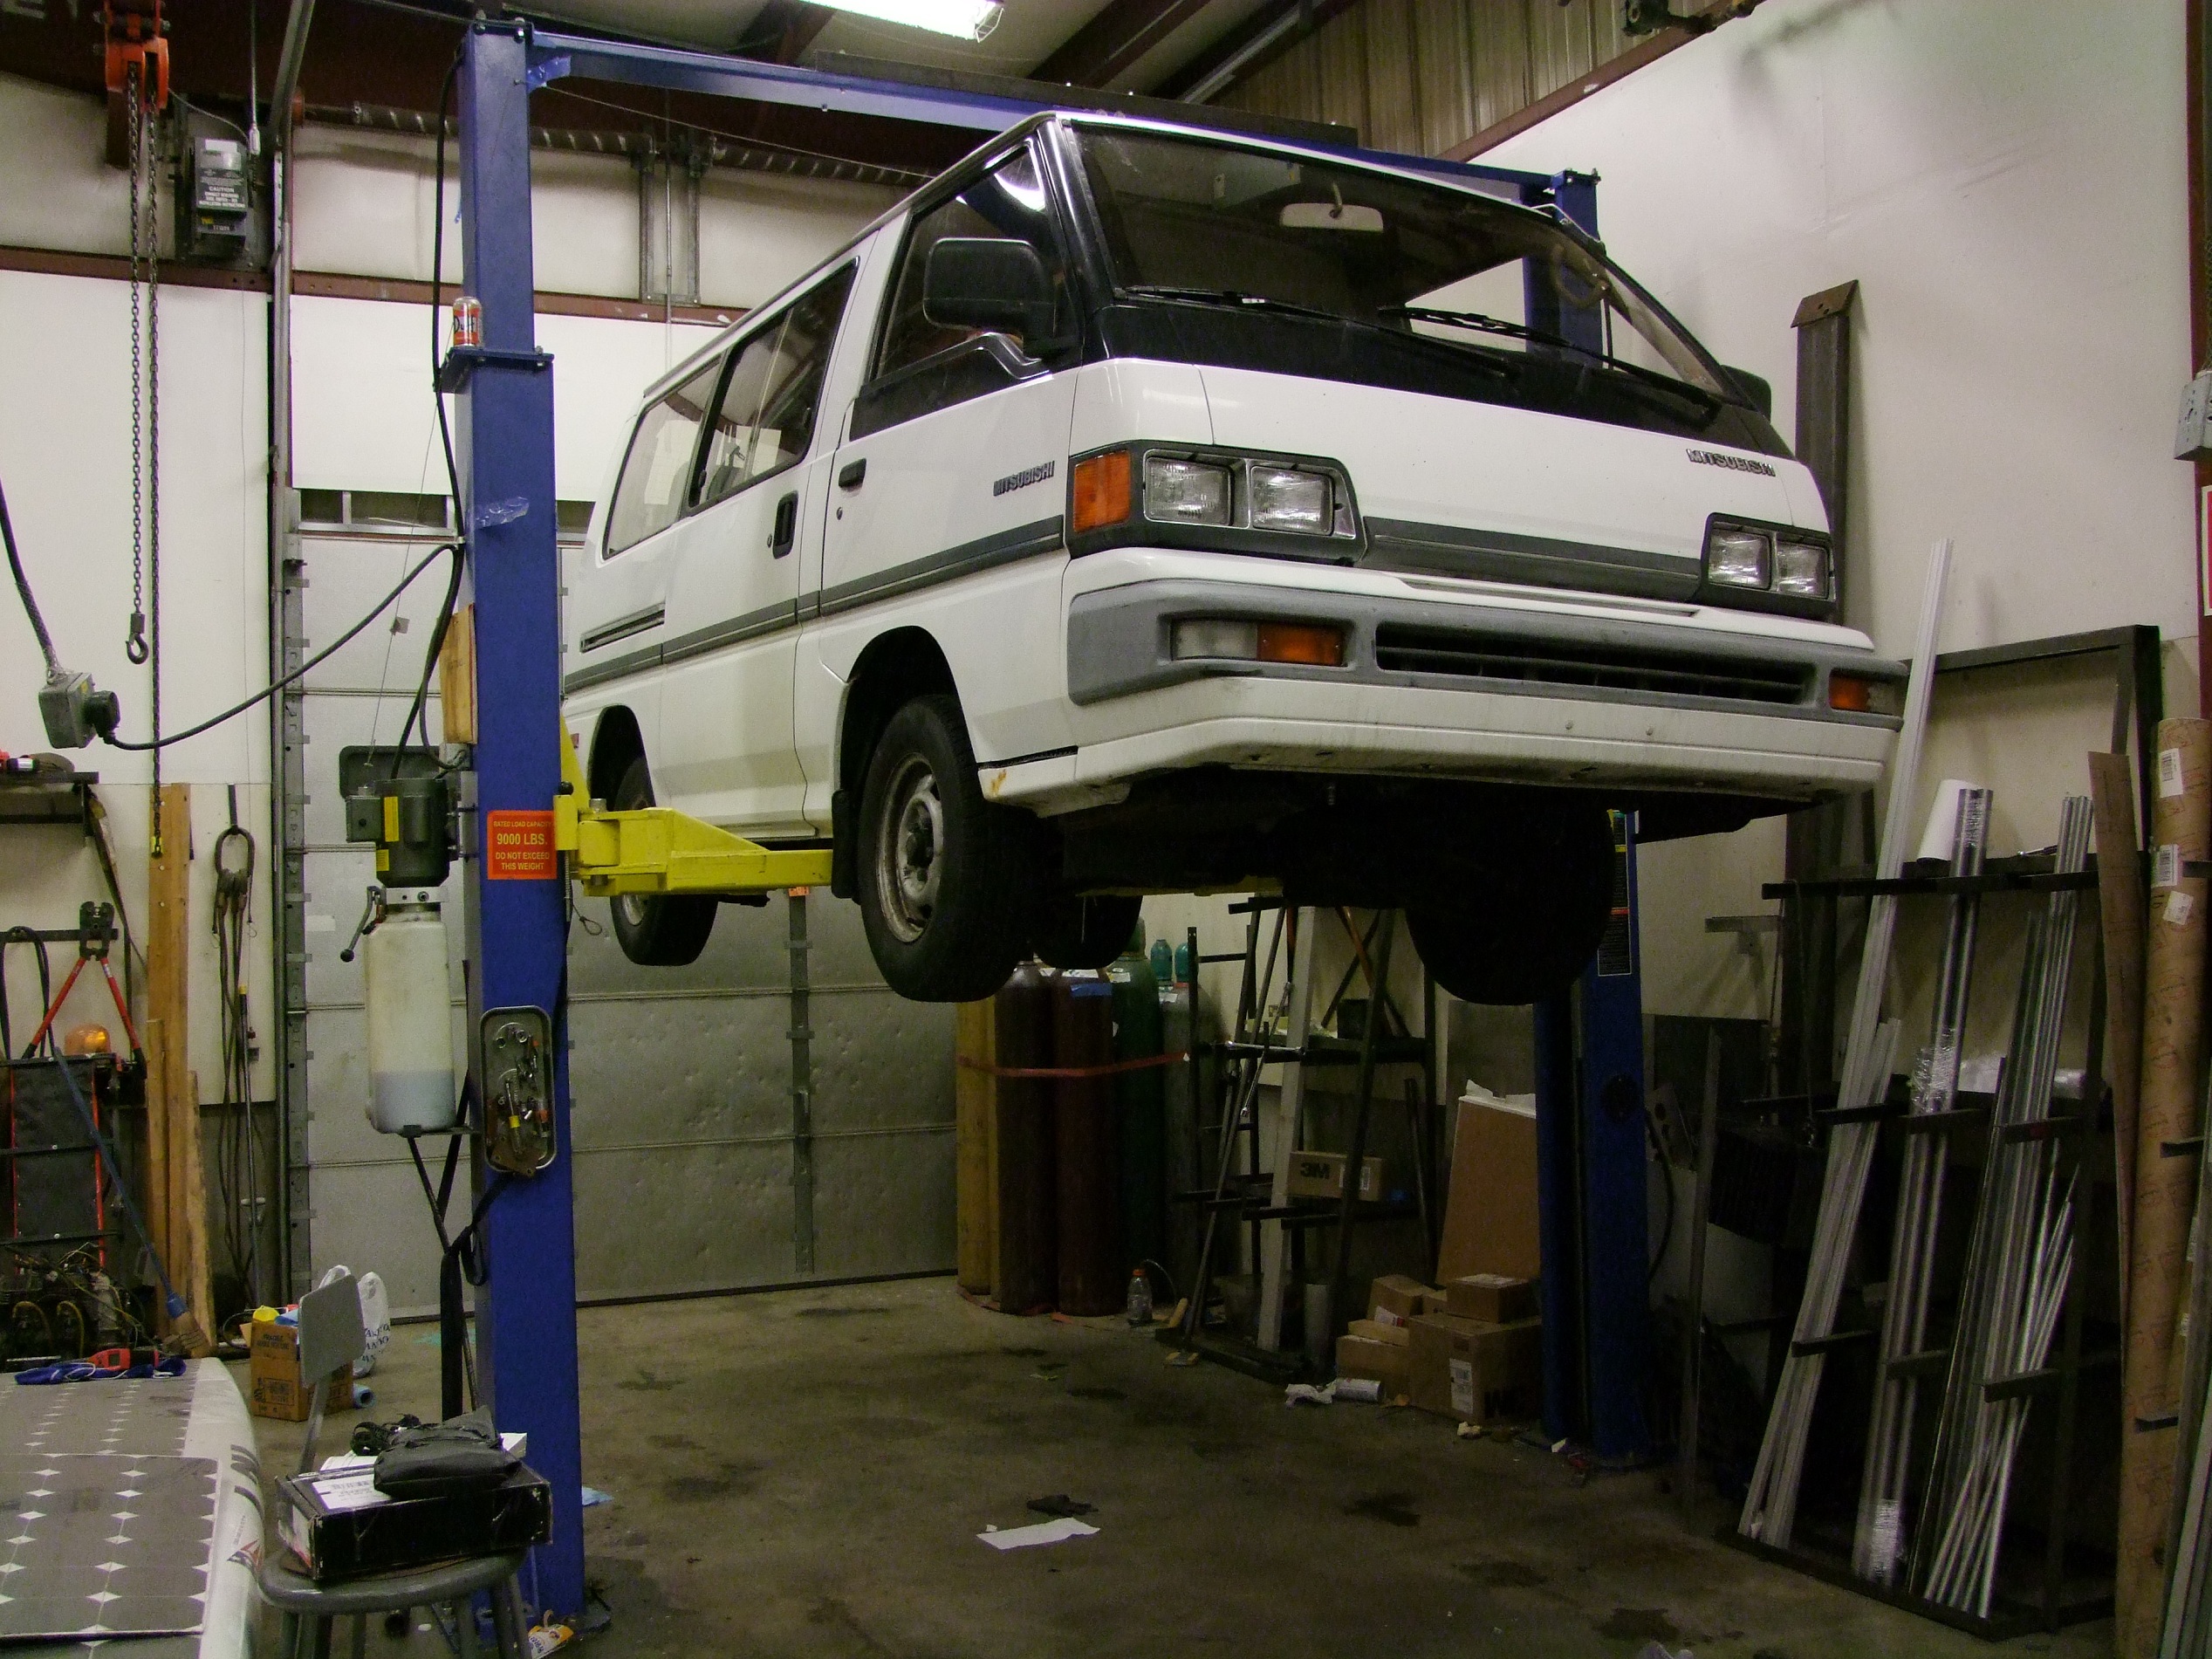
I ran into an interesting problem in that my wheelbase was too short to swing the lift arms under the frame. To fit, I had to remove one pair of lift pads (one is at the end of each arm), swing the front set under, manually push the van a few inches back to clear the rear set, and then reinstall the pads in-place.

The goal of hovering Mikuvan was to perform a full mechanical inspection of the underside as well as to clean the engine and transmission to locate the source of a very small but persistent oil leak.

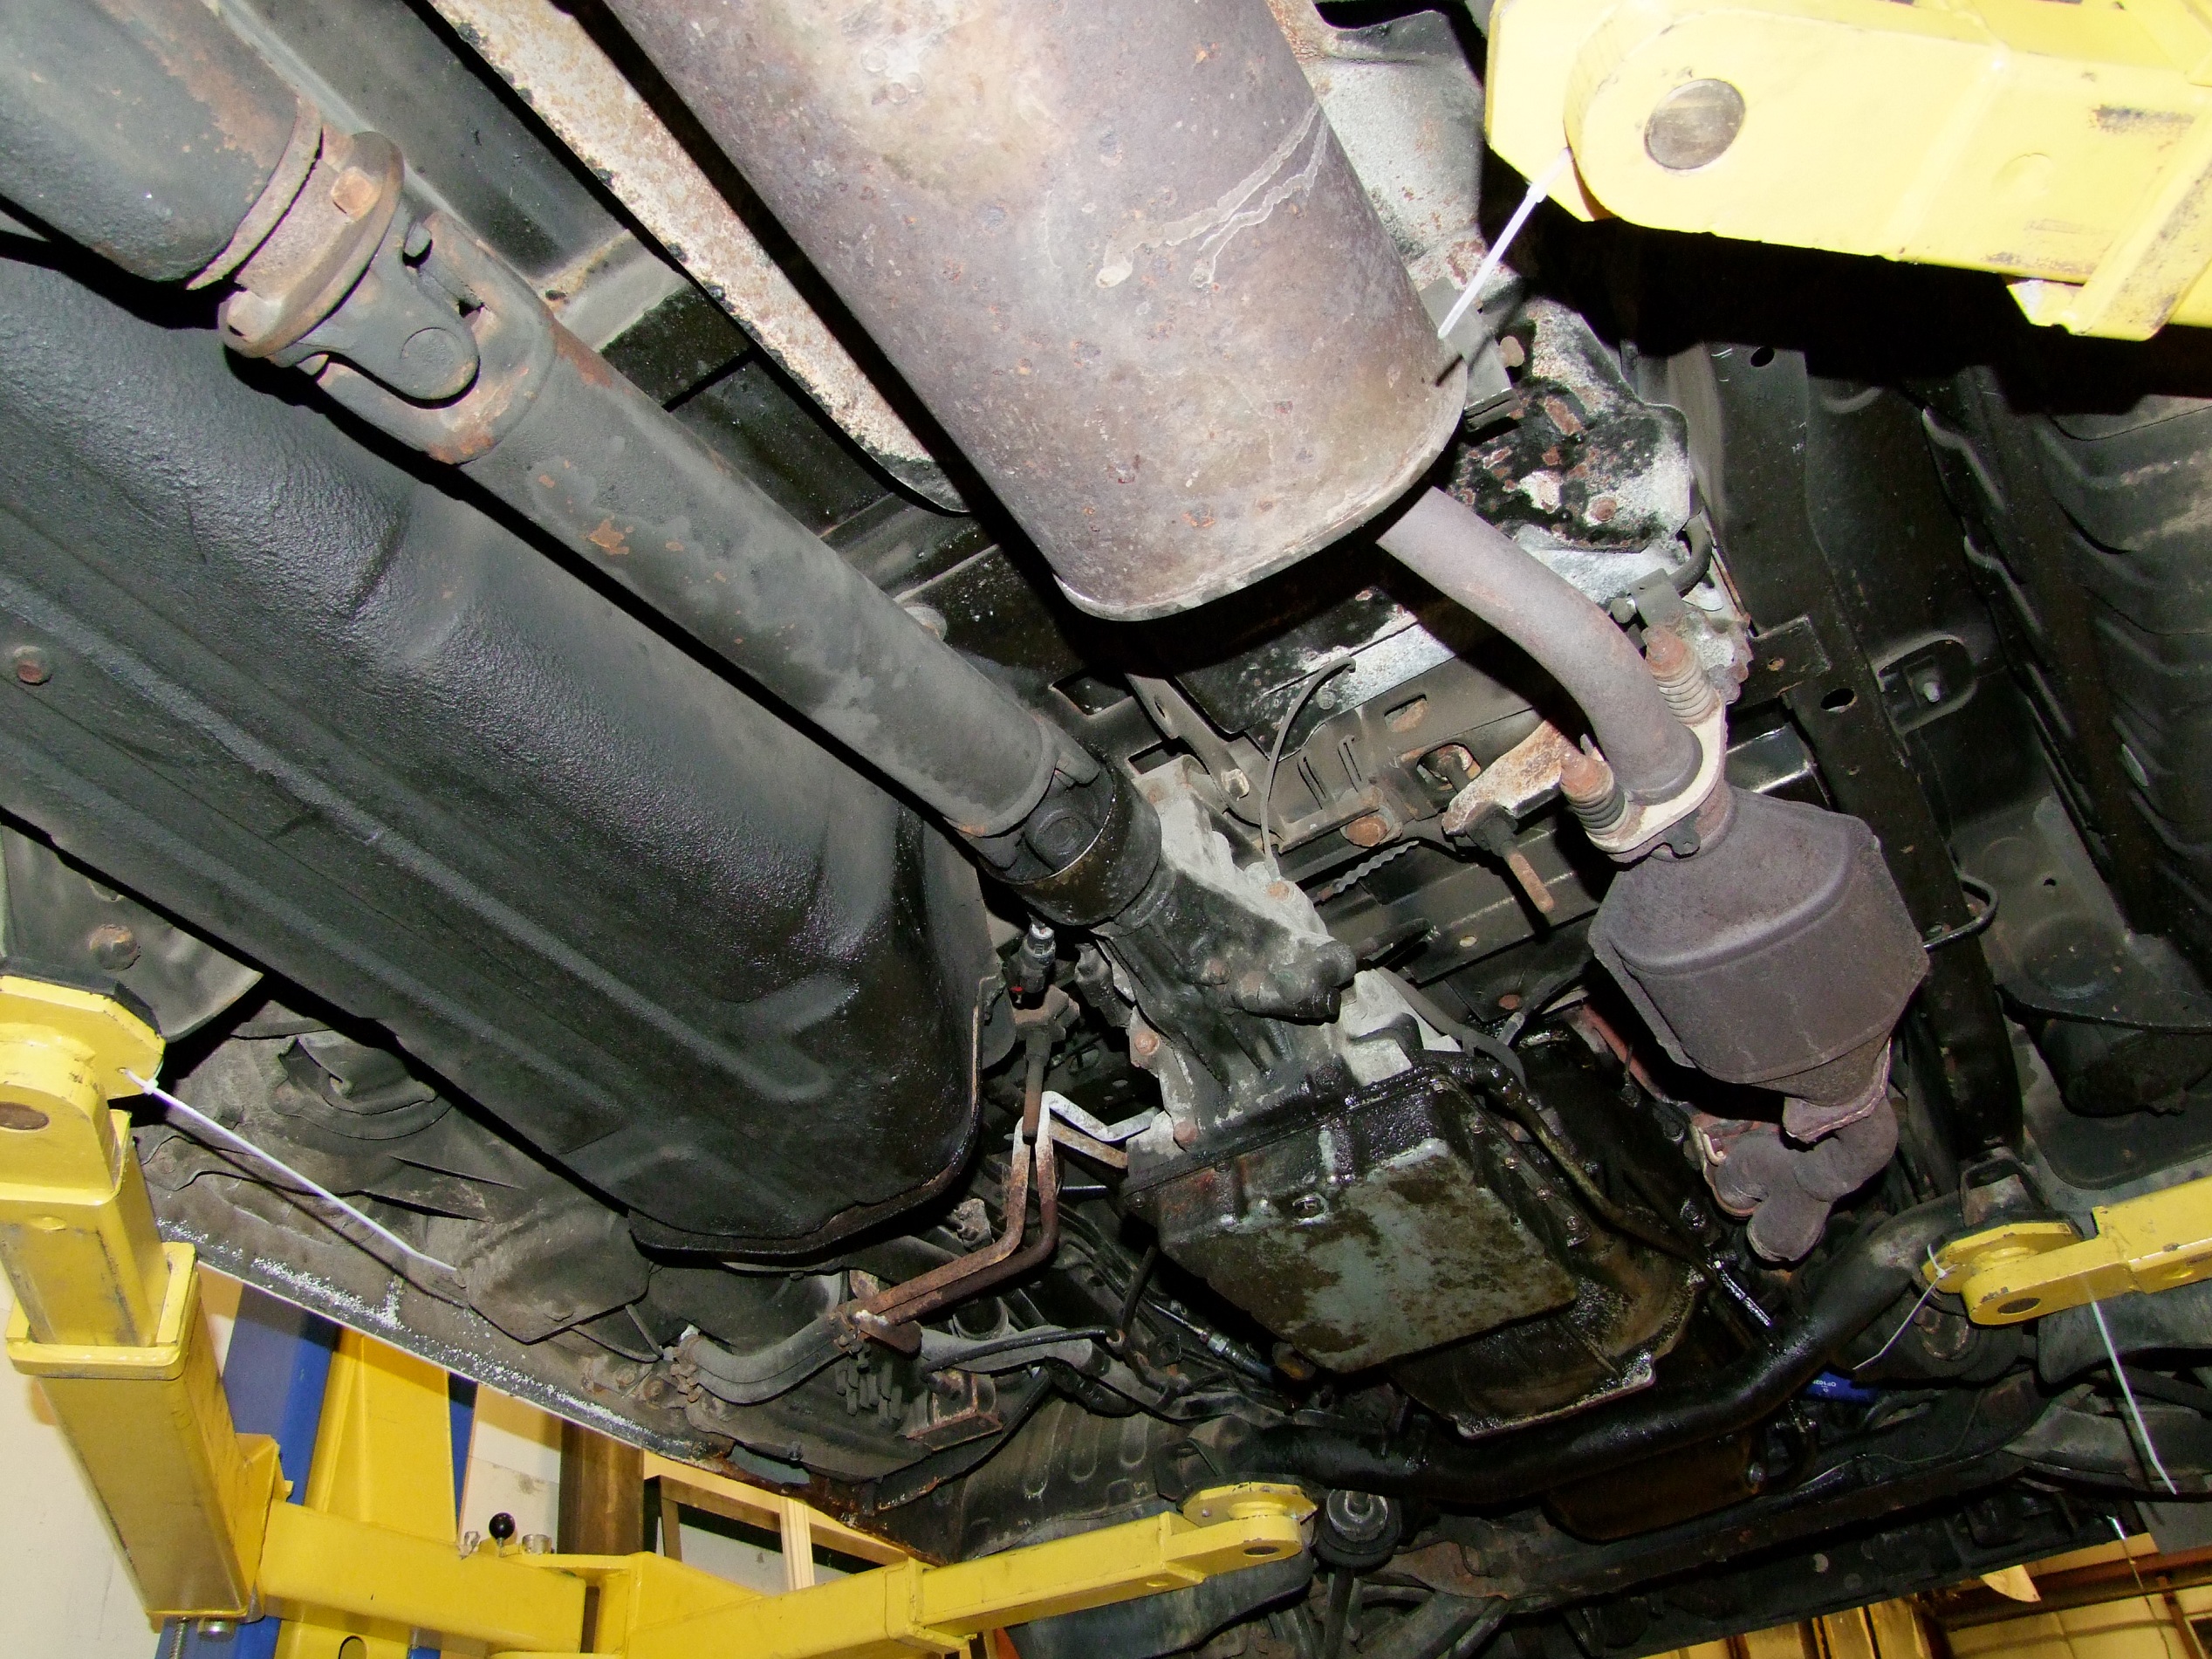
The belly of the beast, front to the lower right. The engine seems to have been burning or leaking (…or both?) oil for a long time, so there were “sludge bunnies” as we called them everywhere. Most of the underside frame near the engine is coated in a thick sludge film. I suspect it has helpful anti-rust properties, but still. Eww.

For the uninitiated, Mikuvan is actually mid-engined and rear wheel drive. The engine and transmission center of gravity is a few inches rearward from the front axle.

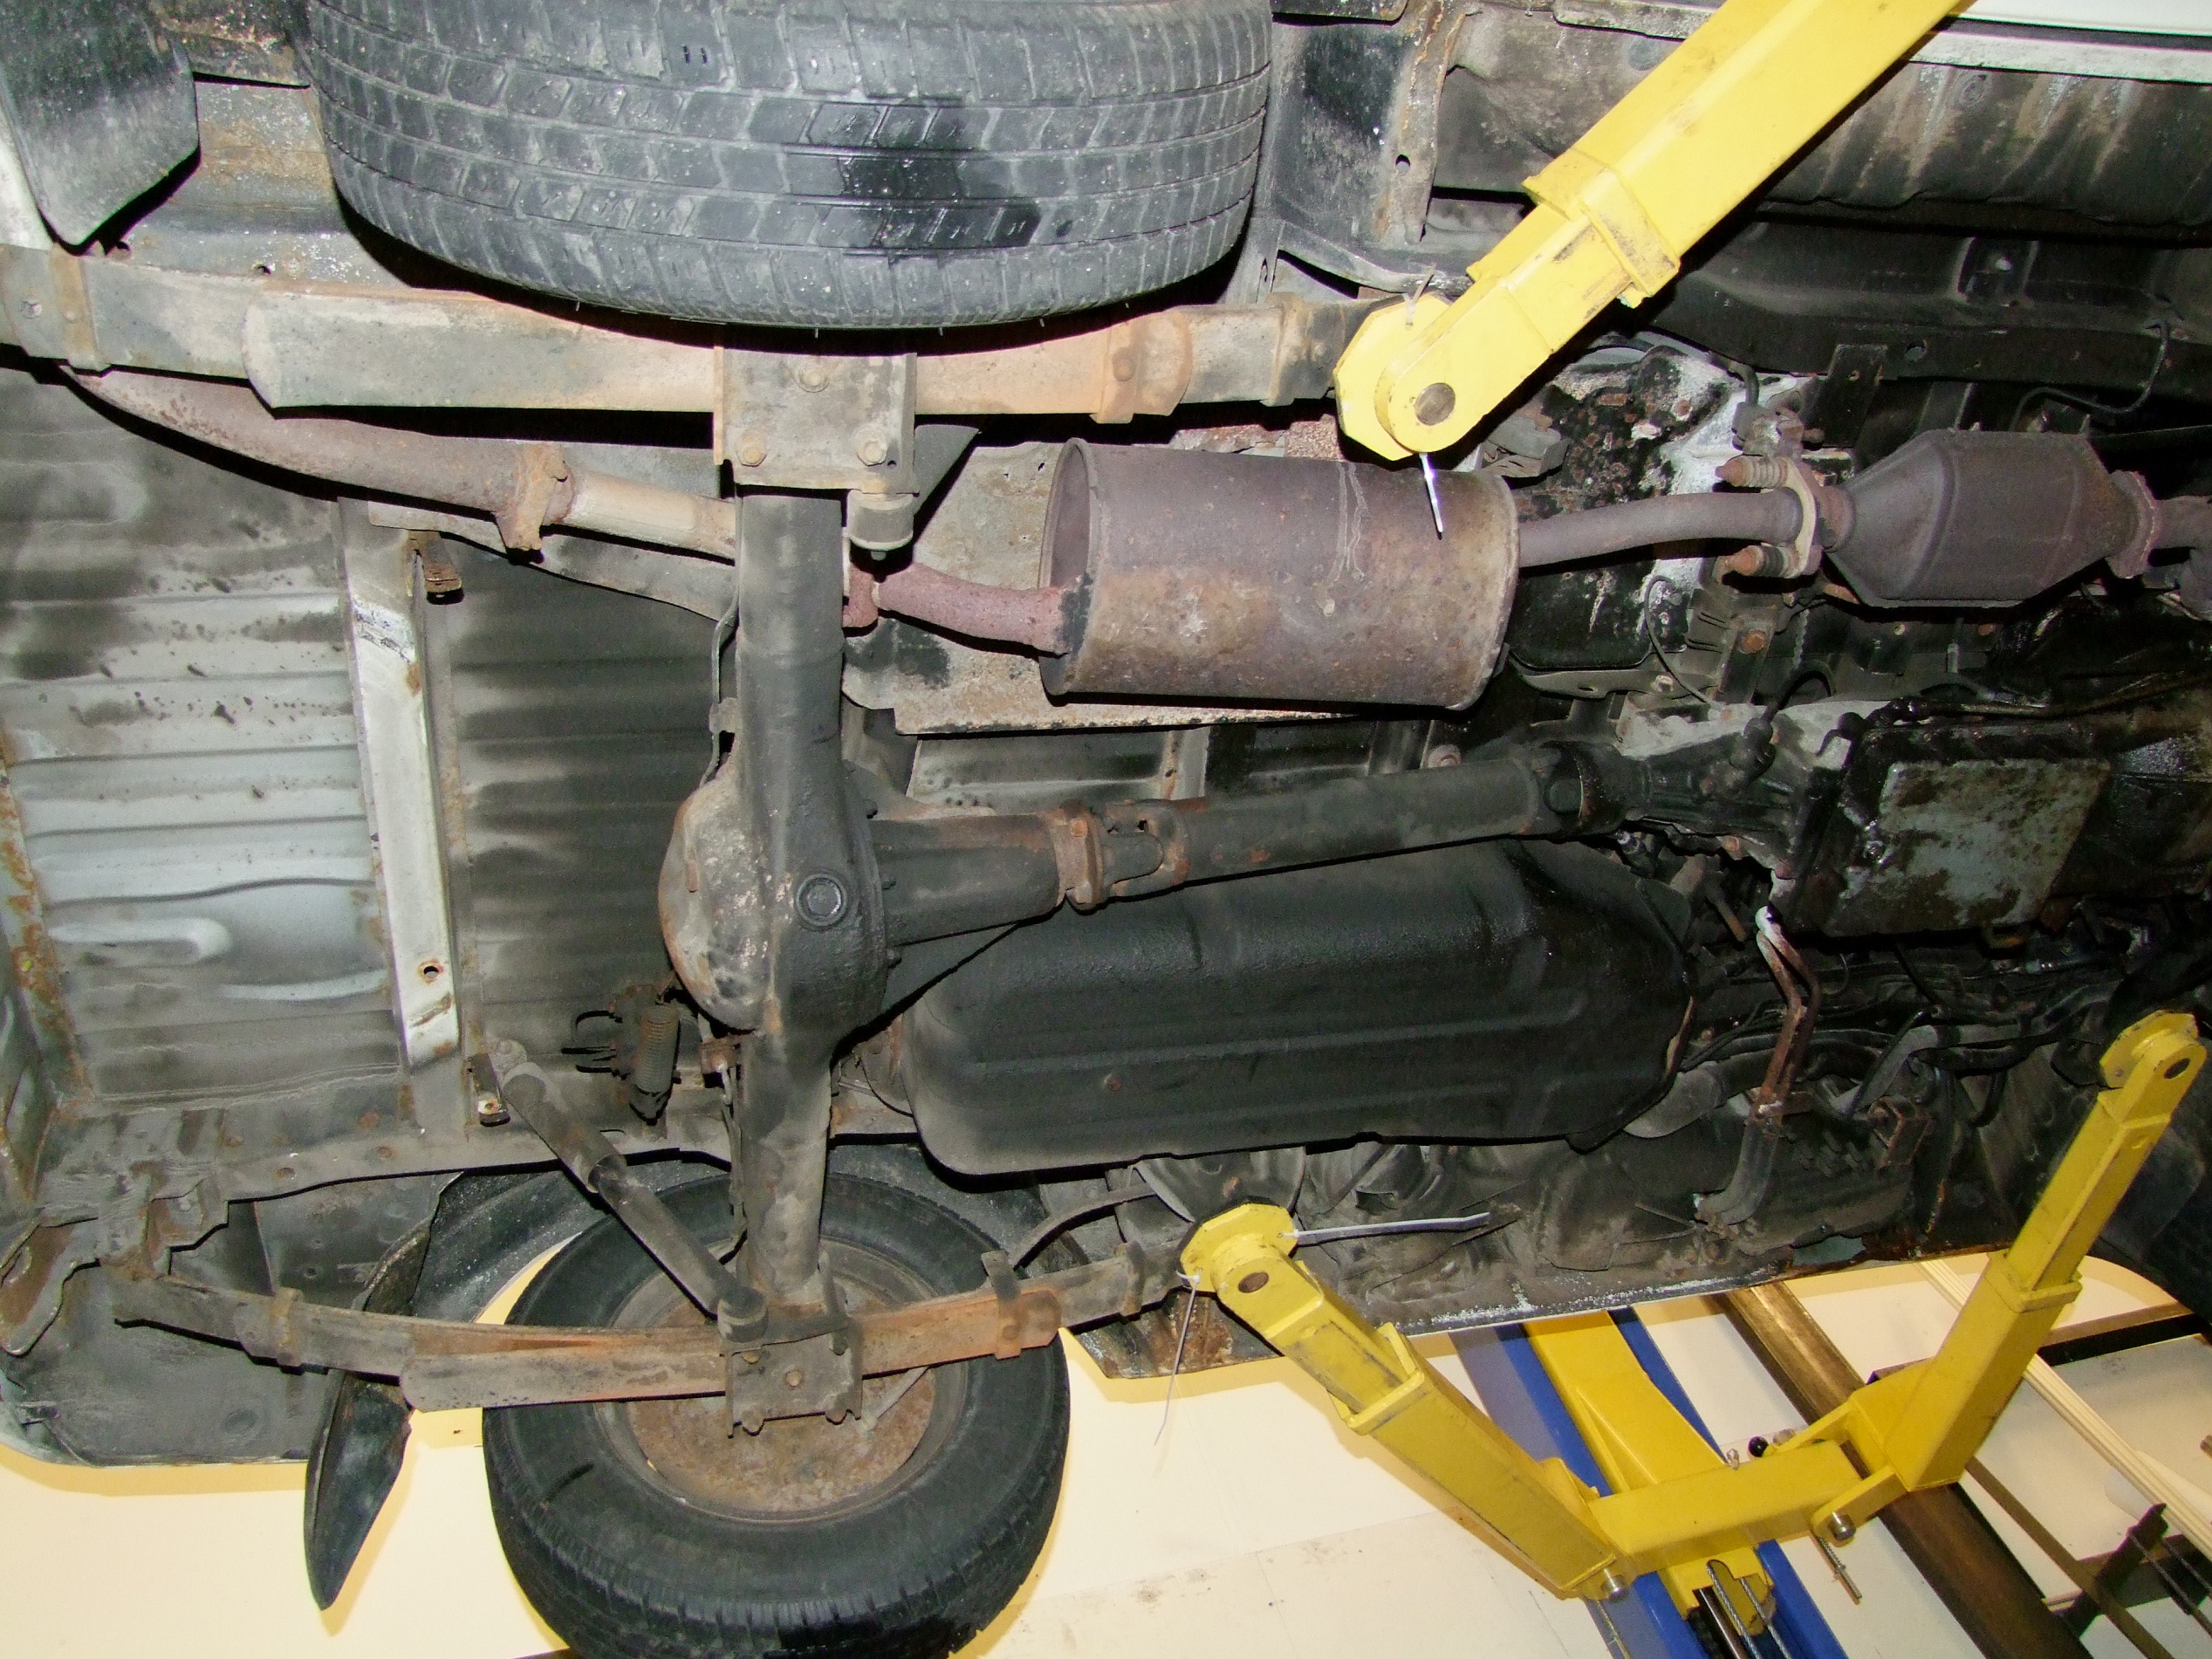
Here’s the underside rear. The clean spot to the left was where the spare tire lived; I had removed this because the rim itself was basically rusted out, and also removed the tire hanger in the process. It’s also where I think the eventual Siemens 1PV5135 will live. There’s many big square frame rails to attach things to in this region. Attachment strategies have been floating in my head and are varied – one part of me thinks I should just buy or Procure Through Alternative Channel a Borg-Warner eGearDrive, a transaxle designed to mate with  the Siemens motor. The other part thinks flipping the diff around and mounting the motor longitudinally (shaft pointing front-back), with an external 2:1 custom reduction, would be better. The differential is a native 4.22:1, so an external 2:1 is almost perfect.

A minor third opinion is to use the guts of the former Mercury Milan hybrid transmission from the old Electric Vehicle Team project, the ELEVEN. It’s basically an embedded eGearDrive, but just a pile of eGears that would require a custom housing. But it comes with a roughly 8:1 total ratio and a parallel-drive (not right angle) differential.

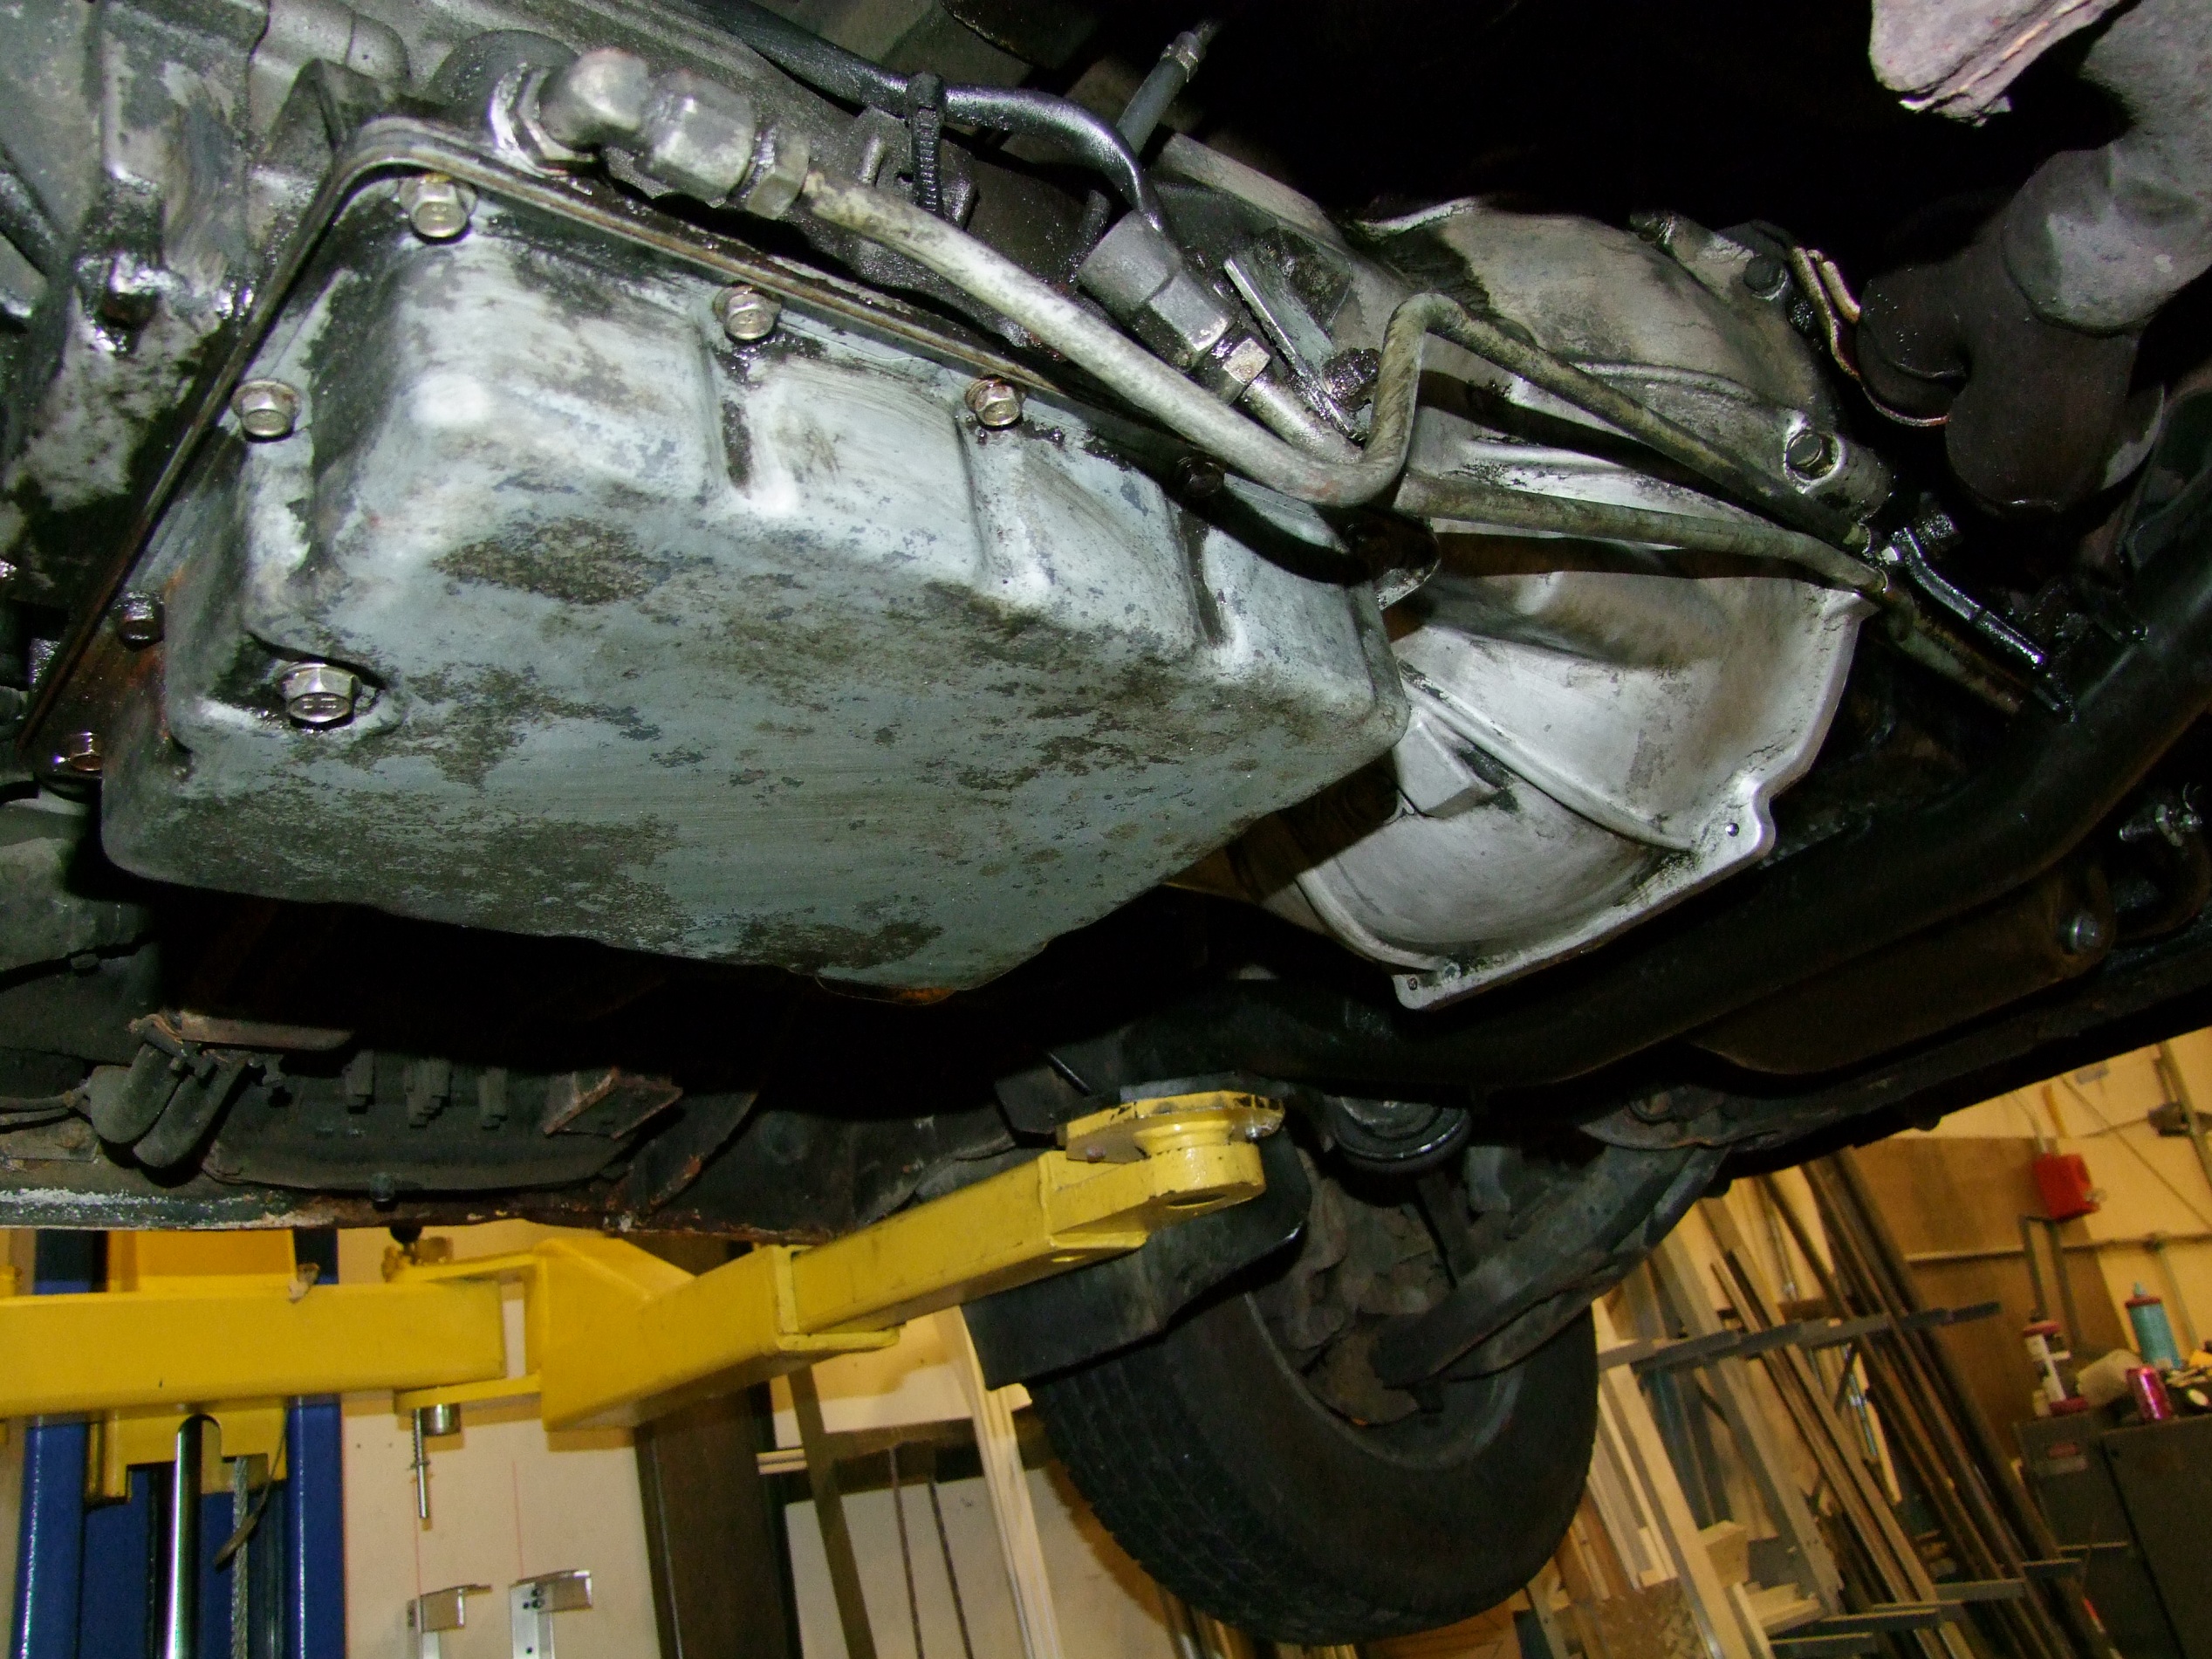
Using several cans of carb, brake, engine, and colonic cleaner, I gave the underside powertrain components a scrubdown. Every once in a while, I’d notice a new dot of oil on the ground while performing pre-drive fluid checks. With the engine and transmission so coated in junk, it was hard to see where it could have been coming from. Hopefully, now, I’ll see a little dark brown slick or something from the point of leakage.

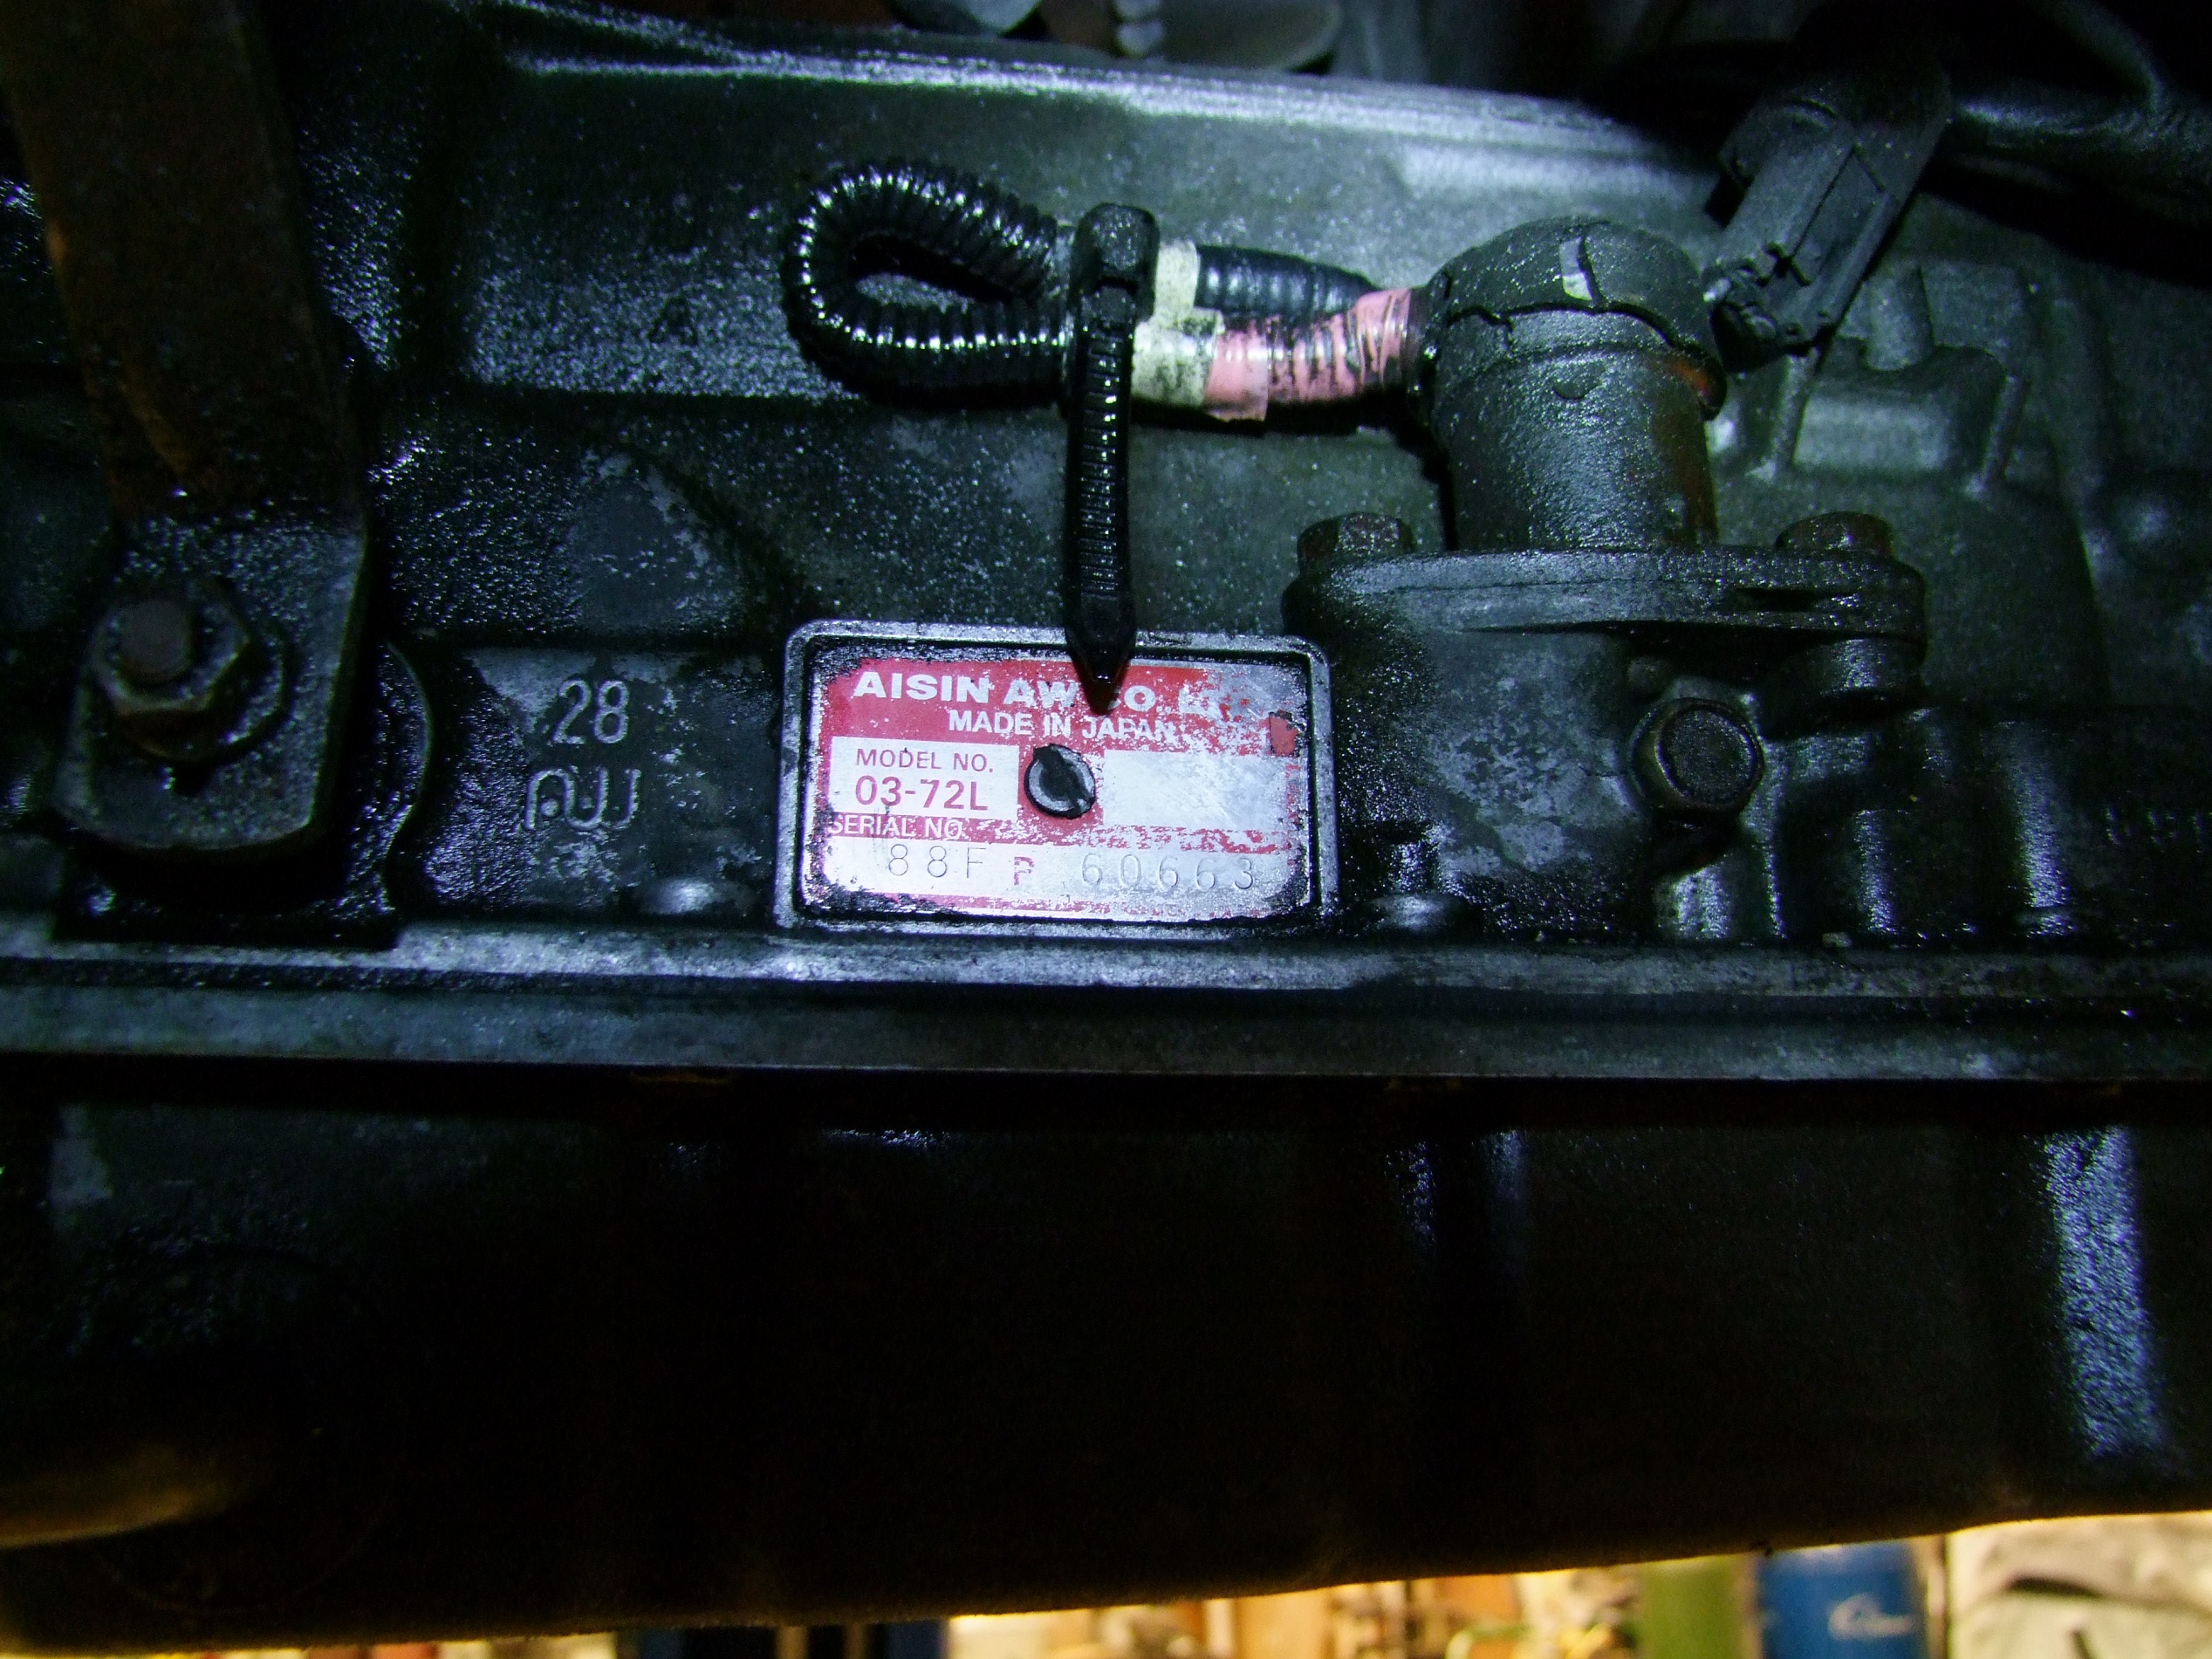
While scrubbing the transmission, I actually found the nameplate! It had been so thoroughly coated I haven’t even noticed it was there.

Interesting enough, the first Google ping for “4G64 AW03-72L” (my model of engine and transmission) is this very theraputic and fascinating teardown video, set to… Christmas music? I’d get to about the 7:00 point and then have exactly shit clue about how to get it all back together.

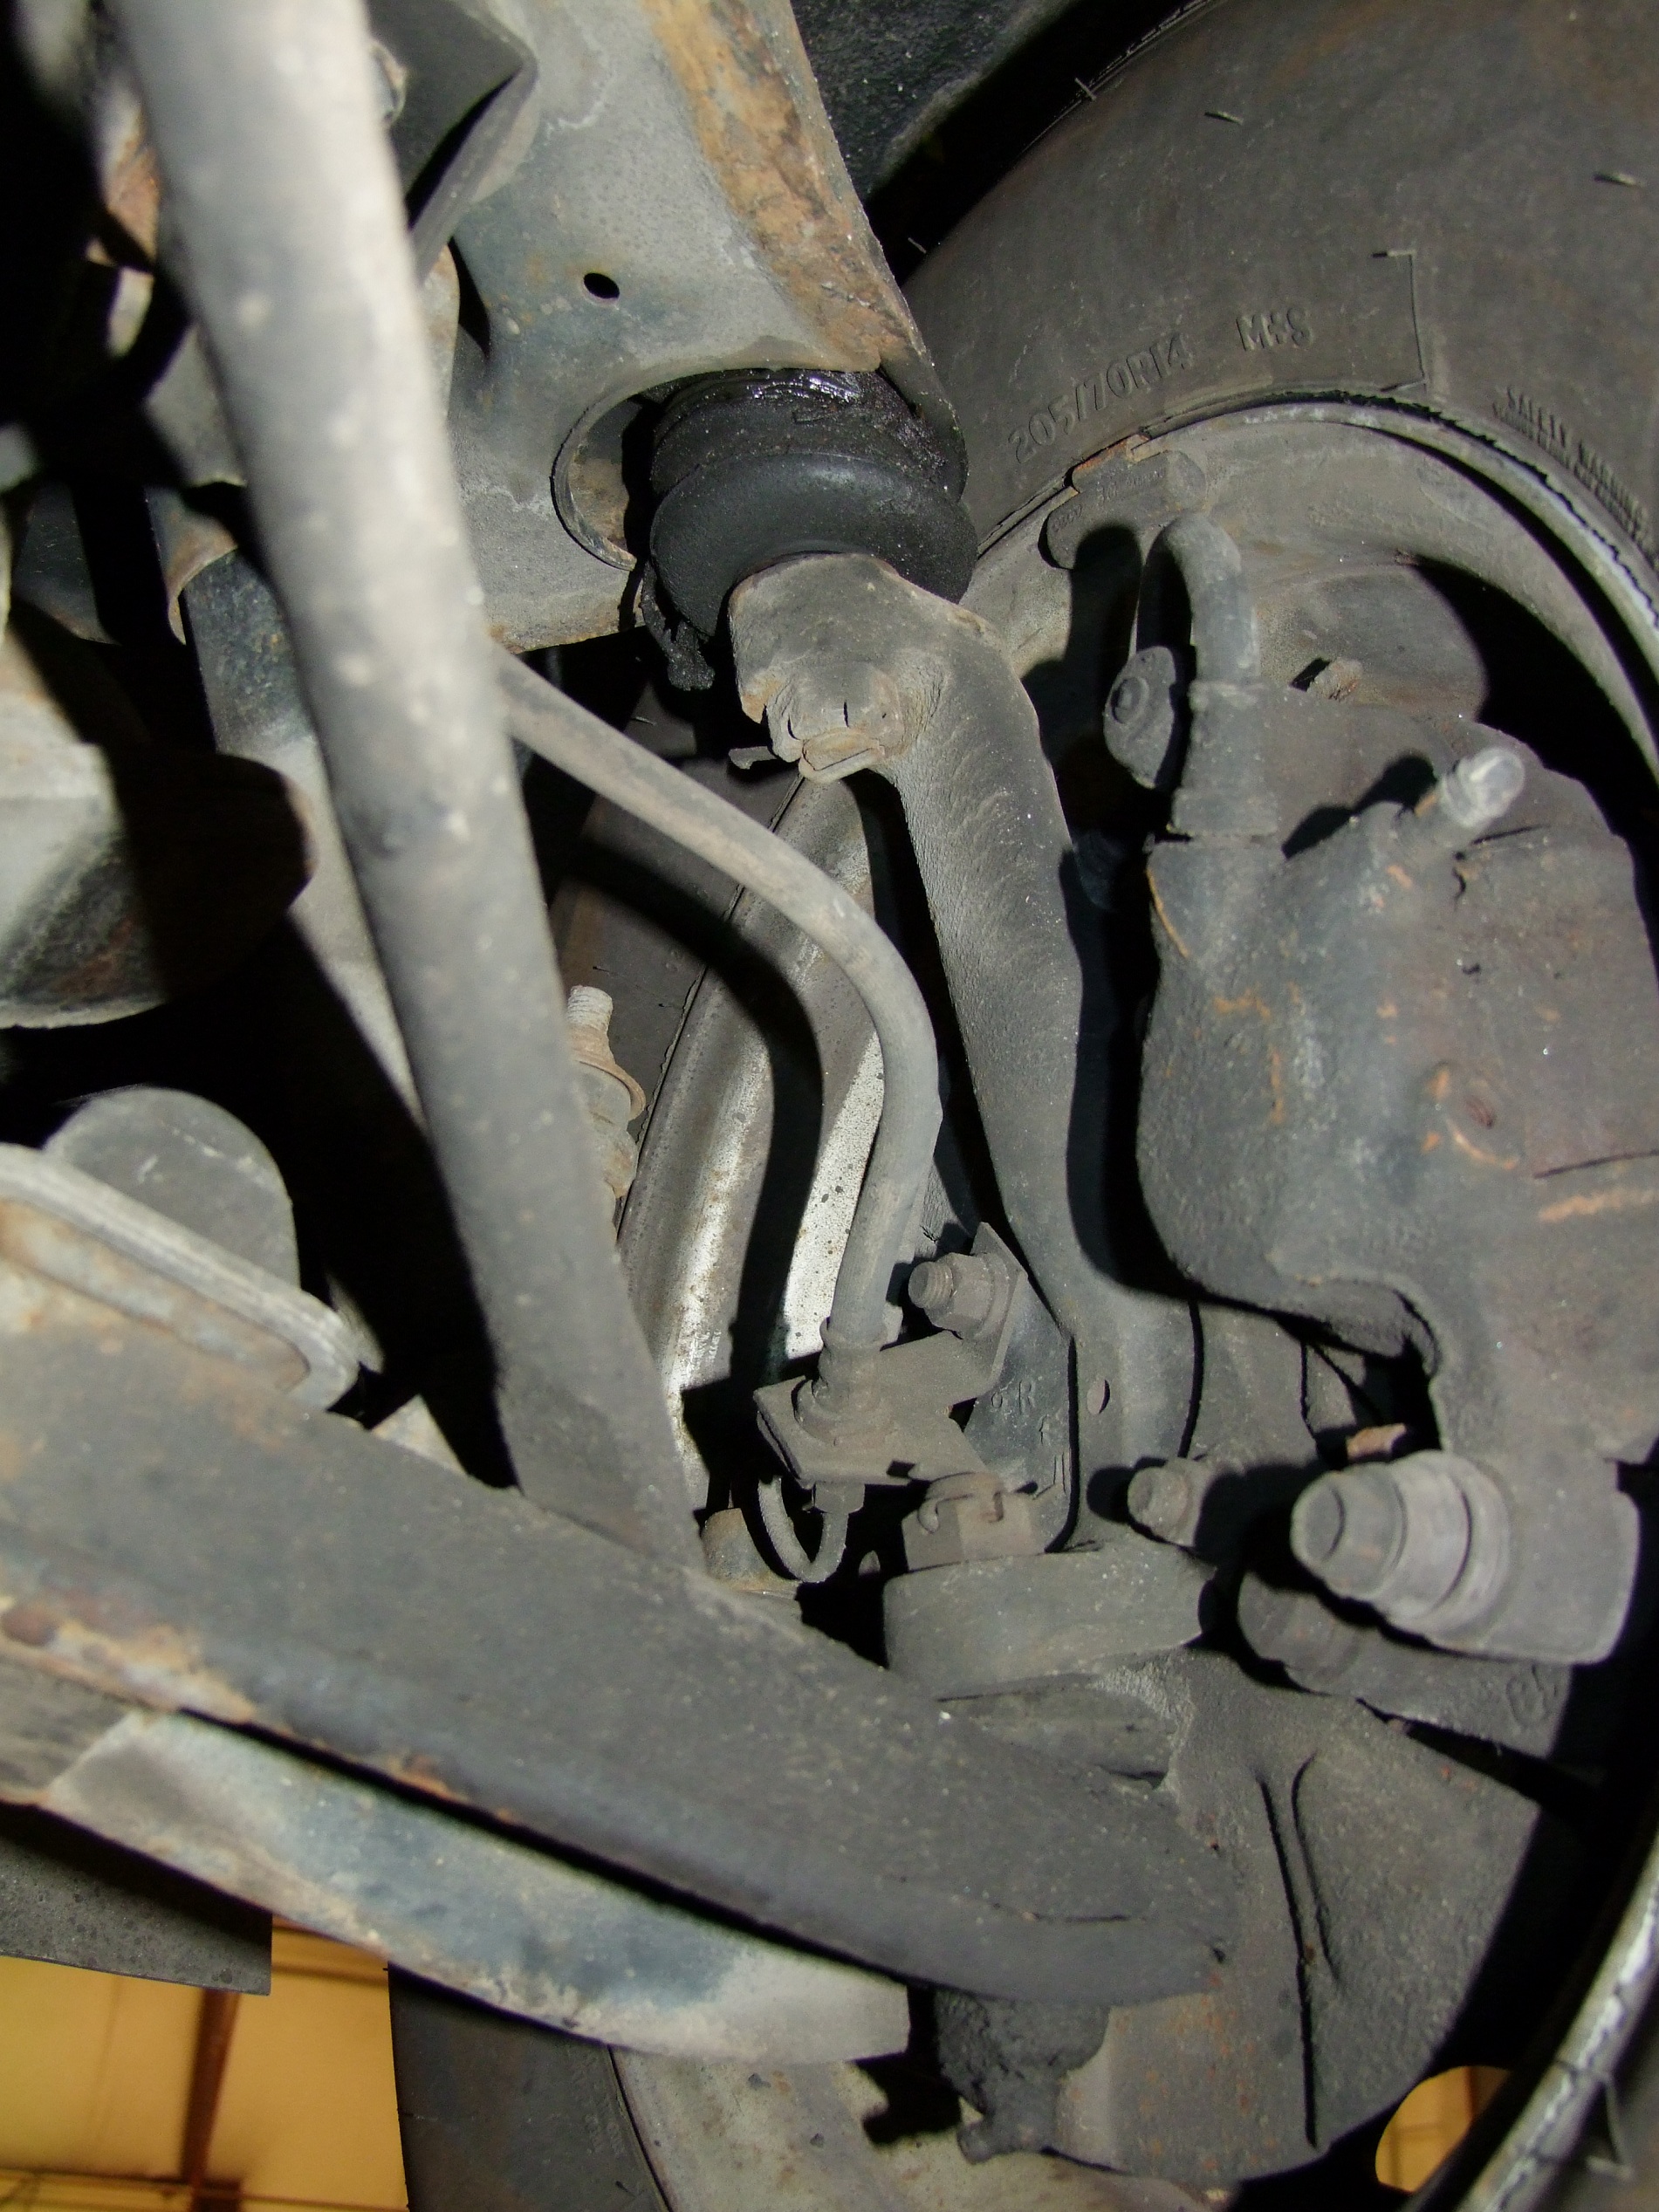
While lifted, I also went around to the wheels and checked suspension and bearings. Nothing seemed obviously bad about the suspension, but I’m also not a professional suspension inspector. The rubber bushings were not cracked or looking otherwise fatigued.

The bad bearing up front has been confirmed – the front right wheel is a tiny bit loose in all directions. If there’s one thing I know about most car axles, it’s that they use tapered roller bearings which must be preloaded (forced together at all times), so any wobble at all is a bad sign. The alleged (now confirmed) bad bearing had been manifesting itself as a rumbling noise at moderate speeds. I haven’t noticed that wheel center becoming substantially hotter, but I’m also not keen on waiting until that point.

No other wheels were found to be loose, but so long as I’m taking one side apart, the other side will also be replaced at the same time. Guess I know what’s coming up next!

the long term plan

While I was initially excited about taking the summer to get most of the way through an electric conversion, I’m now further in support of the second thought – keep the engine for now, and address all the little mechanical and electrical problems first. Get it in good mechanical shape first, patch the rust holes, and fix the accessories. That way, when I do finally manage to grenade the engine or commit fully and drop it, the rest of the vehicle is ready and able to drive right away with a new power system. Whereas currently, even if I were to somehow install the electric powertrain tomorrow, I’d still be faced with a bad wheel bearing, no front fans (forget even air conditioning!), body rust holes, and such things. Since I don’t depend on a car for daily commuting, I can afford it to be a science project and learn how to address these issues.

Plus, as long as I’m paying insurance on it, it might as well be functional and automotive and stuff. My policy is set to expire, with option to renew, at the end of October, which coincides nicely with the season that Mikuvan should not be on the road to avoid further rust spot damage from road salt (if those have not already been sealed by then).

I think the battle plan will be something like this, in no particular order

High priority

  1. Front wheel bearings – replace Real Soon
  2. All brake system inspection, front and rear, probably to coincide with bearing work since the wheels need to come off anyway.
  3. Front heater/AC blower. It’s one thing to not have air conditioning, it’s another to not have moving air or defrost/defogging. There’s already been a sweltering 80-something degree day in Boston, and it will only get worse from here. Unfortunately this seems to be a deep dashboard dissection job (by the Official Strategy Guide, anyway).

Low priority

  1. Underside body rust holes. Not sure how confident I am on this one, since it would require cutting into the bodywork – luckily in a place where nobody can see me mess it up! The side holes seem to be easily patchable with some steel sheet. The two wheelwell area rust holes are a different story since they will require signficant patching, filling, and contouring. And painting. What? Making something look nice?! This is one job which I may actually throw at a body shop and then hide.
  2. Fix the swivelly-slidy seats, which currently can’t latch into position on the slidy-axis. Currently held in place by a toolbox and a milk crate.
  3. Actual professional repaint of the exterior; the paint in some spots is clearly falling apart, and there’s minor rust patches on the rear hatch where it’s bubbling away around them.
  4. The power mirror switch
  5. Some upholstery which could use replacing, especially up near the driver and passenger footwells where there may also be more rust hiding

Operation: Bad Timing and Mikuvan Adventures

I think my new life mission is to collect the 3 legendary birds derpy Japanese 80s vans. Here’s an interesting review of the 3 competing Japanese marques in the November 1987 issue of Popular Science! As an enthusiast of things which go quicker than they need to, I’m glad to see the Mitsubishi Van win the most sporty award. All of these models were discontinued by 1990, and I think the Nissan in particular is the rarest since there was an active mass recall for them. Definitely next on my list…

Anyways, as previously announced, Operation: BAD TIMING went down Saturday, and I am proud to say that it was a resounding success; the sound you hear is a hilariously lawn-mower-sounding 4 cylinder Mitsubishi 4G64 powering a vehicle which resembles a normal American minivan, just with the nose belt-sanded off and a few corners hit with a deburring tool.

Here’s the story of what all came together on a bright, sunny Saturday afternoon in (a basement in) Cambridge.

The scene of the crime. A few days before, I went to the neighborhood Harbor Freight and invested a very low 3-digit sum in a 3-ton hydraulic jack and 3-ton jackstands (among other handy accessories). As someone who has used HF equipment for years, I’m fully aware of the need to de-rate everything Harbor Freight tries to sell you by 50+% in order to use it safely. Especially on a matter which would probably reduce me non-consensually a few inches in thickness if the equipment fails. The van weighs 2910lb (1.5 tons, basically) empty, so 3-ton everything it is. Jackstands were placed according to The Official Derpy Van Strategy Guide – there’s a convenient round frame rail on the underside that fit the stand cradles exactly, almost like they anticipated people doing this or something.

The jackstands enabled free access to the underside of the vehicle in order to release several engine cover/timing belt cover bolts, and to release the lower transmission cooler and radiator coolant feed lines.

To get to the timing belt, the radiator and all accessory belts and pulleys needed to come off. This stage was basically done by Official Strategy Guide and some finger-feeling. The service manual doesn’t show some steps, figuring you know this stuff already.

For instance, the only step in radiator removal was “RADIATOR”, not “Remove these 2 bolts, this hose, and this other hose but from the underside of the car, and drain the transmission first so you can also get these two other hoses. Oh, by the way, the radiator shroud doesn’t clear the main cooling fan, but it will if you yank hard enough so you don’t have to take these 4 other bolts out.”

Yeah. That’s how you do it. “RADIATOR”. We decided that yanking was the best way.

After the radiator was wrestled out, I started attacking the fan and fan clutch. This right angle T-handle drive ratchet came in handy immensely for many of these tasks – among others being a makeshift impact wrench and hammer.

Leverage was used to break the fan bolts hold, then the T-handle used to quickly extract the bolt. There was no space to actually put the electric impact wrench I bought in there.

One of the fan nuts needed some Vise Grip Assist to untighten. It didn’t make it back onto the fan hub afterwards. Surely 3 bolts out of 4 is enough…

About midway into the disassembly process, and all the accessory belts have been removed.  The next stage was to remove the crankshaft accessory pulley, which was another 4-bolts torqued way too tight. I actually had to have Adam counter-torque me through the camshaft pulley (holding a socket wrench locked the other direction from my torquing) and rock my own wrench back and forth to break it loose!

After the accessory pulley came off, a few bolts later and the timing belt cover could be removed.

…and this what fell out as soon as we did that. A ball bearing.

Not a good sign.

As the cover was removed further, several more ball bearings fell out. This was not looking good.

A shot of the front of the engine with timing belt components exposed.  The lower left, short timing belt is the balance shaft belt, to be replaced along with the main timing belt. Its tensioner was actually pretty intact. The main timing belt, however, was a different story.

The tensioner is a “offset cam roller” kind of thing mounted on a swinging, lockable mechanism. The mechanism, a single steel stamping, was just fine. But where the hell is my tensioner?

Oh, there is is! At least, that’s the inner race. The actual tensioner roller itself was freely jiggling around inside the timing belt case. It seems that the bearing disintegrated long ago, scattering balls everywhere inside and causing instantaneous and likely fatal timing loss for the engine.

I purchased a full timing belt components kit, so it came with the 2 tension roller assemblies and belts. This is the new balancer belt assembly.

Bear in mind I was not the person taking the pictures, or you’d likely have gotten a picture of the main tensioner roller with every ball bearing recovered and piled on top of it. Others are not so OCD about photos as me, so for now, enjoy this picture of the lettering on the timing belt.

And this photo of nothing in particular. You can kind of see the new (green shielded) tension roller for the main timing belt installed. Much carb cleaner was used to make sure the mating surfaces and pulley faces were clean, then the new timing belt was installed. We didn’t go to extraordinary steps to clean everything, nor was the water pump replaced.

We had thought that “line up the timing marks” was going to be an arduous process of HERE, HOLD MY EVERYTHING WHILE I PLUG IT IN, but rather found that all the engine parts just sort of rolled into place. The cam shaft has 4 big springy detents from valve actuation, one of which was just the correct timing. The balancer shaft naturally rotated from gravity to the right timing.

It’s almost like it was designed this way or something.

After the timing belts were installed, we plugged the (newly replaced) distributor and rotor in, connected the spark plug cables, and tried a test run. This was the make-or-break here – if something was terribly amiss, it would show itself upon cranking. If the engine still didn’t start, I was prepared to keep removing things on the spot.

The video is of the second test run. On the first, we were all taken by surprise as to how quickly and smoothly it started up. I was honestly expecting explosions or jets of flame or something.

The engine idled smoothly and revved up smoothly. I blipped the throttle to about 2500 RPM briefly before we remembered that it had no cooling whatesoever and decided to end the test. Success for now.

After the test run, everything is getting reinstalled and refilled.

Your pretend-mechanic hoodrats of the day are Adam, Dane, and yours truly.

Buttoning up everything and rerouting all the cables. The passenger engine everything compartment hasn’t been this together since I got the thing.

Finally, after about 5 hours of work, Mikuvan is back together again. We finished at around 7PM Saturday, still early enough for the sun to be out!

Naturally, a high-stakes all-hands test drive was in order.

The total mileage of the first ever test run was about three or so. Not very much, but enough for me to observe that everything was in good working order (up to 3rd gear), that nothing was overheating or making weird noises, or that for some reason it really wanted to turn left. Hell, I’ve ridden in friends’ cars which were consistently less reliable.

The evening resulted in one discovery: the source of the coolant leak. First, a major leak from a misplaced hose clamp on the radiator from our servicing. But second, a persistent but lower flow leak which left me puzzled as to why I was leaving a bread crumb trail of coolant droplets everywhere. It turns out that someone in the van’s 23 year history had sheared a bolt on the thermometer to radiator hose connection, so the gasket was completely uncompressed and leaking.

Well, I sure fixed that.

mission 1

The conclusion of the test drive was the N52 parking lot:

That evening, I topped off the brake fluid and also refilled the gas (with 93 octane premium for sheer kicks) and cleaned off some of the bird shit stains and tree droppings.

Sunday has been filled with gratuitous driving (to places I would normally scooter to or even walk and stuff… amazing, right? It’s the weekend, I can park anywhere!) to double check and recheck reliability in starting and fluid leakage. At this point, I haven’t stalled out once, nor had any more issues with dripping fluids with the exception of some small oil dots that appear after a long period of parking. This tells me that there’s probably a very small but consistent oil leak somewhere. I’d like to get this thing on a lift, still, to fully clean the engine and transmission so I can watch oil leaks form.

Other things I have noticed include a pretty rumbly ride, which could indicate bad bearings. At 151,000+ miles, it’s about time for them to let go. However, during the time on jackstands, I did not notice any wobble or looseness in the front at all. It could just be a natural noise from sitting right over the front suspension.

I have yet to take Mikuvan on any highway cruising to obtain true steady state operation; this is on deck for this coming week. At this point, it only has a pile of minor issues to redress:

  • The body panel rust holes on the underside, and the bumper
  • The swivelly chairs can’t lock in place – the mechanism is obviously broken on both of them.
  • The broken coolant gasket bolt can be resolved by buying a new thermometer unit
  • The idle is still erratic, though I have yet to stall out. It varies between over 1000 RPM and what appears to be 450 or less (expected: 750rpm). The idle air control servo is known to get sticky over time.
  • The front blower is broken! I don’t mind not having air conditioning, but some moving air would be nice. The blower assembly does not seem to be accessible short of an entire-dash teardown, however. I may get desperate enough to do so.
  • Rims
  • Subs

This week, my intention is to maybe take it to a detailing shop to clean the rest of the superficial imperfections out (stuff I can’t attack with a towel and kitchen counter cleaner) and to actually register it. I’m already having immense amounts of fun trolling drivers of more conventional modern cars with its Zeerust-future look and 27 foot turn circle. My ultimate fear is not that I have to learn to handle its peculiarities, but that I’ll forget that everyone else has wheels in front of them. I don’t have front wheels, just middle ones.