Continuing in a stream of seemingly never-ending posts with the word “Miku” in them (I swear! This will be the last one!), here is the tale of how I invaded Miku Expo, along with the work that went into fixing up Chibi-Mikuvan beforehand.
I had learned of Miku Expo around June when it was first announced, and I had even contacted the event e-mail regarding displaying or presenting. At the time, the “Expo” details were not yet on the website, so I had figured it was going to be an actual “expo” kind of event… or conference/convention; hence, my enthusiasm at the prospect of expanding the design-space intersection of engineering and cute anime girls. Well, it turned out to be basically an art show with all the displays pre-selected. The event contact was also just Crypton Future Media’s corporate contact form, so I never heard back over the summer. I tried contacting them again a few weeks ago, again to no avail. For something that’s allegedly so crowdsourced, they’re doing an awfully good job of corporate steamrolling.
So, pursuant to this series of events, in the true Vocaloid community spirit of fan-driven content, I decided was just going to show up unannounced and without permission.
But before doing any of that, I had to get Chibi-Mikuvan back into a state where it didn’t look like total shit. I generally am okay with letting the public view my stuff if it looks like shit, but not total shit. The impressive front left corner damage, for instance, had to be remedied. There were some other small damage spots and places with exposed foam that I wanted to fill in, so long as the epoxy had not yet crosslinked.

So up on the jack we go. In a scene awfully reminiscent of big-mikuvan bodywork, I’m working on sanding the paint down to raw fiberglass in the affected areas, then using filled epoxy to build up the profile again, and sanding down to shape.
I chose to not use Bondo in such volume because it is polyester resin based, which dissolves Styrofoam (the foam core of the shell). Instead, I mixed up glass microballoon and epoxy putty to the consistency of peanut butter (so it wouldn’t sag or flow) and used it like any other body filler. The epoxy resin is compatible with the foam, and the mixture sands down just as easily as Bondo would.

I’m working on two target locations. First, the “Phantom” corner. Second, on the upper edge of the right side, there’s some missing skin that was probably due to rough handling during the races, and because that area is the hand-hold area for getting yourself in and out.

The front left corner after the ‘rough shape’ round, looking as diseased and putrid as (for some reason) all vehicular bodywork does at some point. The darker red material is ‘spot putty” used for filling in little pinholes left over in the filling round, and it’s stained the usually white-colored epoxy putty pink.
I’m going into such detail on something as silly as a….well, a silly go-kart shell, because small pinholes usually cause spraypaint to fail around that area, and if I have all of the tools/supplies out already, might as well since I wasn’t rushed for time (yet…)

Some fine sanding, priming, masking, color coating, and clear coating later, you can barely tell I tried to Battlebot somebody with this thing! I extended the gray bumper accent on this side further than the original because it was a little truer to the real thing, where the gray bumper cover wraps around fairly close.
Lest anyone mistake me for an actual ‘body man’ or boatbuilder or something, all of this went down in basically a day and a half, everything was accelerated artificially by big halogen work lamps, and there is plenty of overspray and other instant auto body technician school fail-outs everywhere.
But from 5 feet away, it looks great!
With the appearance side of things taken care of, I decided to go further and basically race-prep Chibi-Mikuvan for what ended up amounting to half an hour of gentle cruising. I figured I was going to have to do this next spring anyway, so I might as well do it right now when my schedule is predictable and I am not putting out students’ shop fires (possibly literally) next spring.
There were three major tasks at hand to address the cumulative damage of three Maker Faires (Detroit, New York, and our very own home-baked one at MIT which I still need to report on!).
- The Trackstar 200 controller’s motor cables were slowly arc-eroding away due to the poor design of the flexure-based 8mm bullet connectors. In both New York and Detroit, I had failures rooted in the loss of springiness in the bullet connectors, causing the cables to fall out. Even with cable tie backup, it happened in New York.
- The Powermac G5 water pump seized up some time during New York Maker Faire, so it was left disconnected. During the MITMF, I ran too hard and overheated the Aquastar motor and partially demagnetized it! I’m guessing the pump was just not designed to be vibrated and thrown around… Those aren’t things you do to the typical desktop computer.
- The Aquastar motor was leaking at the water jacket badly, and then I partially cooked it. I wanted to replace it with the spare motor I had.

First, the connectors. When the bullet connectors lose their ‘spring’ from repeated insertions, the contact resistance goes up. And if your contact resistance goes up, it heats up the connection. And if it heats up enough, the shady Nylon connector shells melt.
That, and continued movement of the cables causes slow arcing damage to the connector. I consider this motor basically a write-off because of all of this damage, even though it “works” – I could probably jam a Dremel wire brush into the burnt out connectors and it would still work okay afterwards, but I wanted this motor out.

Here is the male bullet connector that went into the worst, most burnt out female side bullet connector on the motor. I’m not sure how this was conducting anything.
I replaced all of the male bullets on the motor controller extension lead for now; I’d like to find more robust high current connectors in the future, but for now, treating the symptom has to do. In the future, I might consider just soldering big wires directly to these connectors and skipping a stage of the bullet connectors.

While I was literally watching paint dry (you can see paint drying!), I coated the spare motor’s water jacket in silicone bathroom tile sealant and left it to cure overnight.

The “Fuse Hack to End All Fuse Hacks” from New York Make Faire was exorcised with a new replacement fuse holder. I will bring the spare next time. I swear. HONEST. Like, I’m so serious that I used all three formatting shortcuts right there.
As for the water pump, I had to explore a few options. This was chronologically speaking the first thing to happen after the MIT Maker Faire, but logically it’s independent of the other work so I can write it in whatever order I choose.
I wanted to move away from a computer pump and to a more harsh-environment tolerant DC motor pump, even if it might consume another 0.1 or so amps, because DC brush motor. One irritating aspect of the Powermac G5 pump was that it was not a positive displacement pump, so it couldn’t self-prime (slurp an air bubble and keep pumping).
Through the magic of the Internet, I present the first three unique results for ’12v water pump’ on Amazon. Here, I define “unique” as “not clearly a Chinese clone of itself”.

On the left, a simple centrifugal pump for computer and fountains and the like. In the center, a small pump of unknown mechanism, but it claimed to be self-priming. And on the right, a miniature diaphragm pump.
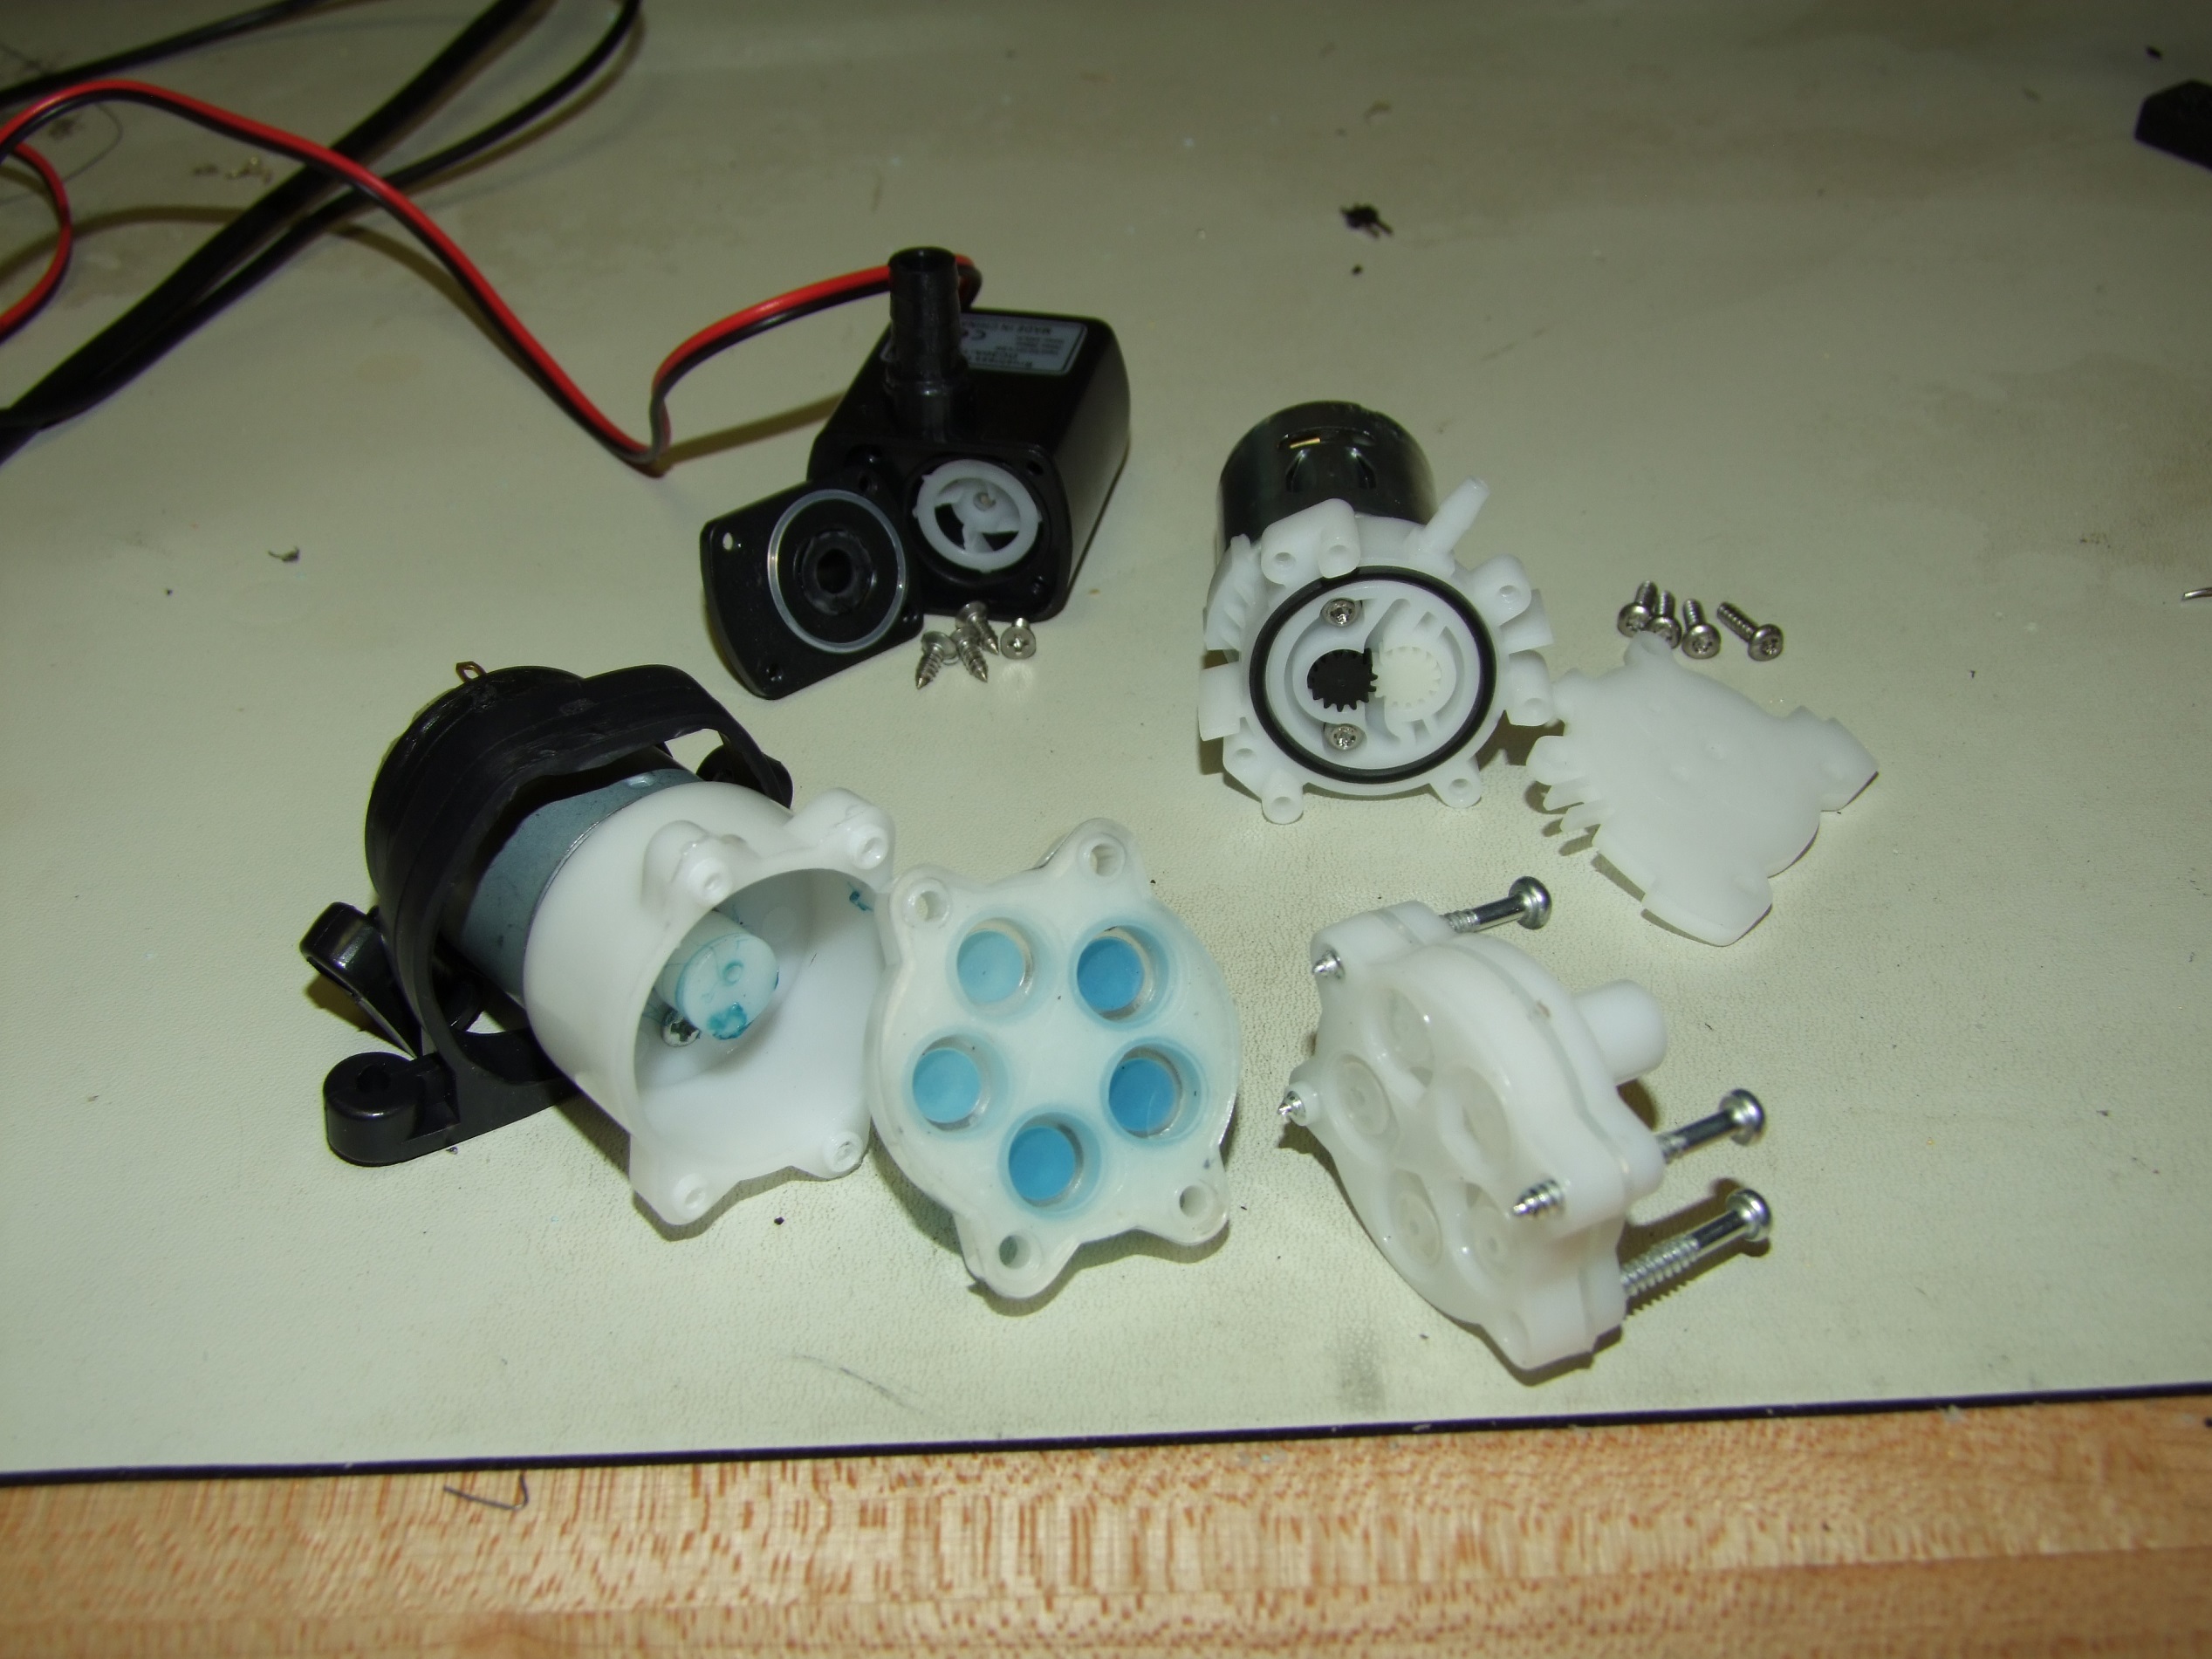
And here, in a miniature Beyond Unboxing post, are the insides of those pumps. That small pump of unknown mechanism turned out to be a gear pump. I was amazed at the diversity of technologies that I managed to rake in with just a search for “12v water pump”. The diaphragm pump was my favorite just by mechanism elegance, and I selected it for the job after seeing that it could actually self-prime when I tested it with a bucket of water and a tube leading down from the pump (so it would have to pull a few inches of water upwards)
The test was to see if I would get soaked or not. It passed.
The Internet Full of Things is your friend for any project.

Installation went very quickly, and I had the liquid cooling loop up and running in about 15 minutes after replacing the motor.

The entirely refreshed running gear, seen from the back. New motor, new cooling pump, new wiring (already pre-enforced with cable ties until I think of a better retainment implement).

And the finished repairs. I decided to leave the tire marks on the side for some character – and because redoing all of those stickers wouldn’t have been fun. While I had the whole thing masked, I also recoated the window outlines to make them more distinct. Originally, the window outline (what on big-Mikuvan is black colored) was going to be a dark gray, but the dark gray I bought was so dark it was basically same as black, so you couldn’t really tell except under outside daylight.
Miku Expo NY
I enlisted the help of Paige, a 2.00gokart alum and adamant Department of Silly Go-karts supporter who also came to the Detroit race, to load and unload, spot, and all of those other demo event things. This makes it sound like we planned any of this out, but rest assured it was not the case. I only did a little bit of scouting on Google Street View beforehand to see where I could possible park or stop, which in the middle of Manhattan is a bleak prospect. I also called some Manhattan-dwelling buddies to scout the area to see how it is in real life, and the prospects were even bleaker – construction and road repaving was everywhere.
In the end, we exercised the “Look like you belong there” card and just rolled right up to the venue entrance.

If my car is a 1/3rd scale, does that mean I only pay 1/3rd of the parking fee?
The reaction was positive as soon as we unloaded. The line stretched across an entire city block and around the corner, and there was plenty of sidewalk space to crawl up and down. Paige handed out Department of Silly Go-Karts stickers (that I made before Detroit) as I drove around slowly giving people high-fives.
If this were a PRS race Moxie round, we would have cleaned house.

After the hand-waving pass, I powered everything off and started letting people jump in to have their pictures taken. Some people got really really into it.
Let’s face it, I probably look just like that going around a corner.

And some fans made it look even better. Maybe I need to up my costume game for the next race season.

After the line started moving for entry, we packed it up and headed for the other half of the event, the “Expo” (slash art show). It was set up in Wallplay, a small corner art gallery, which is a thing you can only find in New York City. I had intended to pick up some Expo swag like t-shirts and posters, but that clearly meant coming on Day 1 (Friday). Pretty much everything was gone already.
Oh well.

So that’s how we drove for 8 hours to accomplish nothing in particular, except perhaps generate good will and maybe some future go-kart ducklings. One thing I didn’t do (since we wanted to make it back into town before ass o’clock AM) was drop by after the concert let out. I saw pictures of this Miku itasha in attendance and was immediately sad that I wasn’t also there.
I’ll have to push a little harder at the organizers if they do this again… or perhaps just stay underground and indie instead of selling out.