This is how not to charge large nickel-cadmium batteries.

The batteries I picked out (literally, from the bottom of a crate filled with cruft) for LOLrioKart have been problematic. They’re more or less in hibernation from being stored so long. While I’ve used my multicharger to try and tend to the batteries, it’s simple too low-power to really wake the batteries up.

Charging individual cells was an option, but not something I wanted to repeat 44 times, if not more, so I would try to ‘zap’ the cells to get them to a workable voltage, then charge the entire pack. But, by the time one pack completed (usually after 18+ hours at 6 amps), some cells would have zero-volted again in the other packs. This was obviously not a sustainable activity.

Plus, pegging a charger at maximum capacity for hours is unhealthy for the charger. Alas, after weeks of nearly constant work, my charger died with a little puff of smoke.

I’m not peeved. The fact that it lasted this long near the top end of its ratings means that the cheap stuff has gained some serious ground in terms of reliability. For those interested, here it is.

After that, I decided to pour a little more brute force into the equation. So now I present…

A 2,000 watt variac. A 50 amp bridge rectifier. 10,000uF of giant capacitors. And… well, that’s about it.

I even added little caster wheels so I wouldn’t have to pick it up and drag it around.

It’s a completely unregulated power supply that *sort of* functions as a constant-current supply when I hook it up to something. There’s no auto-cutoff, no temperature sense, no readouts (have to poke at it with a multimeter), and no SCRAM switch, besides a 40 amp circuit breaker (really 2 20-amp units paralleled). It vibrates at 60Hz ominously, and probably raises the level of the Homeland Security Terror Threat Level a notch just by virtue of existence.

And it works beautifully.  Throwing the switch on all 4 packs and giving it full crank  trips the local 120 volt circuit breaker (20a) within a few seconds. So, to keep things tame, I limit the battery charge current to 25 amps, a healthy 2 electrical horsepower (+a pissed-off pony) at 70 volts.

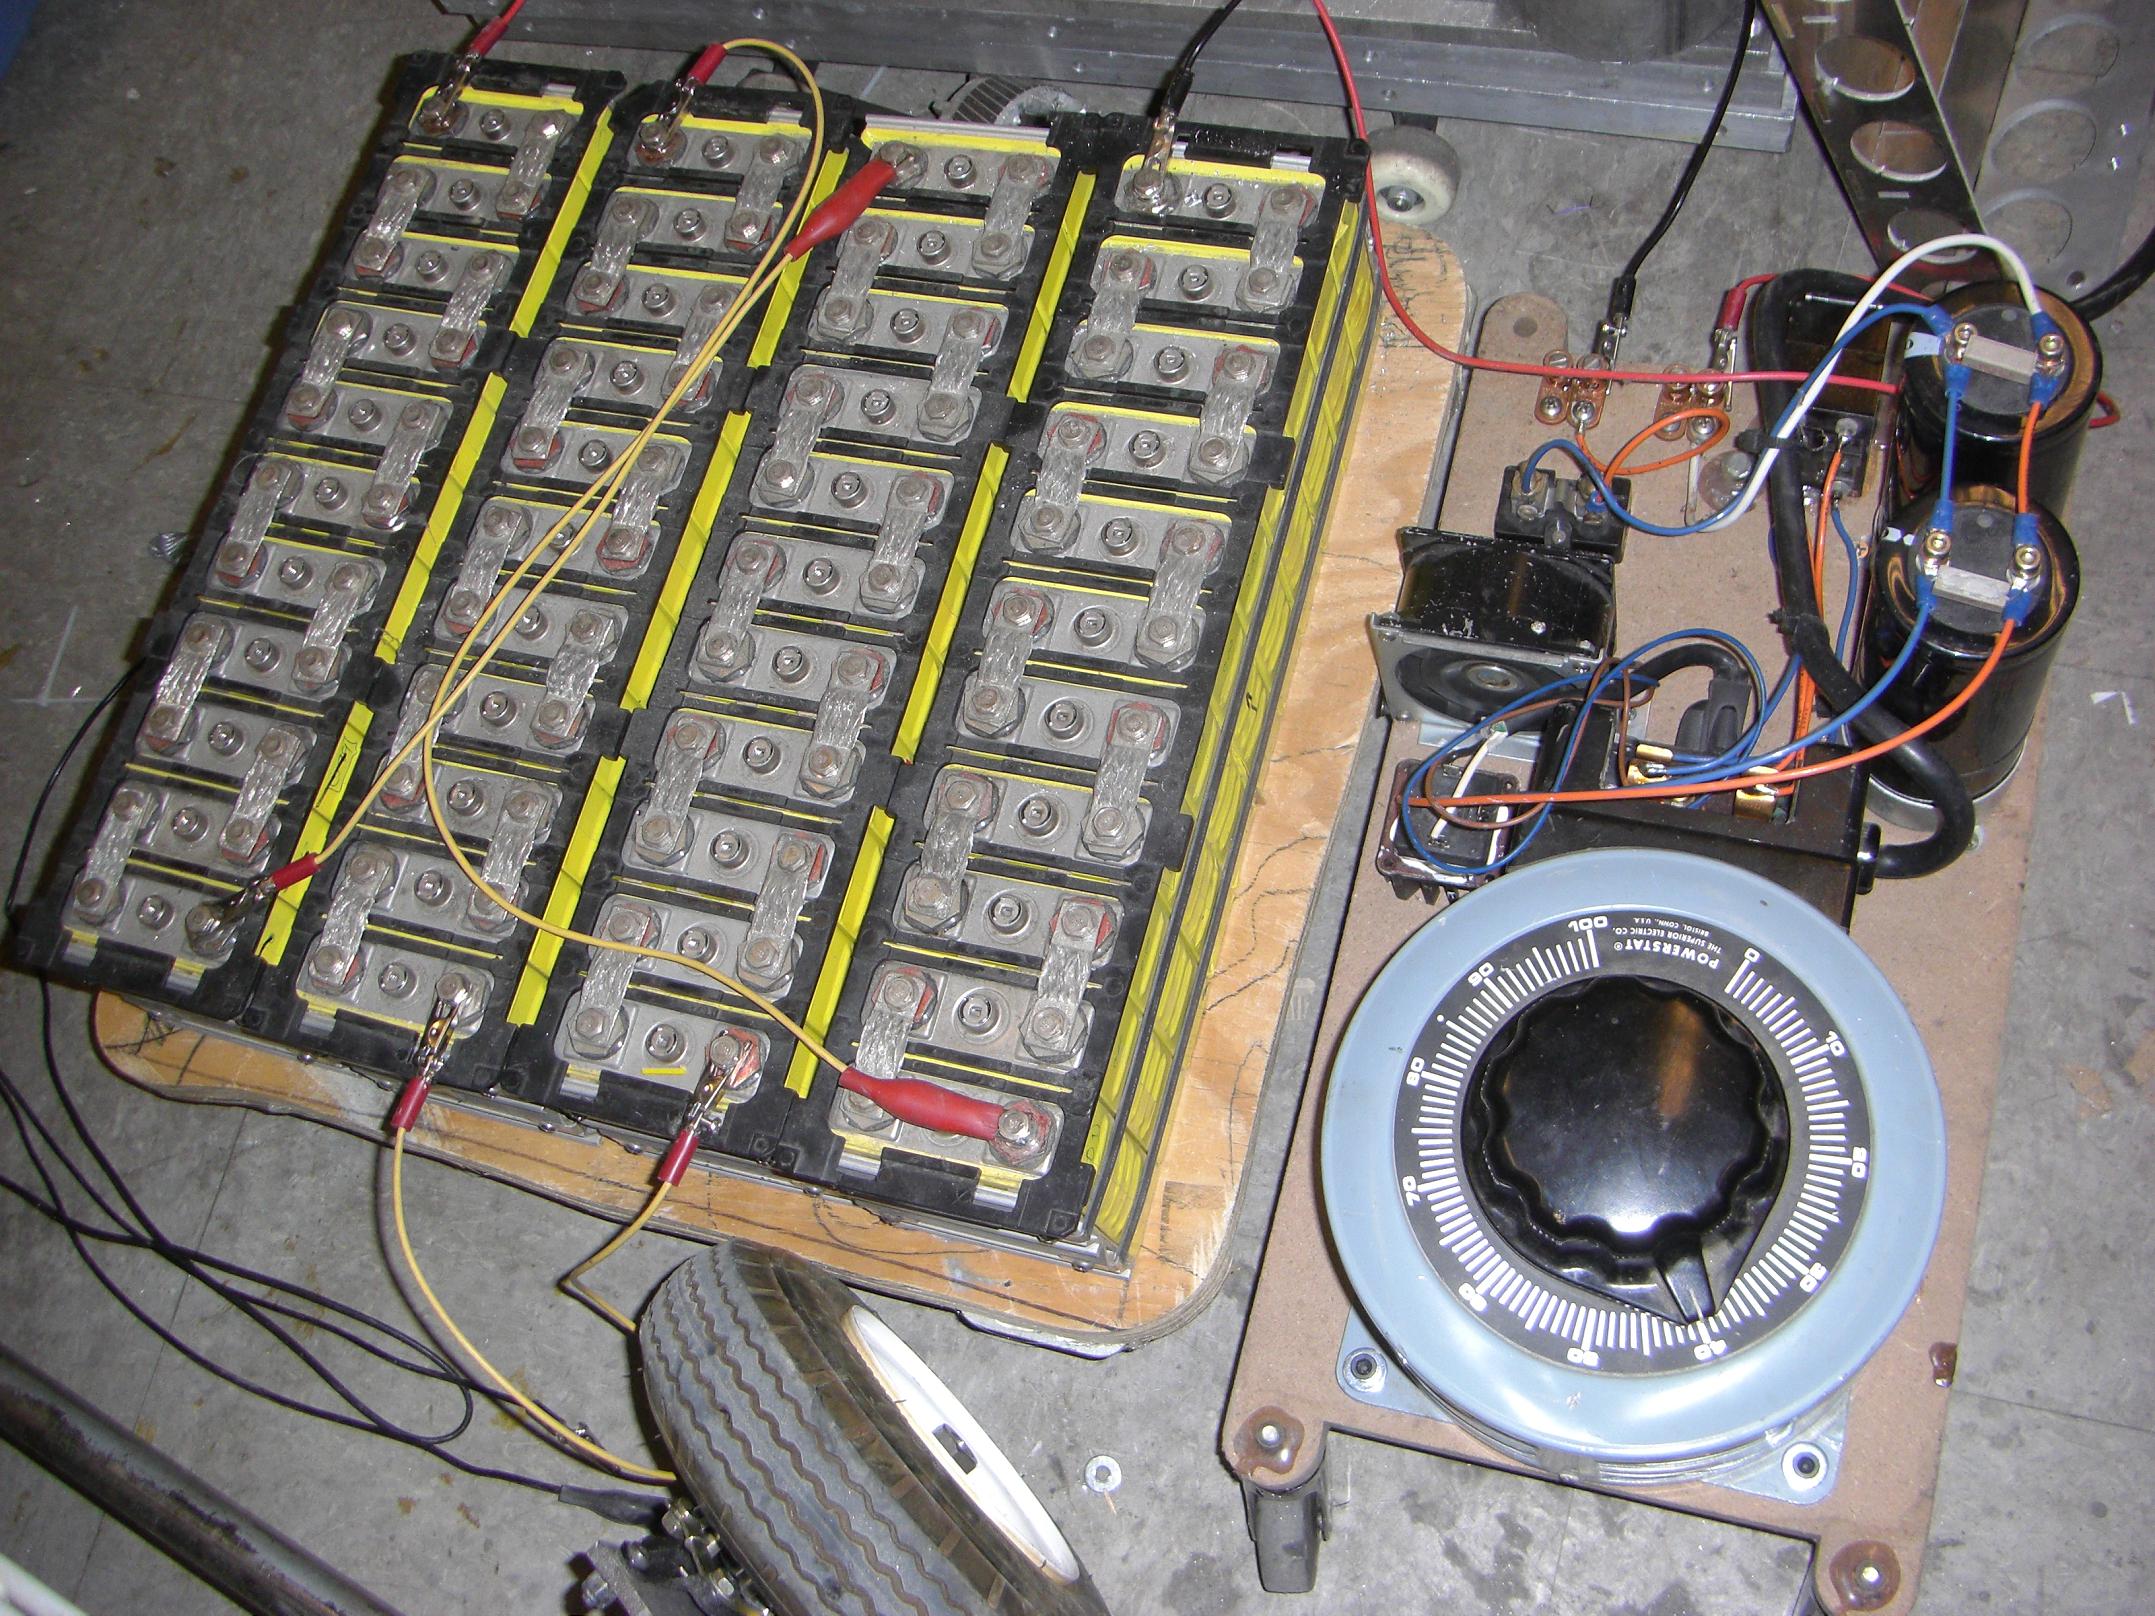
Note that this is a later pic, where I have added a current shunt  (upper left corner of the board) such that I can  get an amps reading without dying.

I actually lied in the title. NiCads charge optimally under constant-current conditions, and a great way to terminate the charge is the rate of temperature rise (dT/dt). For the time being, it’s “poke the battery, come back 5 minutes later and poke it again”, and if the answer to “how much hotter is it?” is between “quite a bit” and “alot”, I disconnect the power. This would be easy to systemize with a few thermistors jammed between the cells.

Currently (LOL PUN) though, I have to babysit it through the charge, lest I want to fill MITERS with a cloud of heavy metals and sodium hydroxide.

The bottom line is, the NiCds needed some ass-kicking to wake up. Work on LOLrioKart can now continue – I was losing interest for a bit because of the battery issue, since without batteries, having an Etek is sort of pointless. The goal is to get it at least running by Campus Preview Weekend, because…

What better preview of MIT is there than this?!

-c

Lithium battery near-disasters and LOLrioKart shenanigans

Lesson for everyone!

1. When you charge your 120 watt-hour lithium ion polymer battery at 6 amps, please make sure your internal charge-balance wiring is not made of 24 gauge wire.

2. If they are, and you should choose to run 6 amps through them, please make sure they are not tensioned against a rough edge in your vehicle’s all-aluminum frame.

3. Should they be so situated, please at least make sure the impending insulation meltdown and dead-shorting of the lithium batteries occurs more than half an inch away from the aforementioned batteries.

If all of these failed to be true, then welcome to my life.

I’m glad that said 24 gauge wire burned through its plastic connector housing before Bad happened.

A few minutes after setting up the charge, I heard my charger beep furiously, indicating a premature charge termination (that’s what she said?).

I turn around and an enormous white smoke cloud is hovering above the scooter back end. Fearing the worst, I grab the thing, bust through the nearest non-emergency door and pitch the whole vehicle into a snow pile.

The heat was intense enough to melt the acrylic connector mounts  and completely vaporize the smaller balancing connectors. The large Deans connectors were fine, because the short occurred through the small wire.  Very fortunately I got it out of there before the ass end of the lithium cells overheated, because angry Li cells are not to be dealt with lightly.

Combine with the very close packing of the cells in the scooter chassis and it could have been.. well, more interesting.

Anyone know what the plastic is that most R/C hobby stuff and electronic casings are made of? Whatever it is, it burns leaving a hideous, acrid, obnoxious smell that can only be described as one part lifelong chain-smoker, one part wet decomposing grass clippings, and one part burnt garlic toast. It also covers the surrounding area in a sticky black oil-like substance.

And it does not ever come out of things. It’s the same stuff which they make power MOSFETs out of, apparently, since those smell just as bad.

The batteries seem to be fine, but the back two cells in the belly pack may have localized thermal damage. Since I don’t like playing lithium polymer games, I might replace those two cells. This is also an opportunity to rethink my battery strategy. The electricals of RazEr are a complete pitch-together hack made of double-sided tape, Goop, zip ties, and heatshrink.

tl;dr use thicker wire 4 batts

LOLrioKart

Over the weekend, I was using my charger to recondition some found SLAs in the great MITERS lead-acid battery pile, before the really dead ones (including 10 car batteries) were sent for disposal.

I remembered I had one of these. And this. Thus, on a whim, we haphazardly taped together a rudimentary electrical system for LOLriokart out of some of those found batteries.

It was just like the first RazEr test run – a knob with no spring return in an awkward position requiring a delicate balance of dexterity and madness to operate. Fortunately, with a 4 wheeled vehicle, no balance was required.

Large model airplane controller and servo tester strapped to the kart for testing...

To my surprise, the sensorless ESC was able to get the kart moving pretty adeptly. I guess that “12mhz CPU” is good for something. (Also, there’s much backlash in the chain drive, so the motor can probably move enough for the ESC to pick up the switching sequence before it hits a load.)

A test video is here.  The 24 volts of SLAs were sagging to under 18 volts loaded.  I estimate the speed at maybe 10MPH, +/- some. Still, in close quarters like the N52 hallway, it was mildly exciting. Obstacles included night janitors, that fire extinguisher, several polished wood and glass art display cabinets, and the MIT Outing Club championship canoe.

And the very well-placed panel of plywood at the end.

See? I promised I’d get the kart moving before February! I just didn’t say how moving!

When the waterjet opens again, and I get a larger sheet of aluminum to finish the battery basket, then the *REAL* fun can begin.

Speaking of the battery basket, here’s the concept.

3D model of the battery basket.

Made of 1/8″ and 1/4″ thick aluminum, it will support the batteries (bounding-box outlines in clear gray) with room to add some shock-absorbing rubber or foam padding. The mounts will clip onto the chassis (bottom halves of the clamp mounts not shown), and be on adjustable-width sliding mounts. The adjustableness compensates for the fact that I don’t actually know how wide the kart, and these compliant mounts allow me to move the batteries slightly if something turns out to be in the way.

I decided to go for the 4-across mounting style just because it leaves more usable (continguous) volume under the basket.

The top plate will be made of whatever nonmetal I find when I cut everything else out. I have it spec’d out as wood, but it could be fiberglass, MDF, Lexan… etc. It will be spring-loaded to the top of the batteries by the corner mounting holes. It will also double as the electronics mount.

Combining the topic of electronics mounting and Conveniently-placed Plywood Planels of Kart-stopping (+1), and continuing my everlasting quest to engineer my way around simple and reliable solutions, I have thinking about giving LOLrioKart power brakes.

Using a beefy servo mounted on the brake mount on each front wheel,  and some interfacing with a foot pedal (you know, like a servo tester, or a microcontroller interface that also handles other vehicle auxilary functions), just use the servos to yank on the levers. With such an interface, I could actually adjust brake balance, timing, bias, and that stuff.

Wait, can’t you just run some cables? MITERS has bins full of bike brake parts I could just pull.

Yeah, but I’m lazy. I would much rather rebuild the brake mounts to include mounting provisions for a servo, then interface with the brake pedal using a clumsily-built and possibly unreliable electronic interface. It’s all the rage these days, like aluminum billet where a simple clamp-and-weld would have sufficed. Besides, since this is an incredibly bad idea to begin with, I might as well add another layer of bad-idea.

(It is indeed easier, faster, and better to route two Bowden cables – don’t get me wrong.)

Work on LOLrioKart will probably taper off a bit as the semester begins.

Speaking of semester, today is Registration day (as well as Techfair), and I need to wake up before sunset.