After the BattleBots 2022 season was all over in October, I took a bit of a slump away from #OperationIDIocracy and also just working on stuff in general for a little while. The warm fall days were soon going to be replaced by cold, moist, and dark winter, my least favorite season by a strong margin. I spent a few weeks just going to meetup and shows, as well as tidying up this here website (the obvious flurry of activity in October – November 2022 is a telltale sign I ran out of other things to do).
In retrospect with all that went down… maybe I should have accelerated the schedule before the winter ugggghhhh kicked in, but at the time, I wanted to avoid the dreaded project car fate of being burnt out by your own project car.
I decided that Thanksgiving weekend of 2022 would be Vantruck’s last hurrah before it’s laid up for its RCOH and mid-lifecycle update. With the engine built and mated to the transmission already and as many parts in house as I knew to order, I had to pull the band-aid off.
Here we go! Bright and early on Black Friday, I started pulling everything out of the bed. The toolbox was unloaded onto some carts, and I also removed the big bathtub (and subsequently sold it – I didn’t like how much water it collected and would rather invest in a spray-in liner). The fuel filler hoses were unscrewed from the fender wells.
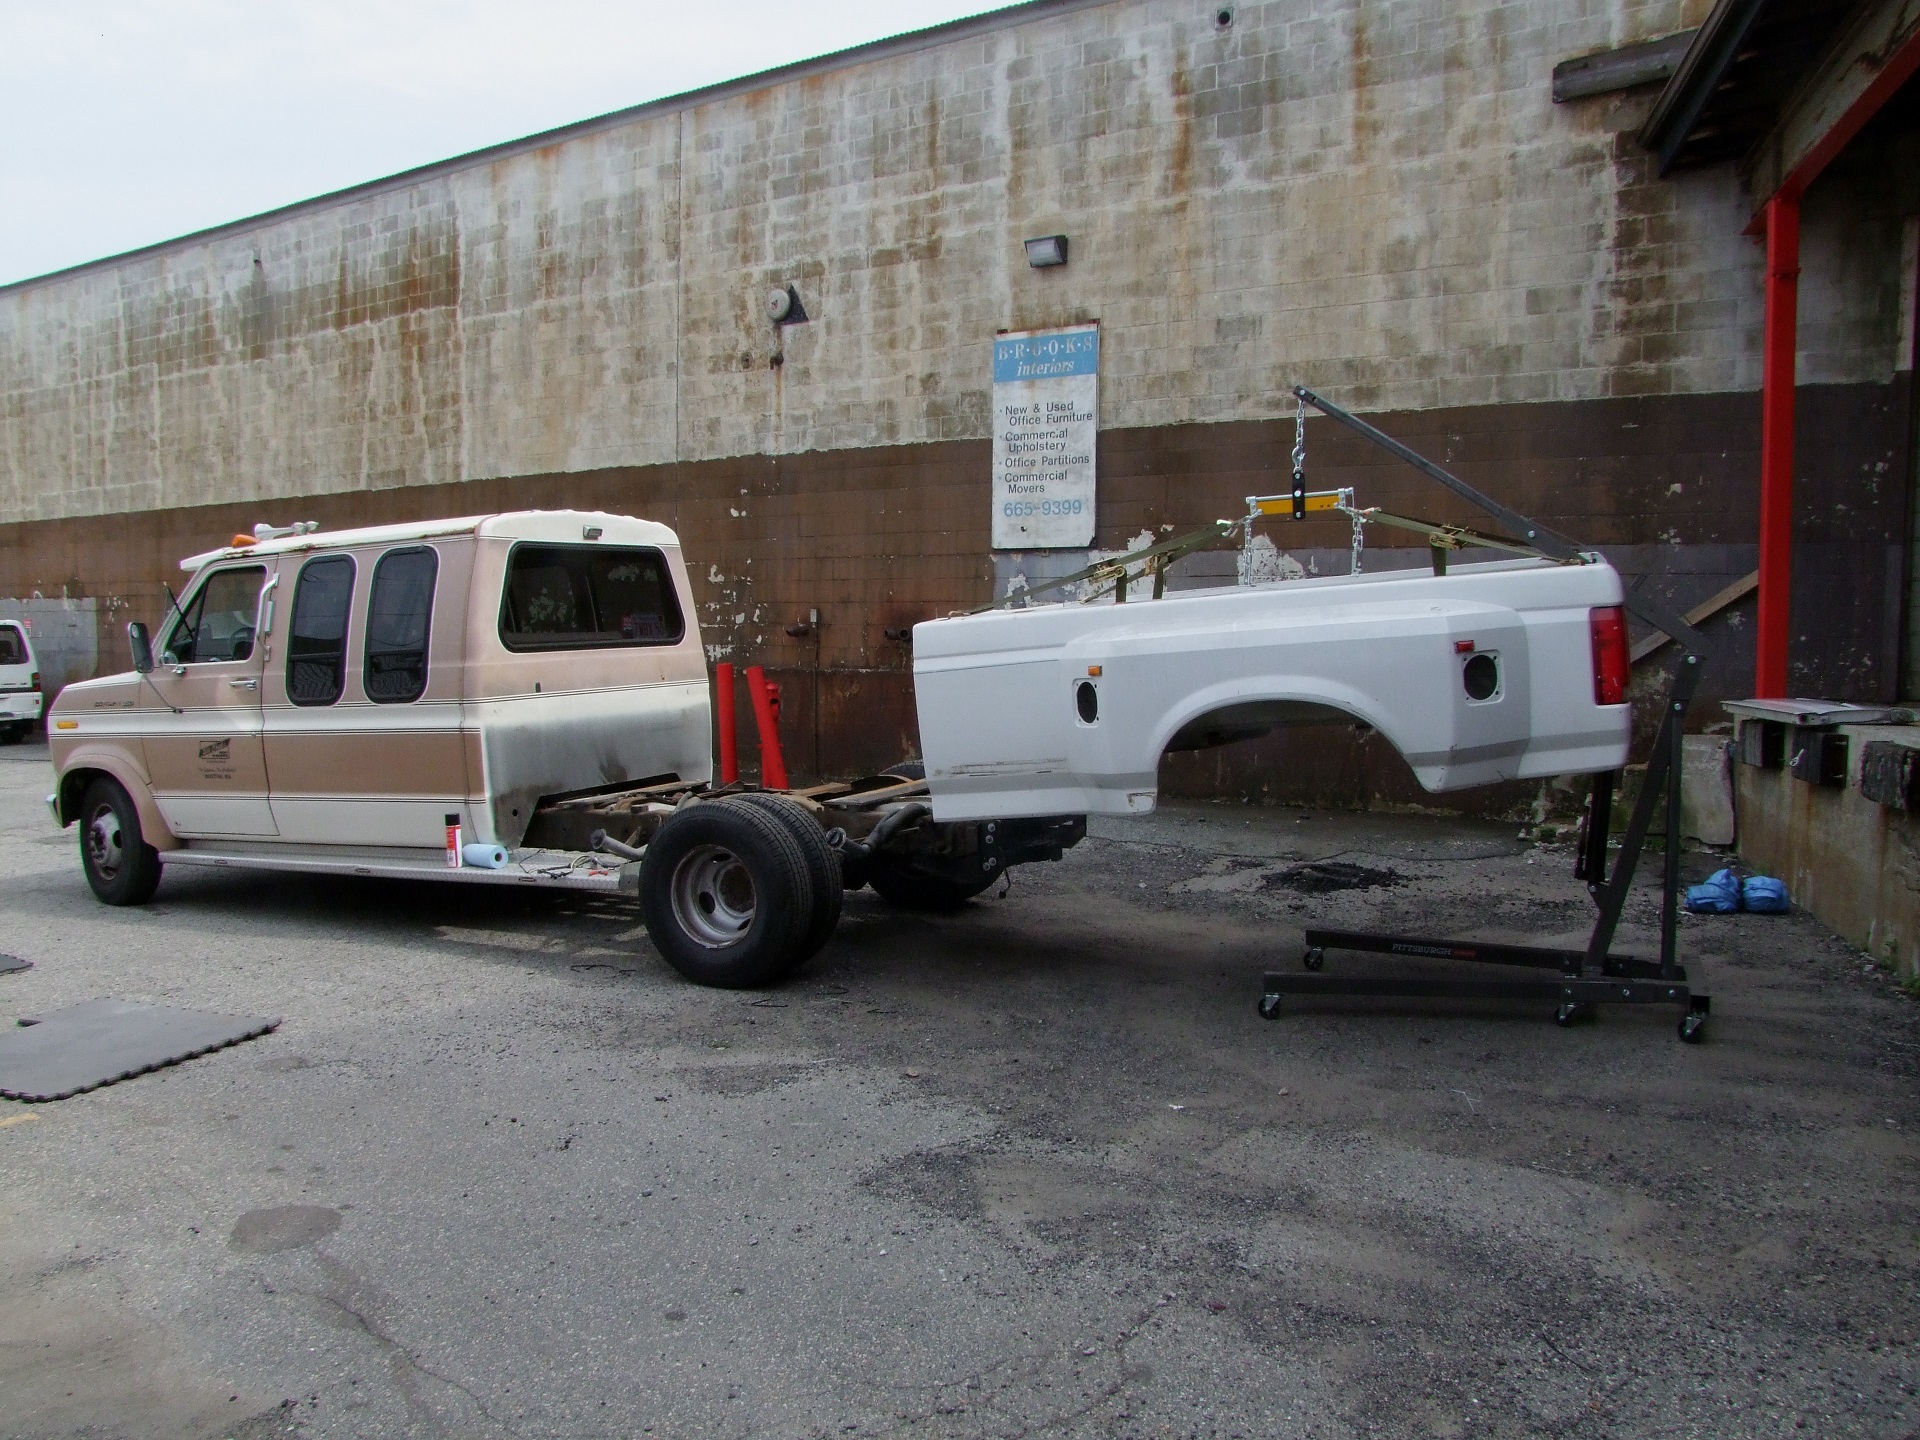
After the Glorious Van Butt (oh crap, i never posted about that) comes off and the bed bolts are removed, I rigged up the extra long #OSHACrane arm again for the purpose it was built… all the way back in 2017!
To pull the engine from Snekvan, I turned it into something I called Econospoon, but it worked the same still: Two long ratchet straps were slung over it in an X shape. The arm was made long enough to reach the center of the 8 foot bed from the back.
Then I just lift it upwards with the crane and drive off! I landed it on the previously-built bed dolly with some collected help, and we pushed the bed away.
Vantruck was taken to its somewhat-temporary-ideally-not-final resting place, where it remained until The Big Funny happened. Considering I left it taken it apart for all of December and January like this, with parts scattered everywhere… Yeah, I deserved that.
Really, I was now just going scorched-earth and removing everything in sight. The first thing to come off is the FITech fuel injection gear, which I planned on reselling. This canister is the good ol’ “Fuel Command Center”, which yours truly popped apart and documented a hack for when it was causing problems. It’s been running ever since then, with no problems at all.
I had no system or science to this dissection process. I just removed everything that the tool I was holding in my hand could loosen or unscrew, then grabbed a different tool and started that process again. Needle nose pliers? Sure, those work for hose spring clamps, screws and nuts under 1/4″-20 in size, and vacuum line retainers too!
The thing with these old “analog emissions” engines, as I called it, was the miles of hoses and vacuum lines they all came with because of tightening emissions regulations after the 1970s predating computer-controlled closed loop fuel injection by a hot decade or so. The commonly termed “Malaise Era” was when a lot of these big American engines became encumbered with vacuum-powered thermostats and surge valves and ported one-way turboenculabulators and the like. One of my remarks when I heard the 460 only made ~220 HP in this time was something to the effect of “Never have I heard of so little being done with so much”
Vantruck’s EFI retrofit made almost all of these slowly deteriorating hoses and valves unnecessary…. not that I think any of it was working to begin with. Besides what I removed during the FITech install in 2017, it was all left in place at the time.
One thing I could not wait to get to was a chance to basically start over from scratch on the Ford Spaghetti OEM wiring. Not only that, but Vantruck being an aftermarket-finished vehicle means the Ford Spaghetti got some special meatballs connected to it too, all over the place. The wiring on this thing has always been a disgusting mess, not that the others were better or anything.
In fact, working on the wiring for the many IDI ven has traumatized so much that I vowed to create a near-OEM grade integration for the diesel electrical system. That is an entire side quest to write about, something I began sketching out around this time as the L.E.W.D (Legacy Electrical Wiring Distribution) harness.
I’ve knocked the front off now (ouch, those rust holes on the front right fender sill plate) and am removing the transmission and oil cooler hoses.
I planned on reusing the external transmission cooler, but the 7.3 IDI will have its own oil cooler already, so this part won’t make it back on in the interest of minimizing unnecessary hosiery.
The 460 radiator is big, but not as big as the IDI radiator! The brackets were pretty rust-welded to the sheet metal, and I broke the bond by raising it with a jack. I’m planning to clean up and re-coat or rustproof Bracketry as I need them on the reassembly path later.
The big 460 sits rather low in the chassis. For some reason it was never apparent to me, but I guess I just never looked at it in the disassembled state. I started removing the accessory drives and deeper-buried fluid lines at this point.
I found a funny failure mode when I removed the ignition control module – the entire potting/sealing compound had detached from the module. In one piece. It was literally just sitting there under it. Protecting nothing in particular from the elements. The module underneath clearly showed some corrosion of the casing, and who knows what else.
I’m not sure if this was part of the cause of Vantruck’s slightly funny running and bad attitude when it was raining or wet, but I’m also not saying it wasn’t aliens.
Pretty much everything’s gone from the engine side of things, so I dove under to release the Gear Vendors unit, which I’ll also sell. With the planned 4-speed transmission install, I didn’t see a point in running a “double overdrive” which I’ve heard some people do.
I’ve never actually removed the exhaust pipe from Vantruck before, and didn’t see a way to remove it from the top side, with how the manifold extended under the cabin sheet metal. Well, with enough extensions and swivels, anything is possible from the underside, I suppose!? This is the passenger side, where everything comes really close to the frame rail. The driver side was pleasant in comparison.
One of the very last operations was to release the main engine mount bolts located on the engine cross-member.
With the last hoses removed and transmission linkage released as well, only gravity held the 460 and C6 transmission in.
I had built up around me an enormous pile of Van Paraphernalia. No other way to explain it! I was hoping to sell all of this soon to a single party if I could help it, alongside the engine and transmission. After all, these are all parts from a known running truck.
On the next episode, I’ll demonstrate a rigid pull of the 460 and C6 together, without separating them, from the van chassis….
I received the message during the middle of Sunday at Momocon.
Come and get it. 700
– this dude
Still donning my trademark cat ear headphones, I ran through the crowd towards one of the many exits of the Georgia World Congress Center in a attempt to get some reception for the U-Haul trailer reservation.
It was too late in the day by then to get out and do the retrieval, so we struck a time for Monday. The next morning, I hitched up Vantruck at the local U-Haulmongers. At this point, these guys basically know me by name, and I pretty much just walk up and grab whatever I need. This is how you know things have gotten really bad.
So what the hell was I getting? Behold, this absolute something:
That’s… yeah, you know what. I don’t know either. Because I always have a heartbeat on the regional terrible diesel Ford van market, I tend to see listings pop up not long after they’re posted. And trust me, due to the prevalence of the van chassis in commercial applications, there are a lot of oddities.
This thing actually showed up for me back in August of 2021, and I went to inspect it at that time. It was located across town in the “acres of metal recycling yards, tire shops, and half burnt-down apartments” neighborhood, of which Atlanta actually has a couple but that’s besides the point. At that point the seller wanted $2500, which was quite optimistic for a non running chopped up ambulance chassis without a title. I figured I’d let it bake for a while before lowballing him, and then promptly forgot about it due to the impending Battlebots season and the fact that, you know, I already had three of these damn things.
That was, until that fateful Sunday. Basically, he was going to junk it the following week so it was me or the yard from whence it came. That’s right – I learned from him that he bought it from a junkyard which had built it as a side project. It certainly fit the bill, with a 12 foot flatbed and that makeshift towing empennage for dragging scraps around.
You know what? A little over the dollar amount it would have scrapped for is a great value for (YET ANOTHER) potential engine donor for Vantruck. If I build up a big enough pile of vans, surely one of them will be useful, right?
It was clearly an ambulance chassis with the box removed, and it still had the ambulance light and siren control console (but with all of the wiring scrapped out of it). The odometer showed around 58,000 miles, which seemed reasonable to me – ambulances usually don’t go very far, just idle and hang around a lot.
With immense difficulty, the seller and four of his buddies helped me winch the thing onto the tow dolly. Everyone made sure to take their guns out of their pockets and put them on the sidewalk beforehand, because safety first! We promptly discovered the front axle was too wide for the tow dolly – the lug nuts were digging into the plastic fenders, and there was no flex room available (These tow dollies rotate slightly at the axle centerline to aid in turning).
After some “SURGERY”, the right fender of the tow dolly and right side step of the… thing were removed, as right turns would necessarily be tighter and require more articulation. I bought a round of beverages for all involved for the three hours of finoodling this took.
And an hour later, I’ve bestowed yet another eyesore upon the neighborhood. A pox upon my house in particular, said my neighbors, presumably. As night fell, I prepared the tools and substances needed to perform a routine Unknown IDI Diesel Reboot. I’m not sure if I should be proud that this is now an SOP for me.
So in the end, this thing needed…. absolutely nothing.
Yup. Two freshly charged batteries and cleaned up cables and terminal clamps and off we went. I didn’t even get to use the Spicy Canned Air.
The general vibe with these old engines is that they need 1.21 jiggawatts to build the compression and to run the glow plug system, so any decay in the electrical system will quickly affect their ability to start. And for most people, batteries and electrical systems are basically black magic, which is why so many of these listings say “Needs fuel pump idk” when the real issue is they can’t turn over fast enough to light off.
I pulled it gently off the dolly and slowly backed up the driveway – that front tire had fallen off the bead, so it couldn’t be inflated. I had to replace at least 3 tires due to dry rot anyhow, so no biggie.
Not wanting to extend my U-Haul rental another day, I had to now put the fender back on before returning it. Mikuvan acted as the yard shunt to get the dolly closer to the garage. These fenders have 4 bolts holding them on, but the light is not on a connector – we had to cut the cable off, so I had to reattach it.
I quickly spliced the cord back together with some solder-shrink splices. Notice that these wires have already been spliced once? Makes you wonder if someone has been in here before with the same idea.
Maybe I should mark that down as pre-existing damage on my rental contract…
Nobody will ever know the truth.
The following weekend, I made a trip to my favorite local Hispanic-owned used tire peddler, where the tires are stacked high and haphazardly. These nice folks also know me well at this point since I keep showing up with terrible van after terrible van. I had to replace three of the tires (the passenger front and both rears) because I was concerned about how much they were flaking apart in my hands.
This was a good chance to actually see the difference between a real Ford dual rear wheel axle setup and Vantruck’s fake dually conversion. That’s right, for the longest time, Centurion didn’t use a true DRW axle because Ford didn’t make the > 8500 pound GVWR cutaway van chassis yet. Vantruck has dually spacers, front and back!
This makes its front track very slightly narrower than the factory dually setup here. But it seems like that makes all the difference when it comes to fitting on the U-Haul tow dolly.
On the rear axle, the drum brakes are wider, there are more leaf springs, and the aftermarket ambulance upfit also added airbags. This is a 11,000 pound gross weight chassis based on the door sticker. Vantruck, in comparison, has a 9,900 pound label (probably for regulatory reasons) and the heaviest GVWR stock non-cutaway van of the time was 8,500 pound.
The most notable feature of this abomination is the homemade tow rig sticking out the back. It’s a vernacular attempt at a hook-and-sling wrecker, as far as I could tell. The body is entirely made of 1/4″ thick diamond-plate steel welded (WELDED) to the frame with 1/2″ thick plates and 1/4″ thick angle irons. WELDED. This whole thing was rigid!
The Towing Empennage was held in with bolts and backed up by these chain binders which appeared to brace it further up the bed. I’m guessing it’s removable for hauling or picking up scrap metal, and attached whenever it has to go recover a WE PAY $$$$ FOR JUNK CARS subject.
Just like an old-school tow truck, it was run by a winch and cable instead of hydraulics. This is just a 12,000 pound off-road winch, bolted to the body. It still worked if hooked up – I winched up the tow bar so it wasn’t at Stab Everyone In The Face height by gently tapping a battery with alligator clips to it.
Overall, I respected the builder. As I said, it was clearly a vernacular attempt at making a utility vehicle for a job at hand. There was nothing that I found outright wrong or incorrectly made. Really! Someone had a appreciable learned-on-the-fly understanding of structures and the strength of materials. The welding was messy, but all solid looking.
It’s not how I would have done it if you told me “Make a tow truck that’s also a flatbed that’s also a shitty cut up ambulance”. But it’s how someone did it, and the sheer effort put into crafting a singular and unique tool like this is something I can bro-nod at.
Via my terrible vehicle chat groups, this object was christened Econocrane, for being made from a Ford Econoline chassis and having a crane sticking out the back.
As I said up top, while the mechanical and fabrication skills needed to bang something like this together is more common, the electrical complement is not. This is the level of spaghetti wiring that was prevalent throughout the cabin and towards the rear here. I had to chase these dragons upstream a little to find the original van tail light and body lighting harness.
That’s because it didn’t really have any taillights to speak of. I ordered these “Generic Truck Combination Light” units and bolted them to the side of the bed so I could at least drive it places.
In this photo: A tow truck that is doing useful work, and a tow truck that is ???????!!!!!!
As expected, Econocrane was slow. The immensely heavy all-steel bed and empennage made it feel somehow slower than Snekvan when I got it running, almost Murdervan-tier with its older 3 speed transmission. Driving it was very binary – it was pretty much either full beans or nothing, also a common sentiment among vintage diesel owners. I never took it over a truck scale, but I was betting this was north of 7500 pounds given all the 1/2″ and 1/4″ steel plates making up the back half.
Speaking of, the transmission also seemed to be on the way out, as it needed a few seconds to think and build up pressure or something if it ever was taken out of Drive. It also had a habit of holding first gear forever then smashing into second or third. Definitely a rebuild core if I ended up sacrificing this thing.
I took Econocrane around town and to the lab a few times because… hey, why not scare your coworkers some more!? I also took it back to the junkyard I THOUGHT might have been responsible for it. They denied all knowledge of it ever existing.
Sus. To be fair, there are probably a half dozen scrap yards around here and the seller couldn’t remember where he got it from, only pointed thattaway.
At one point, I followed the cab wiring around to see if I could get the sirens to turn on again. Unfortunately these sirens ended up being just big loudspeakers, not the self-contained kind. So they needed the controller, which had been ripped out long ago.
If a Ford van chassis is impossible to service, then an ambulance integration piled on top of it is basically needing quantum entanglement to change a fuel filter. These ambulance builds usually add a lot more wiring, switches, lights, etc. and this one in particular had several runs of underhood heavy-gauge power wiring added, including a master shutoff and a current shunt (seen top center above the grille).
Heavy wiring also extended out the former cab back, presumably to an inverter to supply house power to the “ambulance” bit. A big electrical distribution box was placed under the driver’s seat which fanned these wires out from the engine bay feeder. Coolant and A/C hoses also were greater in number than a typical van since the box would have needed climate control. On top of all that, there were controls for the air suspension.
I continue to maintain Ford never intended for anyone to “service” these things so much as run up the 50-80K miles in a fleet before problems start appearing and then sell it down the river. To me. All of them.
It’s turbo time!
Econocrane was funny to have as an object for a few weeks, but beyond being visually interesting, it was just another 1991 IDI chassis much like Snekvan was. By July, Snekvan had long been knocked down and taken by the methy scrap man, with all of the turbo parts stashed. I began wondering if it was worth putting a second prototype together.
This would allow me to start clean and basically see if I could put my own “turbo kit” together and what issues I’d encounter with an from-scratch install. Snekvan had been built very incrementally and there wasn’t really a data package or installation notes besides whatever I scribbled in my notebook. Because I wasn’t sure if I could even manage the swap project, the plan for Vantruck all along as been to perform the swap first, then install my setup, instead of doing it all at once.
Econocrane therefore became an opportunity to refine the design and process. So I challenged myself: Could I do the full install in a weekend?
Let’s begin. First, I removed the PCV valve (or CDR, or the ham can…) in preparation to turn it around. The PCV has to be attached to a source of atmospheric air or mild suction instead of boost pressure, so it can’t point directly into the intake manifold any more.
I used an expanding pipe plug to block off the vent hole. Snekvan simply used a rubber grommet silicone glued in place.
The CDR turnaround bracket was reused in full from Snekvan, including the heavy hydraulic hose stumps used to convert the flush output hole into something I can put a breather hose in.
Snekvan just had the glow plug controller hanging randomly wherever, but I went ahead and formalized the measurements and made a bracket out of aluminum that will let the glow plug controller bolt in slightly lower. This was one of the points of improvements I sought to make, as one of the problems for people turbocharging the IDI is always repositioning this glow plug controller.
A lot of creative solutions involving valve covers and extension brackets exist, but I was hoping I could escape the worst of the engine bay cramming with my approach. This bracket makes it so that no wire cutting/extending has to happen.
I just twisted the harness around to face the other way, and bolted it in.
The turbos and downpipes were already made for Snekvan, so installing these two was quick and painless. The same main oil gallery spigot on the driver’s side rear corner of the engine block was used for the turbo oil feed.
I routed remaining segments of the “slinky hose” from the turbo outputs up to the engine bay. On the right, it follows the transmission dipstick. On the left, the auxiliary (rear) heater hoses act as a guide. Vantruck does not have these hoses so I’ll have to figure out another way to constrain it.
Notice the left hose is black and the right is orange. The left one is made of neoprene, which is not oil resistant. I just had it standing around and decided to use it instead of buying more silicone hose. This would prove to be a mistake as it melted after a while, so later on it was replaced with more orange silicone hose.
In one morning/lunch period, the turbos were installed and hoses run. Not bad so far!
Up at the front of the engine, I made another turbo oil return assembly by drilling a panel-mount barb fitting into the timing gear inspection cover.
I decided to go for broke right away and cranked up the fueling on the injection pump all the way. I think it was around 1.5 turns of the Magic Hog Cranking Screw before I felt it stop fully.
Here is the finished “upstairs” integration with the Onyx intake adapter curing. The wastegate actuator hoses are also installed.
With the afternoon progressing, I went on a quest to collect basically every 2.5 inch exhaust pipe in a couple mile radius. I had to mate the turbo outputs to the funny dual stacks and I wasn’t going to do it very professionally.
I recovered the exhaust system I banged together for Snekvan, including the “Trumpet of Shame”, to reuse the output flanges and most other parts.
I’ll be honest, putting this exhaust adapter setup together took longer than installing the everything else. There were several awkward turns to make because of where the stacks are positioned. Also, I never really took a photo of them… but the 5″ diameter exhaust stacks are welded to a 5-to-4 inch adapter, which is welded to a 4-to-3 inch adapter, which is welded to a 3-to-2.5 inch adapter before making the turn.
This was simply more impetus to keep Vantruck’s eventual exhaust system to 3 inch tractor stacks or Corvette side pipes or something.
And here we are, both sides finished on a Sunday mid afternoon.
The last step of it all before bootup was wiring in the oil bilge pump into the ignition circuit. I used the same Key-on/Run circuit as Snekvan, though for Vantruck I want to figure out how to use the Accessory circuit or a timer relay so it doesn’t keep cycling the glow plugs.
Overall, I felt pretty validated that the “turbo install” will go smoothly. I specifically wanted to avoid invasive surgery as one of the requirements of the project, and I think this was accomplished. I only really had to drill 1 hole for the oil return fitting, and everything else cutting-shaping-grinding related was just fitting that exhaust up. I’m not aiming to ever sell these things as kits because my target market would be like 7 people (But we care… very much…) but hey, it’s contributing to the knowledge and shitpost base!
Alright! It’s time to go test drOH MY GOODNESSthis thing is far quicker than it should ever be. It was a relatively low mile engine with great compression (it never failed to light off with what felt like less than one crank rotation). The Magic Hog Cranking Screw was bottomed out, and the wastegates were left from Snekvan at about 15 PSI (I never put the boost gauge back in to verify). I was easily contesting the interstate at-will, and the straight-piped exhaust stacks shooting out bald eagles and airstrikes whenever I went to pull out to pass simply added the corn-syrup-candied cherry to the whole experience.
This was truly an OBNOXIOUS, MENACING machine.
I tried dailying it a few times and just couldn’t stand the exhaust noise. This was good to confirm, because Vantruck definitely needs mufflers now. The deafening booming got old real fast. On top of that, my opinion is that a straight-piped IDI engine actually sounds like garbage. I’m not sure what property of the firing order or manifold design causes it, but they sound like they have a skip or missing cylinder.
One thing I noticed was that the weenie little “clicker’ fuel pump it came with just couldn’t keep up with the fuel demand any more. I’d have plenty of fueling for the first few seconds… then it felt like it runs out of steam. Friends told me to get a high-volume fuel pump and pressure regulator, and so I grabbed a gently used Holley vane pump off the orbiting cruft cloud of eBay, along with a matching regulator.
The regulator is quite important because fuel inlet pressure strongly affects the timing inside the distributor pump, and too high an inlet pressure basically causes it to lock timing too far advanced and the engine runs like trash. I dialed the regulator in for 6 PSI. You’re technically supposed to re-time the engine (by shifting the distributor pump) if the inlet pressure ever changes, but meh.
Here was another good lesson learned for Vantruck: I hate this fuel pump. Being made for racing applications, it’s very loud and draws a ton of power. I think for Vantruck I’ll stick to a larger capacity Facet pump, such as the one I put on Spool Bus, maybe two in parallel
You know exactly what’s happening next.
By mid-August, with the system having built up a lot more trust from me driving it to work and randomly to meetups and events and all… There was only one place left to go.
Yep, a three hour jaunt up to my favorite proving grounds. No van of mine is fully commissioned without this last important sea trial.
Besides it being thunderously loud the entire way there and back, I didn’t have a single problem. This is quite encouraging for the Vantruck build.
Econocrane was another squirrel-brained adventure that turned out to be a very net positive (??????) experience. I managed to make some incremental design changes to the turbo system, and found out that it installed from scratch very painlessly. I then ended up with a machine that was the very embodiment of American excess: Loud and obnoxious, menacing and antisocial, fuel-guzzling and emissions-spewing, built by one or more people with their hands and only one brain cell between them all. A rented brain cell.
Then I proceeded to do fuck-all with it all fall and winter. Econocrane served its purpose, so I just kept it stashed in the yard. And so, when the city came a-knocking, I decided it had to be culled.
Luckily, the Econocrane story has a happy ending. I was lucky to find a “wholesale buyer” in none other than the wonderful, fantastic Speedycop. The builder of many hilarious LeMons race vehicles, you probably have heard of his work if you’re knowledgeable of Car-tube and the world of shitbox racing.
Jeff and friends tripped down from his new Tennessee fortress and took Econocrane off my hands along with the two Citicar cheese wedges, which I’ve been sitting on since spring ’21 without a single post about. He has plenty of plans for these things, so stay tuned to his channel and page! Econocrane in particular will be a drivetrain donor for a terrifying new build he wants to do, which I’ll happily race with Vantruck because hopefully we’ll finish up around the same time.
The funny thing is, the Speedycop Walled City is located mere minutes from the Tail of the Dragon. With how many times a year I tend to end up there, it was almost like having a custody sharing agreement. I occasionally dropped by to say hello to the children:
On the next episode of Big Chuck’s Backlogged Vans: A quick return to robots as I took Sadbot to a heavyweight sportsman’s style tournament in Houston. Yeah, 2022 was an absurdly intense year! i”LL fInAlLy LeArN To rELaX AnD ChIlL OuT


