So I mentioned at the end of the first bed drop operation that I was definitely going to do a second one now that I had seen what went into it. As it turns out, drilling holes in a truck frame is not hard, and I had to do it once already, so why not again? I dunno what I thought they were made of – maybe all of those “Over 9000% more rigid” truck ads had subliminally convinced me that all trucks are made of AR500.
Part of the issue with the first set of bed mounts was the off-center mounting holes between the bed and frame being drilled into the same bracket. This meant that no matter what, there was flexing between the bed (made of stamped sheet metal) and the plates forming the brackets, amplified by the width of the brackets and the flexibility of the rubber bushings. The bed was on the whole very wobbly, and not something I would load with more than a few compact hundred pounds.
The new plan was to make brackets with in-line holes so there was no center distance induced flex, and take the opportunity to move the bed forward the inch or so I needed.

From the first install, I knew what heights the new brackets needed to be. This is the new rear bracket, a slat of 0.5″ thick x 3″ steel bar with a hole counterbored big enough to take a 1/2″ hex-head bolt and washer. I bought the barstock already cut to 42″ and finished the holes on the newly commissioned Bridgett.

The front bracket was a little more involved since it had to be an inch taller. I chose to use some 3/16″ wall 3″ x 1.5″ rectangular steel tubing. One side has a large hole bored to take the washer and bolt head, and the other just has a 3/4″ clearance hole. To mount the bed, I planned on welding 1/2″ coupling nuts to the inside.

I drilled one side to 3/4″ diameter and the other to 5/8″ diameter, then machined down the coupling nut into a flanged shape so it dropped in, and welded around the edges.

…which, to my chagrin, didn’t quite work out due to the width of the bushings.

So I machined those nuts flat and flush-welded over the seam instead!

Here’s the front bracket after…. painting. Yep, let’s take a part which nobody will ever see again after it’s installed, and paint it Miku Blue! I mean, to be fair, the real reason was for rust prevention, and I was going to leave it black after primer, but…

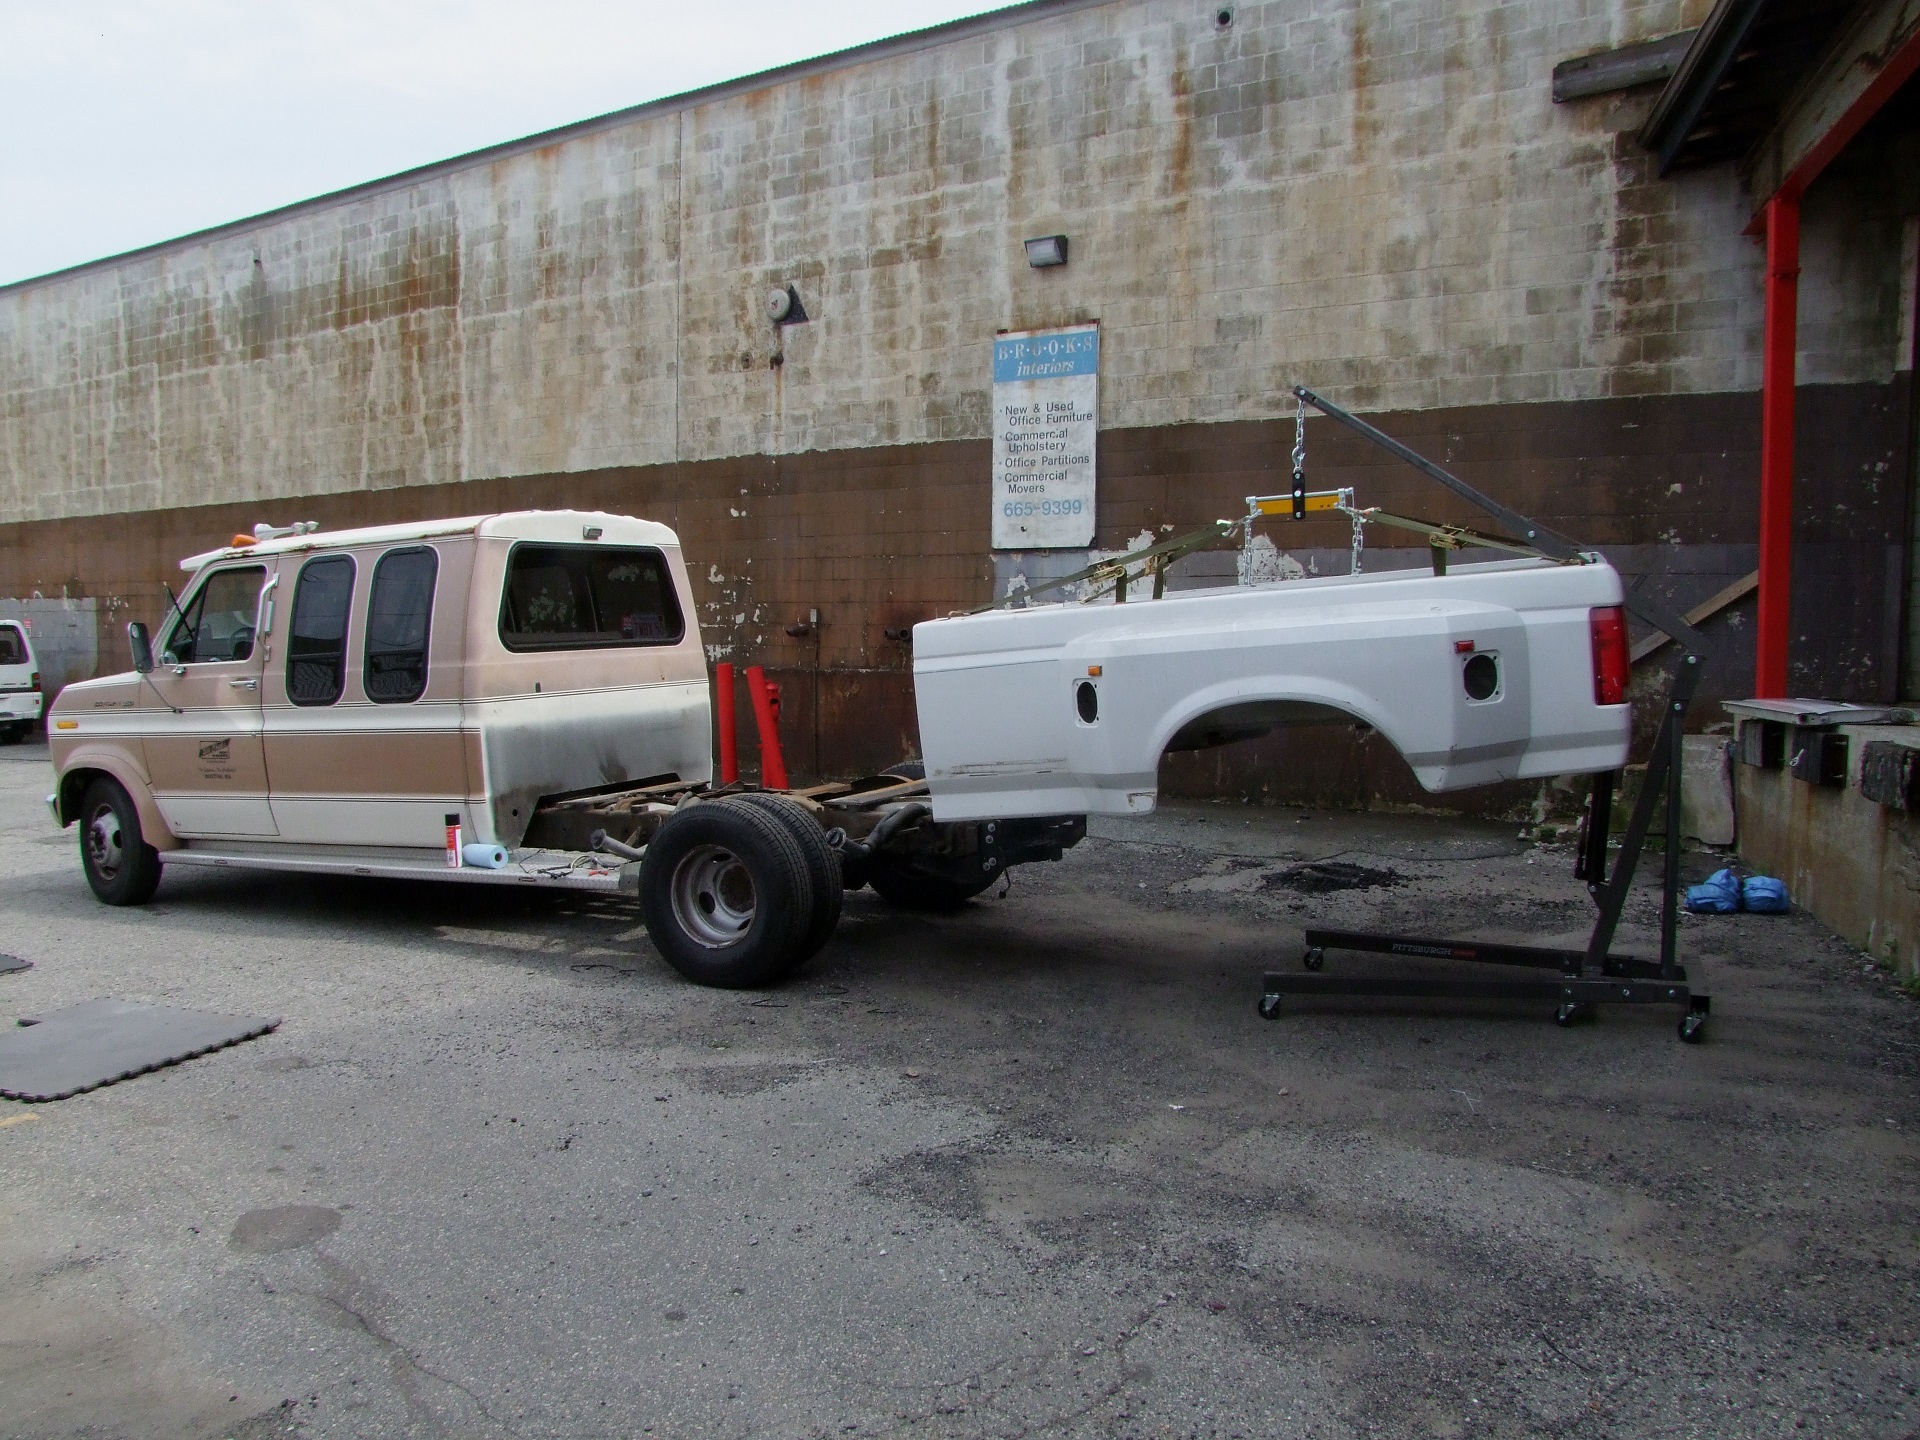
We bust out #OSHACrane once more! Removing the bed is almost too easy now.

Ah, we meet again after a few weeks. You can think of this operation as moving the current set of frame mounting holes to where the bed mounting holes are, but forward about 1 more inch.

This was the bushing that was completely roasted in the Great Carburetor Meltdown of 2017. It was basically turned back into the bituminous goop it was made from – anything that touched it took a chunk of it off. Luckily, I have spares from the old bed.

Commencing with new hole drilling! The white line marks the centerline of the frame member, which is not where the holes need to be – they’re about 3/8″ further out on both sides.

New brackets installed in place. Notice now the rear set has a 5-degree (or so) tilt to it? That’s because the correct location was technically over where the suspension hump begins. There was no avoiding this one, so I had to perform an act of mechanical terrorism instead and take advantage of the immense amount of compliance SLOP afforded by the rubber bushings.

This is a 5 degree angled biscuit piece that I whipped up and 3D printed from Onyx. I unbolt the bracket slightly, shove this under its mating interface with the bushing, and tighten it back down. The rear lip forces it to be straight with respect to the bracket. There, instant -5 degree compensation… Actually it was slightly less due to the compression of the rubber, but it was straight enough that I could get the bolt started in the threaded hole easily, and it was straight once tightened.
The height of the biscuit was an estimate of what was needed to make the bed flat with respect to the side running boards. I discovered that the front bracket might have lined up the front edge, but the bed as a whole was then tilting very very gently to the back, almost indiscernable except to obsessives like me.

This is now how the front edge of the bed lines up. I’m much happier with it, and the rigidity of the whole thing has been greatly increased. Beyond the 4 mounting holes, though, at the very back of the bed, it’s still a bit flexible. However, now that it’s in final position, I can also make the rearmost bracket, most likely from one of the existing used slats machined down.
There’s a slight optical illusion which makes the bed still look like it tilts backwards, and that’s because the endcap of the van cab tilts slightly forward – its longer at the bottom than at the top. Whatever, at least I don’t have panel gaps like this guy any more.
Broken Windows? Open Windows? y not both
Observant readers might notice that every picture of this thing since when I got it back has had the driver’s side window rolled halfway down. That’s because the day after correcting the carburetor mishap, the power window motor died.
I have heard of vehicular whack-a-mole before, but this is the first time I have gotten to experience it.
So since then, it’s mostly been hanging out with a trash bag covering the open portion of the window. And you know what? No matter what level of trashy it is a symbol of, I refuse to have an actual trash bag window. After the bed replacement and EFI swap, it had been running without mishap, and so I decided it was time to start making problems for myself fixing up the little leftover things beyond basic drivability. You know, the same old story.

I started by removing all the interior fixtures, but couldn’t find any fasteners for the door panel. That’s because in classic 80s American car company fashion, it’s all held in by plastic snap rivets. I had to very traumatically pry at the panel little by little to free the plastic caterpillar things, one of which died from old age while in my care. Just one, whew.

….and after my emotional trauma from all that, the facepalming begins.
I often telll friends that 1980s middle-aged successful chain-smoking family-man Charles would not have bought one of these new, with the knowledge that I have of it now. The build quality all around, to be honest, is atrocious. This panel is made of regular 1/4″ plywood with the leather/fuzzy upholstery stapled to it around the edges. The pocket on the inside is also a staple job. Maybe this looked okay when it was new? I dunno. The bottom edge had significant water damage and the wood was coming apart, so I knew I had to put that back together before reinstallation.
I almost want to find some junkyard doors from a regular unadorned 3rd-generation Econoline, with its square miles of plain plastic, than deal with this. Or, perhaps, just laser-cut or CNC-rout an ABS plastic flat panel in the correct shape.
Granted, I probably wouldn’t have torn down a brand new vehicle at the time to assess build quality, but I like to think that at least some of the shenanigans such as the aftermarket wiring installs and the abomination that was the 5th-wheel hitch plate could have been seen with a lookover.

And then behind that, we have…. fucking wax paper? This is called the “vapor barrier” in the official Ford strategy guide. I call it “not ok :(”
It’s clearly been reused a few times, since its own rubber adhesive outline was long gone. Someone’s been in here with duct tape – judging by the condition of the adhesive behind the tape once I peeled it off, it’s “not less than 5 but not greater than 10” years old.

I peel back the wax paper a little and yes, indeed, someone’s been here before. I also am not sure how you were supposed to get to this power window motor without dismantling the whole door, but I see someone’s executed a community-supported hack.

Undo the three 8mm head head bolts and the window motor falls out like it came out of a vending machine!

So here we have it. 1985 date code and all! I suspect if it was precisely extracted in the past 10 years, it was a junkyard unit that itself is original to the date of manufacture (not a reman unit) as it did not have any sign of a rebuilders’ label or something indicating it has been opened.

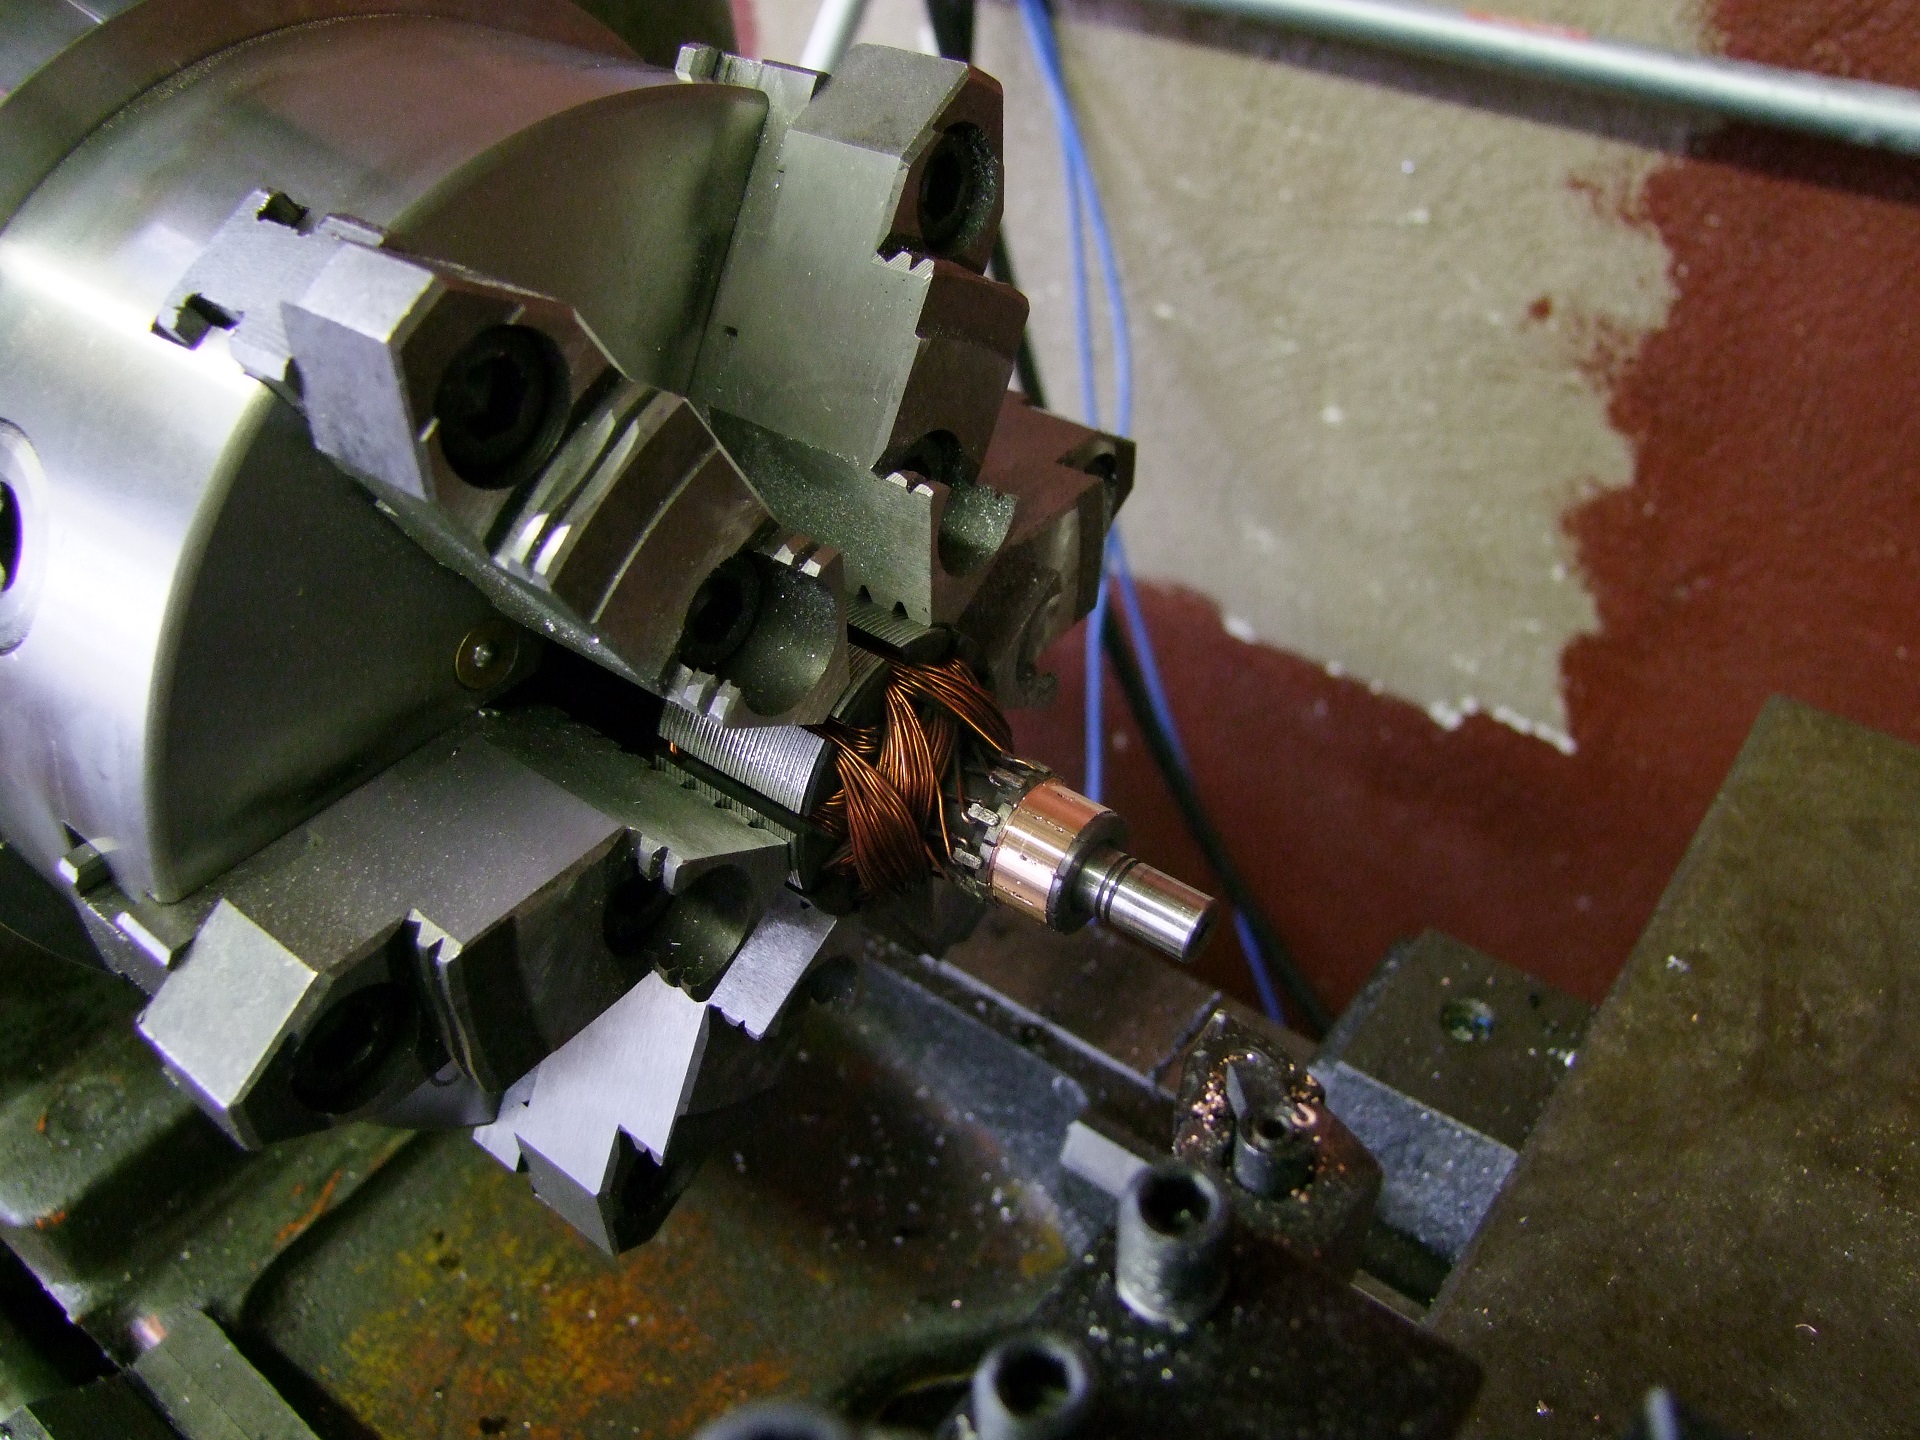
Well then, I shall be the first! Yep, that’s a really well used motor. The first thing that fell out at me was a remaining chunk of brush, so I take it to mean that it just finally ran out of brushes worth using. Self-generating brushless motors are truly the future! It looks like it would just need some cleaning and new brushes.

Yeah, umm, back up. I noticed an interesting pattern on the commutator, and when I gently clean it off I found that it had been worn into a polygon. What? Okay, I’m not going to ask….

The challenging part was finding motor brushes I could swap in. My life has become so brushless that I had a hard time finding motors with replaceable brushes to scrap them out of, and trips to 2 local hardware stores revealed that they no longer had the little bin of motor brushes (because nobody rebuilds tools any more :'(((((((( ) I knew from years before when I didn’t need them!
Finally, I took apart the air horn compressor motor that I pulled out of the engine bay and… well, they’re wrongly sized in one dimension, but that’s what a belt sander is for!

I decided that as funny as a 11-sided commutator was, it was going to be bad for the new brushes, so I turned down the copper bars using Taki-chan and cleaned between the valleys with a knife blade afterwards. A quick gentle polish with some Scotch-brite and the motor was ready for service again.

The new motor back end after cleaning and re-arming the trimmed brushes. I put everything back together and ran the motor for 5 minutes on 6 volts to get all the new brushes and commutator comfortable with each other.

I then poured epoxy all into the door panel’s rotten bottom edge and clamped it together for a few hours. Sorry, no fancy interior customization here. I just want it to stay together until it gets replaced with some LED-backed smoked acrylic or something.

Back in we go! I carefully reapplied the lunch bag and taped more constently around the edges. The plastic caterpiller rivets were in general reused – I would have had to take off the fuzzy interior to replace them which is patently absurd so this door panel will be a little wiggly from here on.

And a pleasant test mission to Lake Chuggawuggadingdong, making 9.2 miles per gallon all the way there and back.
(๑◕︵◕๑)
Well, the mission wasn’t to see the attention-getting placename of a town that seems desperate for tourism dollars all around, but to visit a nearby salvage yard to pick up some interesting EV components with MITERS. It’s another hybrid battery, this time out of a Hyundai Sonata – a relatively tiny 1.5kWh, 72S lithium polymer unit from a car literally nobody cares about, so it was super cheap at $260. It could split up into several Power Racing Series batteries, much like what I did with the Ford Fusion battery for Chibi-Mikuvan.

I’m not doing anything with it, but pay attention to MITERS members’ websites and you might see something neat later I suppose.


