A Return to Inexpensive Chinese Van Lighting: LED Sealed Beams Update

Boy, I’m all up on that chinesium recently, what with Chinese machine spindle drivers, the inaugural Chinese ~120lb Middleweights tournament which I helped transcribe results for, my Chinese production run of RageBridge 2sChina China China China. I love China. China is where all kinds of interesting things spawn from, some of which make you wonder who approved the push to production.

A while back, I broadly sampled cheap automotive LED products in an effort to convert all of Mikuvan’s auxiliary lighting to LED. That writeup is here. I’ve been pretty successful on this front, only having to replace one of the dashboard lights and another running light since then…. so they definitely don’t not work, but I’ll probably do another round of upgrades to the next price tier soon and see how the Market Structure has changed.

What I want to go back to is LED headlights. When I made that post, LED headlights were still quite a novelty, and very expensive. What generic products existed then were limited to these kinds of things:

I discounted them pretty heavily because they looked simply too Harbor Freight flashlighty for me – there’s no way you can aim those things properly. Just like a cheap LED flashlight, they wouldn’t have any meaningful beam pattern, and instead just be a soft wad of light. I wasn’t in much of a hurry to get real GE Nighthawks obviously, so I let the matter fall aside.

Until a few weeks ago.

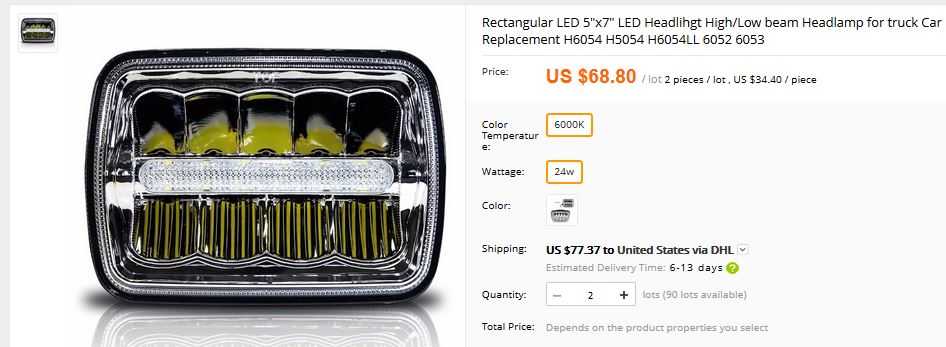
While campaigning for Vantruck parts on RockAuto, my automotive opioid dealer, I noticed these under the headlights section:

Hmm, well that’s interesting. They look exactly like the GE Nighthawk units. I’d not researched the 5×7 H6054 sealed beam size before since I never had to; the 4×6 H4656 type didn’t have any LED listings on RockAuto, probably because everything sucks.

Well, now I’m beginning to think there’s a pattern. I looked in some other palces for H6054-sized LED lights, and….


That one is from TruckLite, which carries them along with other annoying Brodozer lighting products. For the record, this is a GE Nighthawk 5×7:

The problem? They’re all expensive as hell. I’m really not in the mood to pay $180+ for a single headlight unit, especially if I don’t know if they’ll work well.

Well, now I see the pattern. One axiom of Chinesium product finding is a corollary to the Law of Chinese Product Packaging Inertia, which states that if the products look alike, they most likely function alike in all but the most trivial ways. This has been my guiding principle for finding Chinese motor controllers and mechanical products for years.

If you turn that around a little, it becomes if multiple U.S. vendors offer the same looking product, there is likely a generic Chinesium origin. It’s something like that old quote that goes Behind every great man is a woman, except made of phthalic acid plasticizers and artificially manipulated currencies.

So I went AliExpress hunting. That didn’t take very long:


Score! I had what appeared to be the same kind of units as the first hit. Even better, the top 3 hits were three different approaches.

This is what always pleases me about the wild world of Chinesium: Nobody knows what they’re actually selling, so unlike Western product development culture where everyone focuses on one or two strategic approaches, the Chinese philosophy (if there even is an organized one… I don’t think so) might be spam the SHIP IT button . Recall my post about finding a new coolant pump for Chibi-Mikuvan, and how I found 3 different styles of water pump on Amazon in a few minutes.

So we have the Nighthawk clone on the left, what appears to be some kind of optometry examination device in the middle, and the “compound fly-eye” LED grenade on the right. Pretty much all of these listings, by the way, have random images of American pickup trucks or heavy duty trucks in their descriptions. They know. Since I know the Nighthawk style exists in the US as a baseline, I decided to spring for a set to try out.

While on Aliexpress, though, I got curious about the state of the 4×6 market. The styles are much the same, with most products being the LED-spam approach and some of a hybrid projector design like the aforementioned middle 5×7 product. Which, by the way, seem to be rather trashy for aimability also based on Dane’s analyses, as his Jeep XJ also uses the 5×7 size.

There was a style which was different , a combination of the LED-spam and the Nighthawk style divided high-and-low beam reflectors. These things used significantly fewer LEDs, so there might be some hope of the beam pattern being reasonable. I found a set from the same seller as who I was planning on getting the 5×7 size from:


By the way, don’t be deceived by the suggested transit time for the shipment. Often, you can pull down a little menu under Shipping which might reveal a very cheap DHL or Fedex/UPS option. For $14 I had all 4 headlight units in one week. I can barely coerce a shipment across the US in that time!

Fast forward a few hazy days where I think I remember some Brushless Rage work, and….

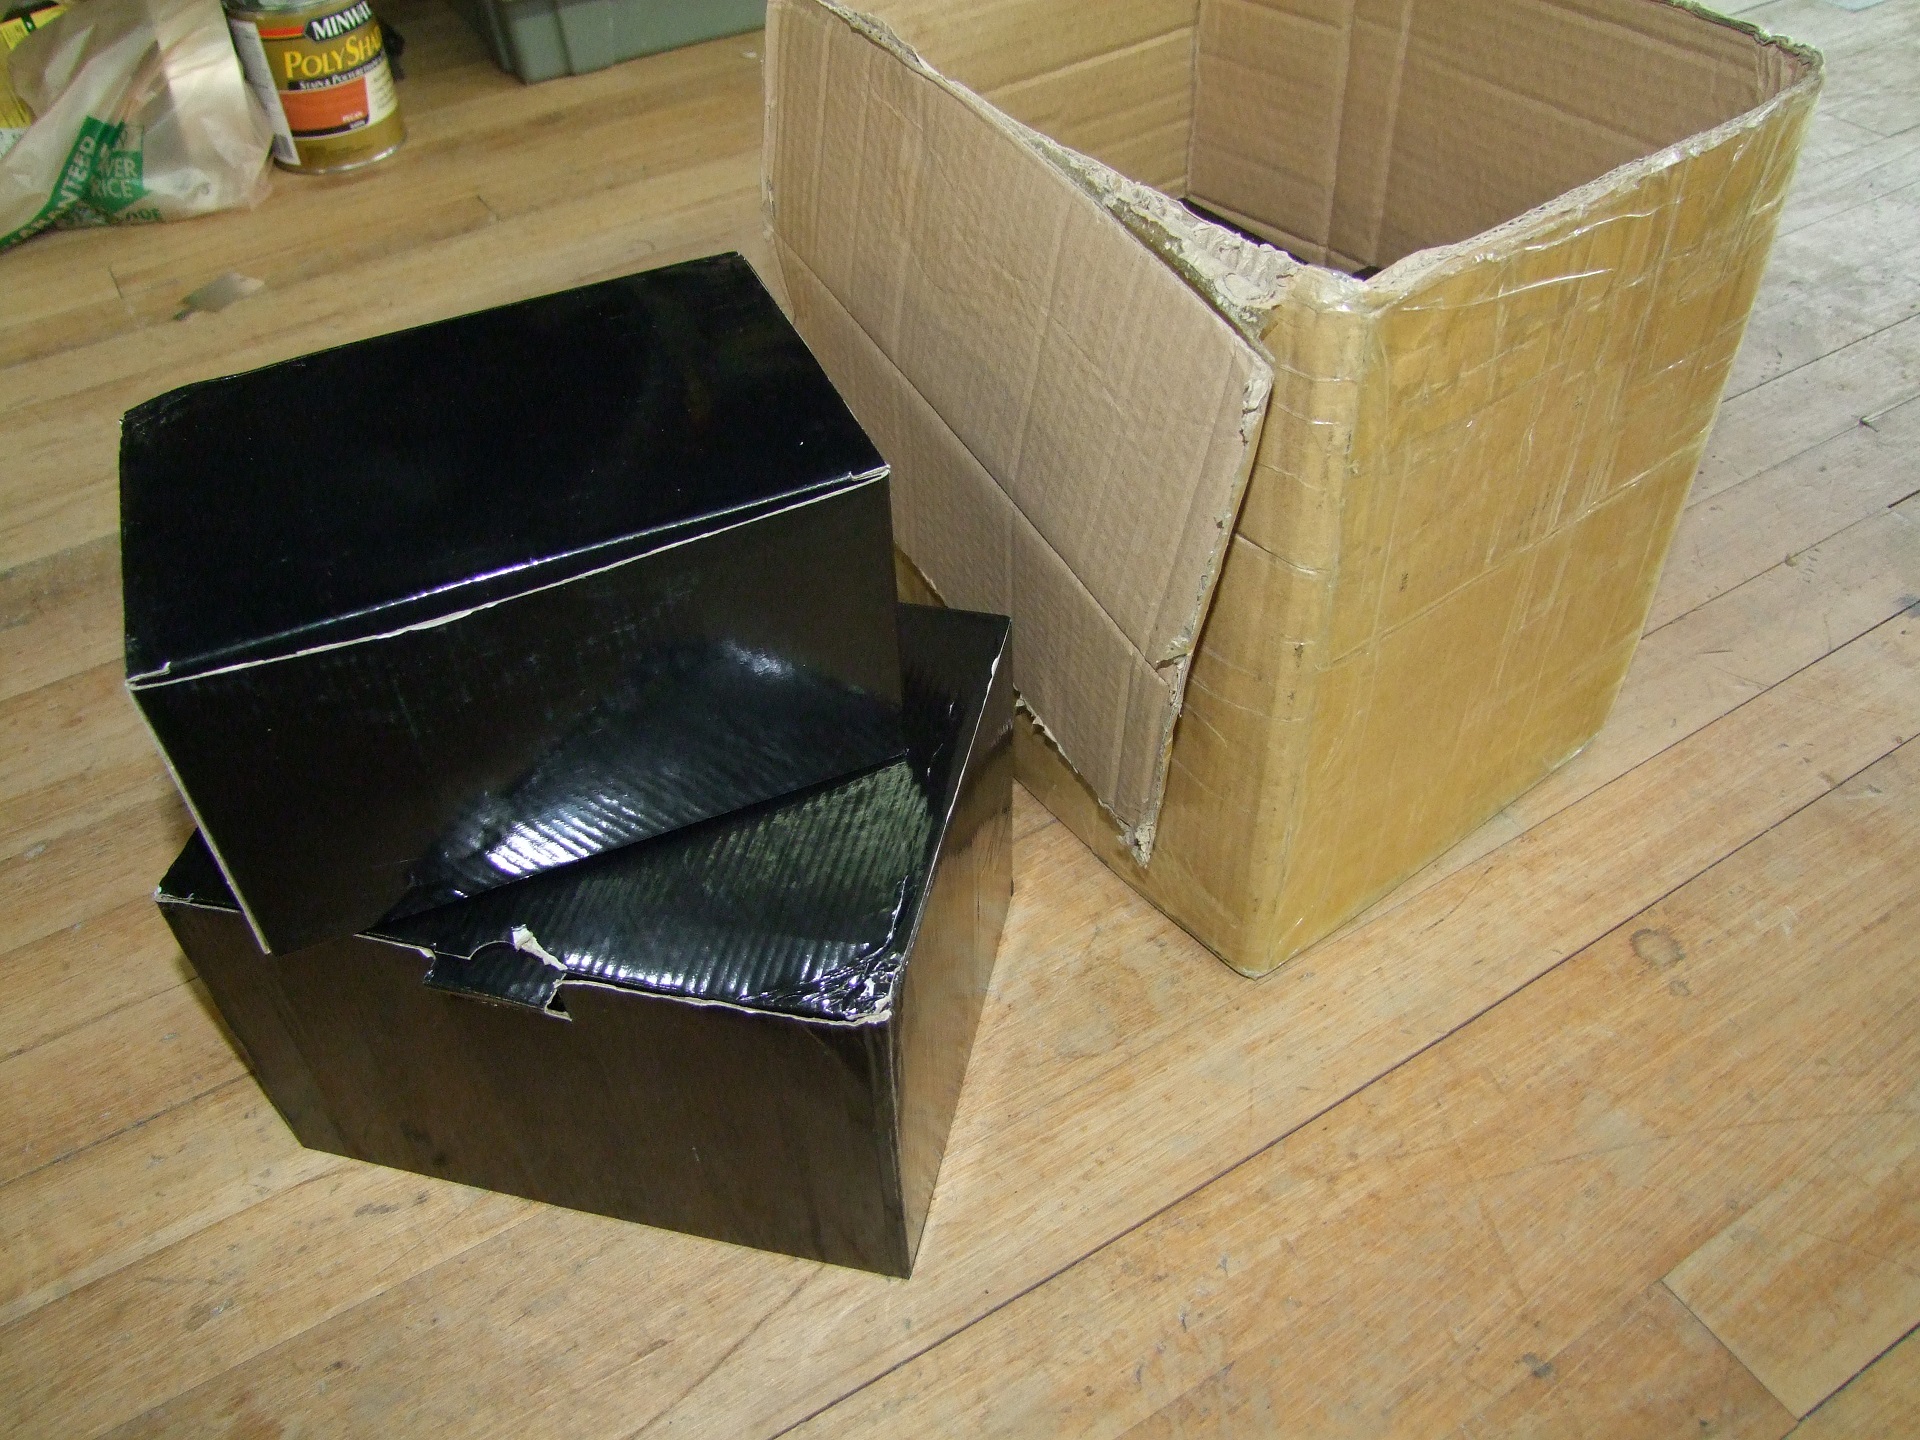
Nondescript Chinese gift boxes! Hurray!

The boxes are completely blank – presumably, resellers will have their logo and other information printed on them.

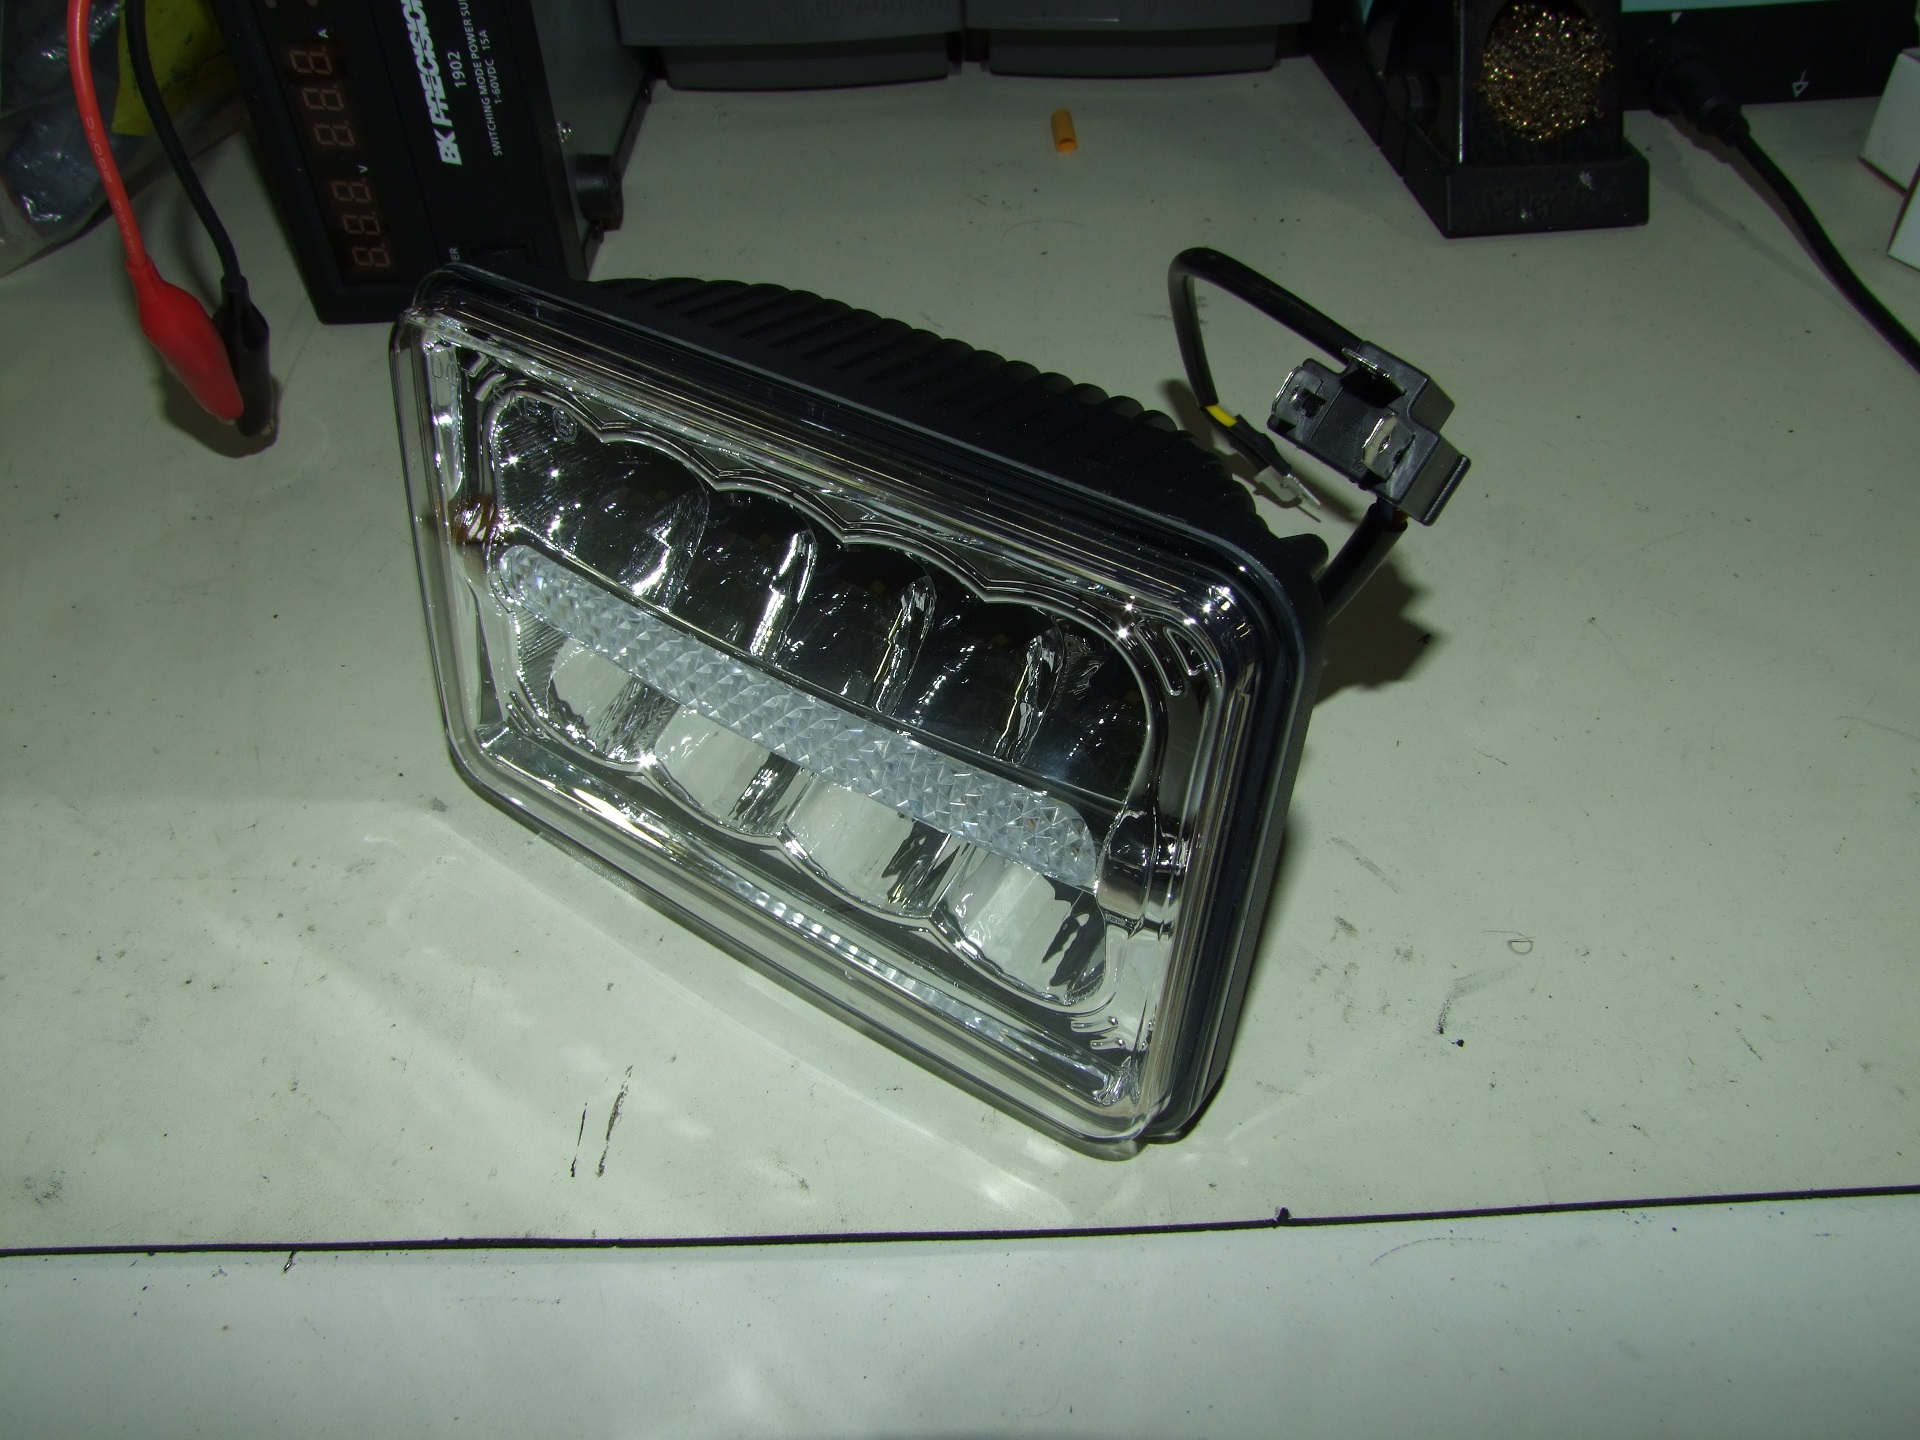
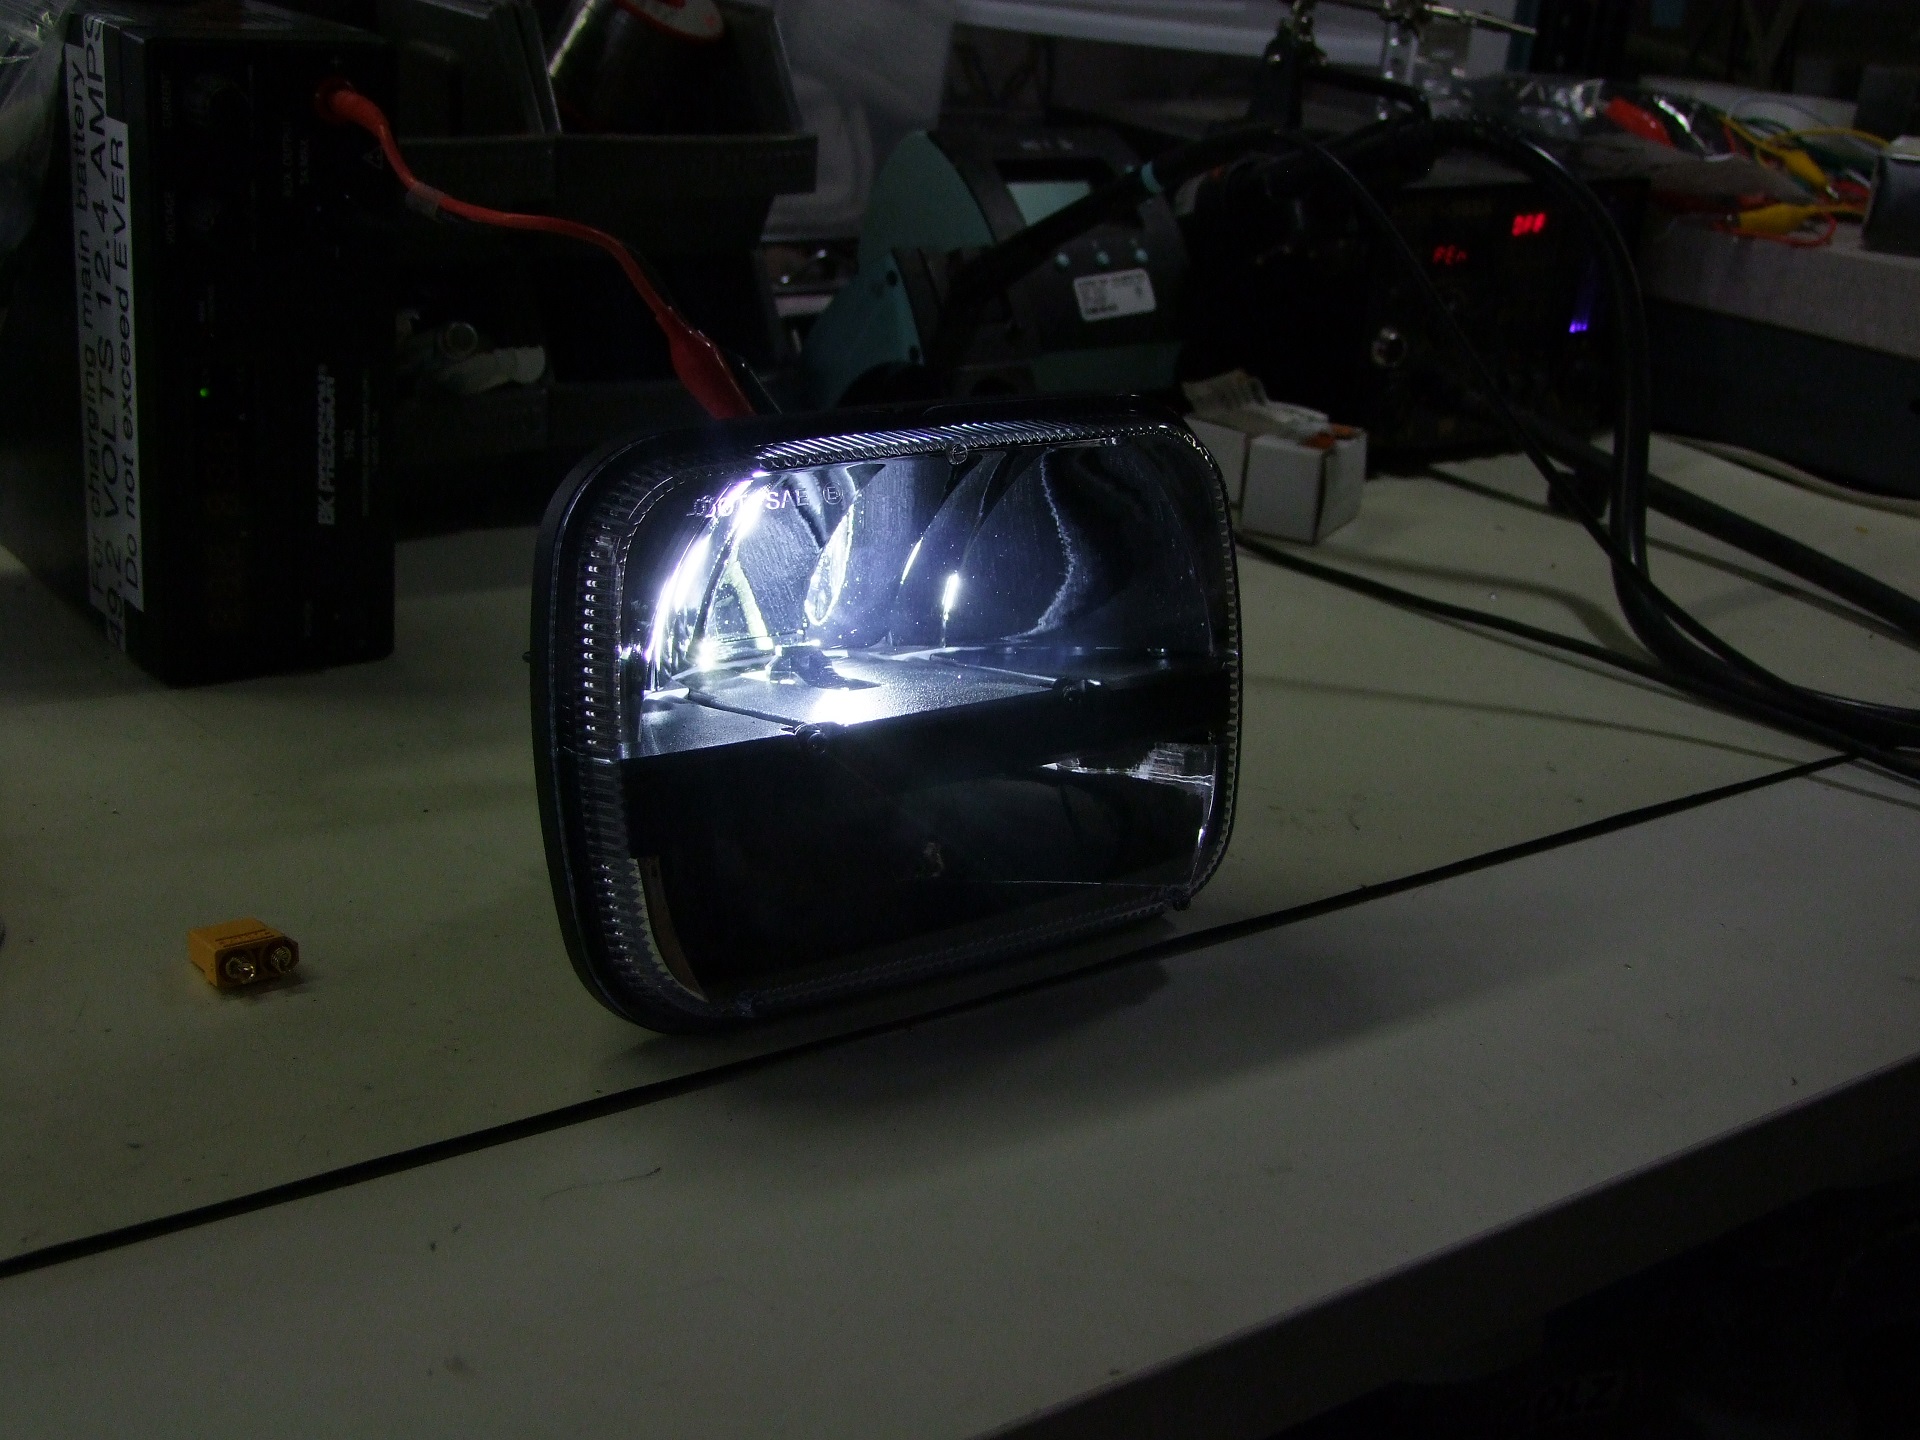
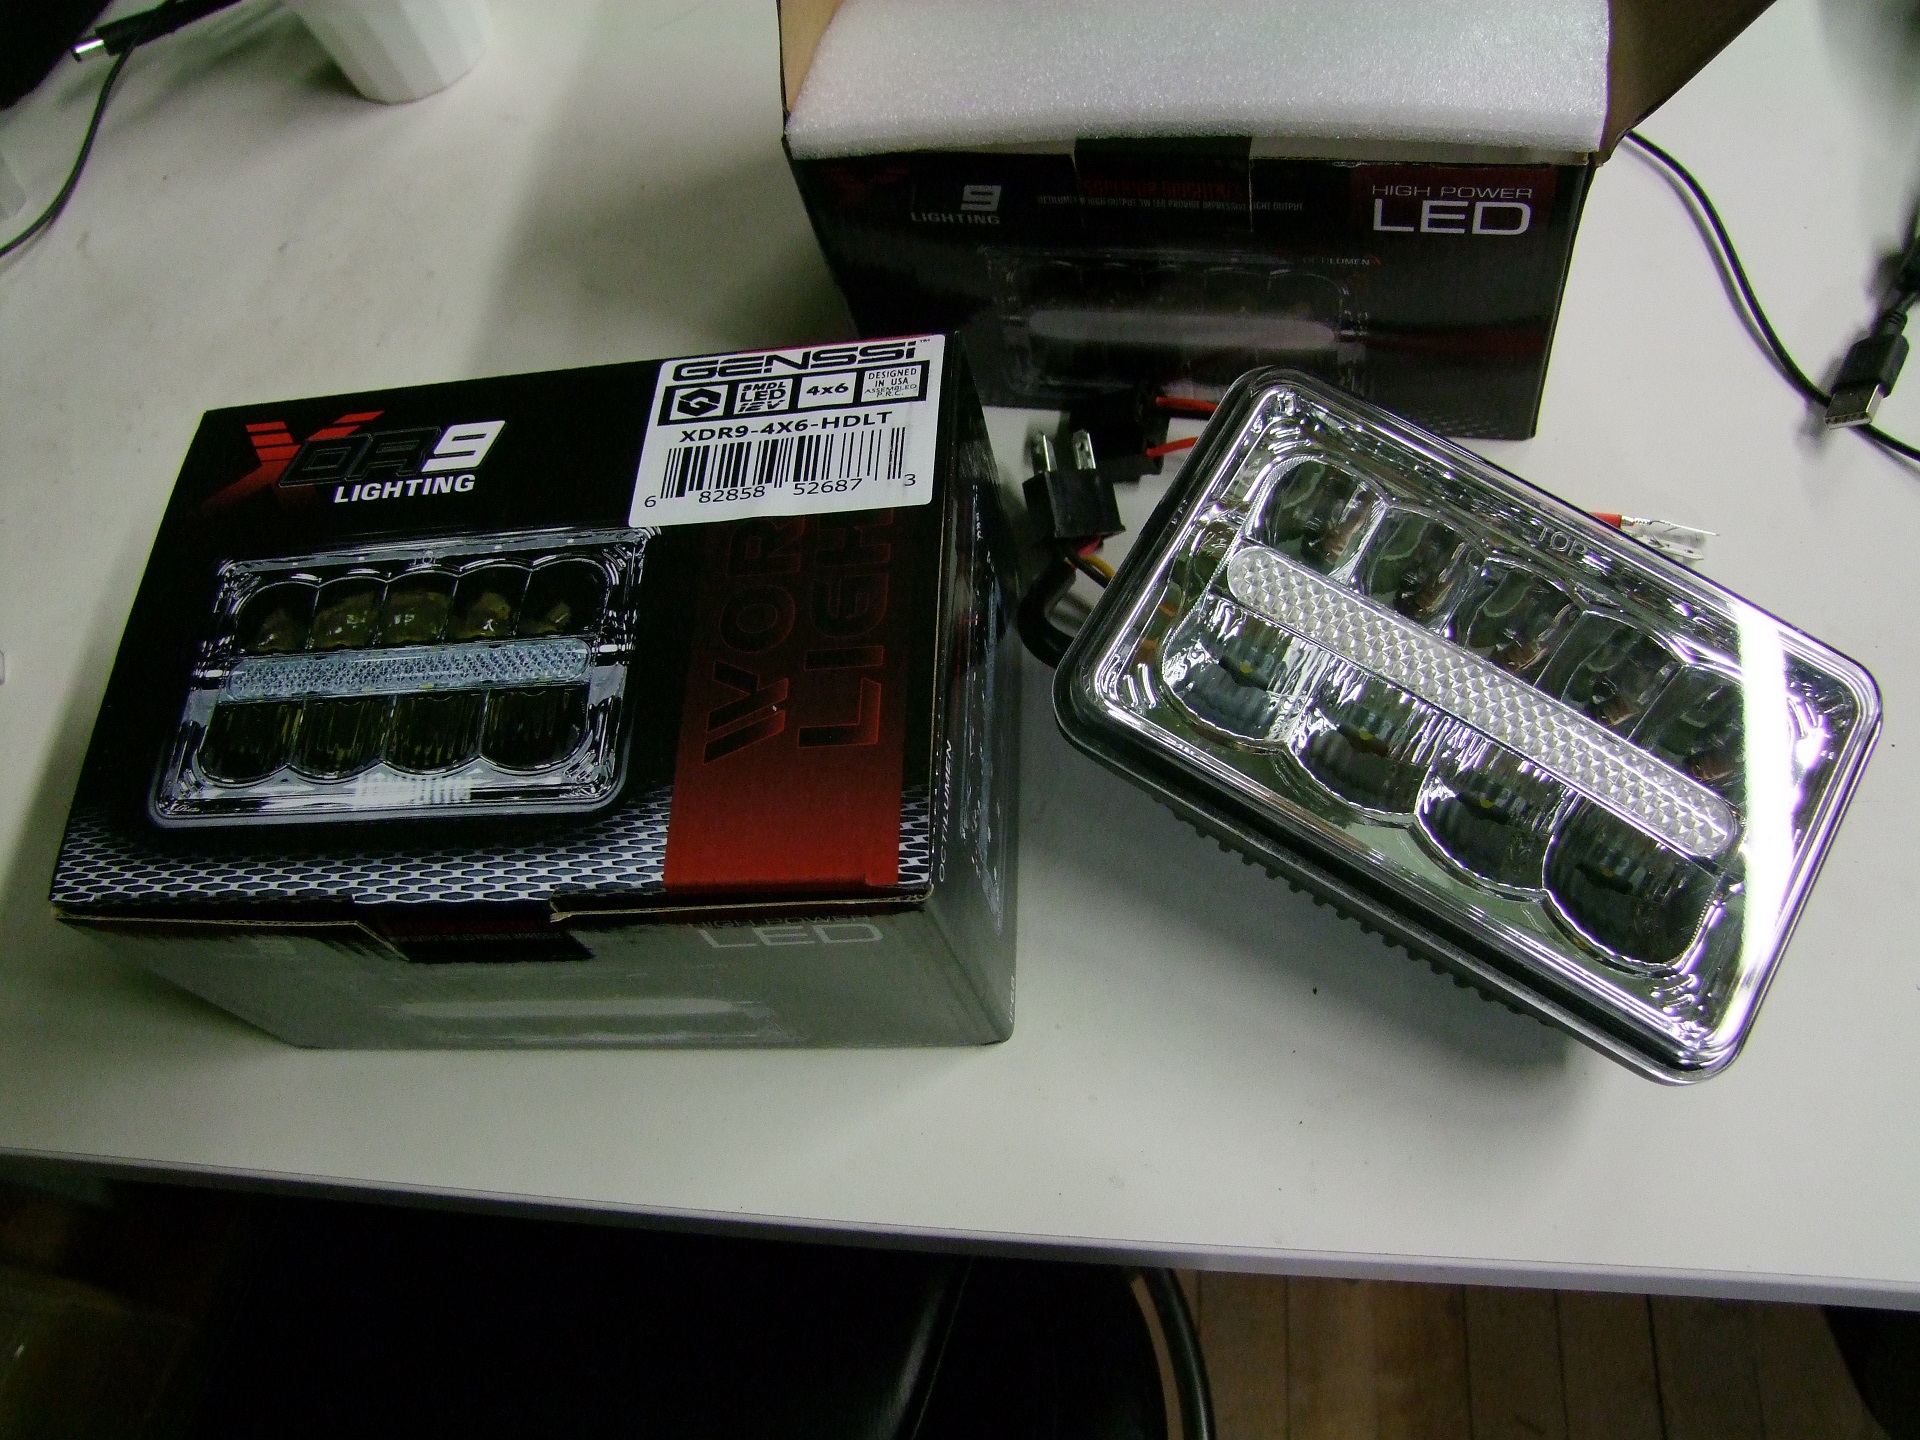
Here’s the 4×6 unit. The front cover is an unknown clear plastic; while it was advertised as a UV-resistant anti-scratch-coated polycarbonate, who the hell knows. I didn’t feel like taking a torch to these to sniff them just yet.

The casing is a very solid feeling cast aluminum with heat dissipation fins. Cooling, for the longest time, was the biggest issue plagueing LEDs and preventing their use in high-powered lighting. There aren’t any provisions for forced air or active thermal management (some modern car LED headlights are maintained by a Peltier solid state device), and I think they’re just counting on sealed-beam sockets on older vehicles being pretty open air. It’ll be interesting to see how these fare in a hot environment.

Let’s power it up! This is Low beams mode:

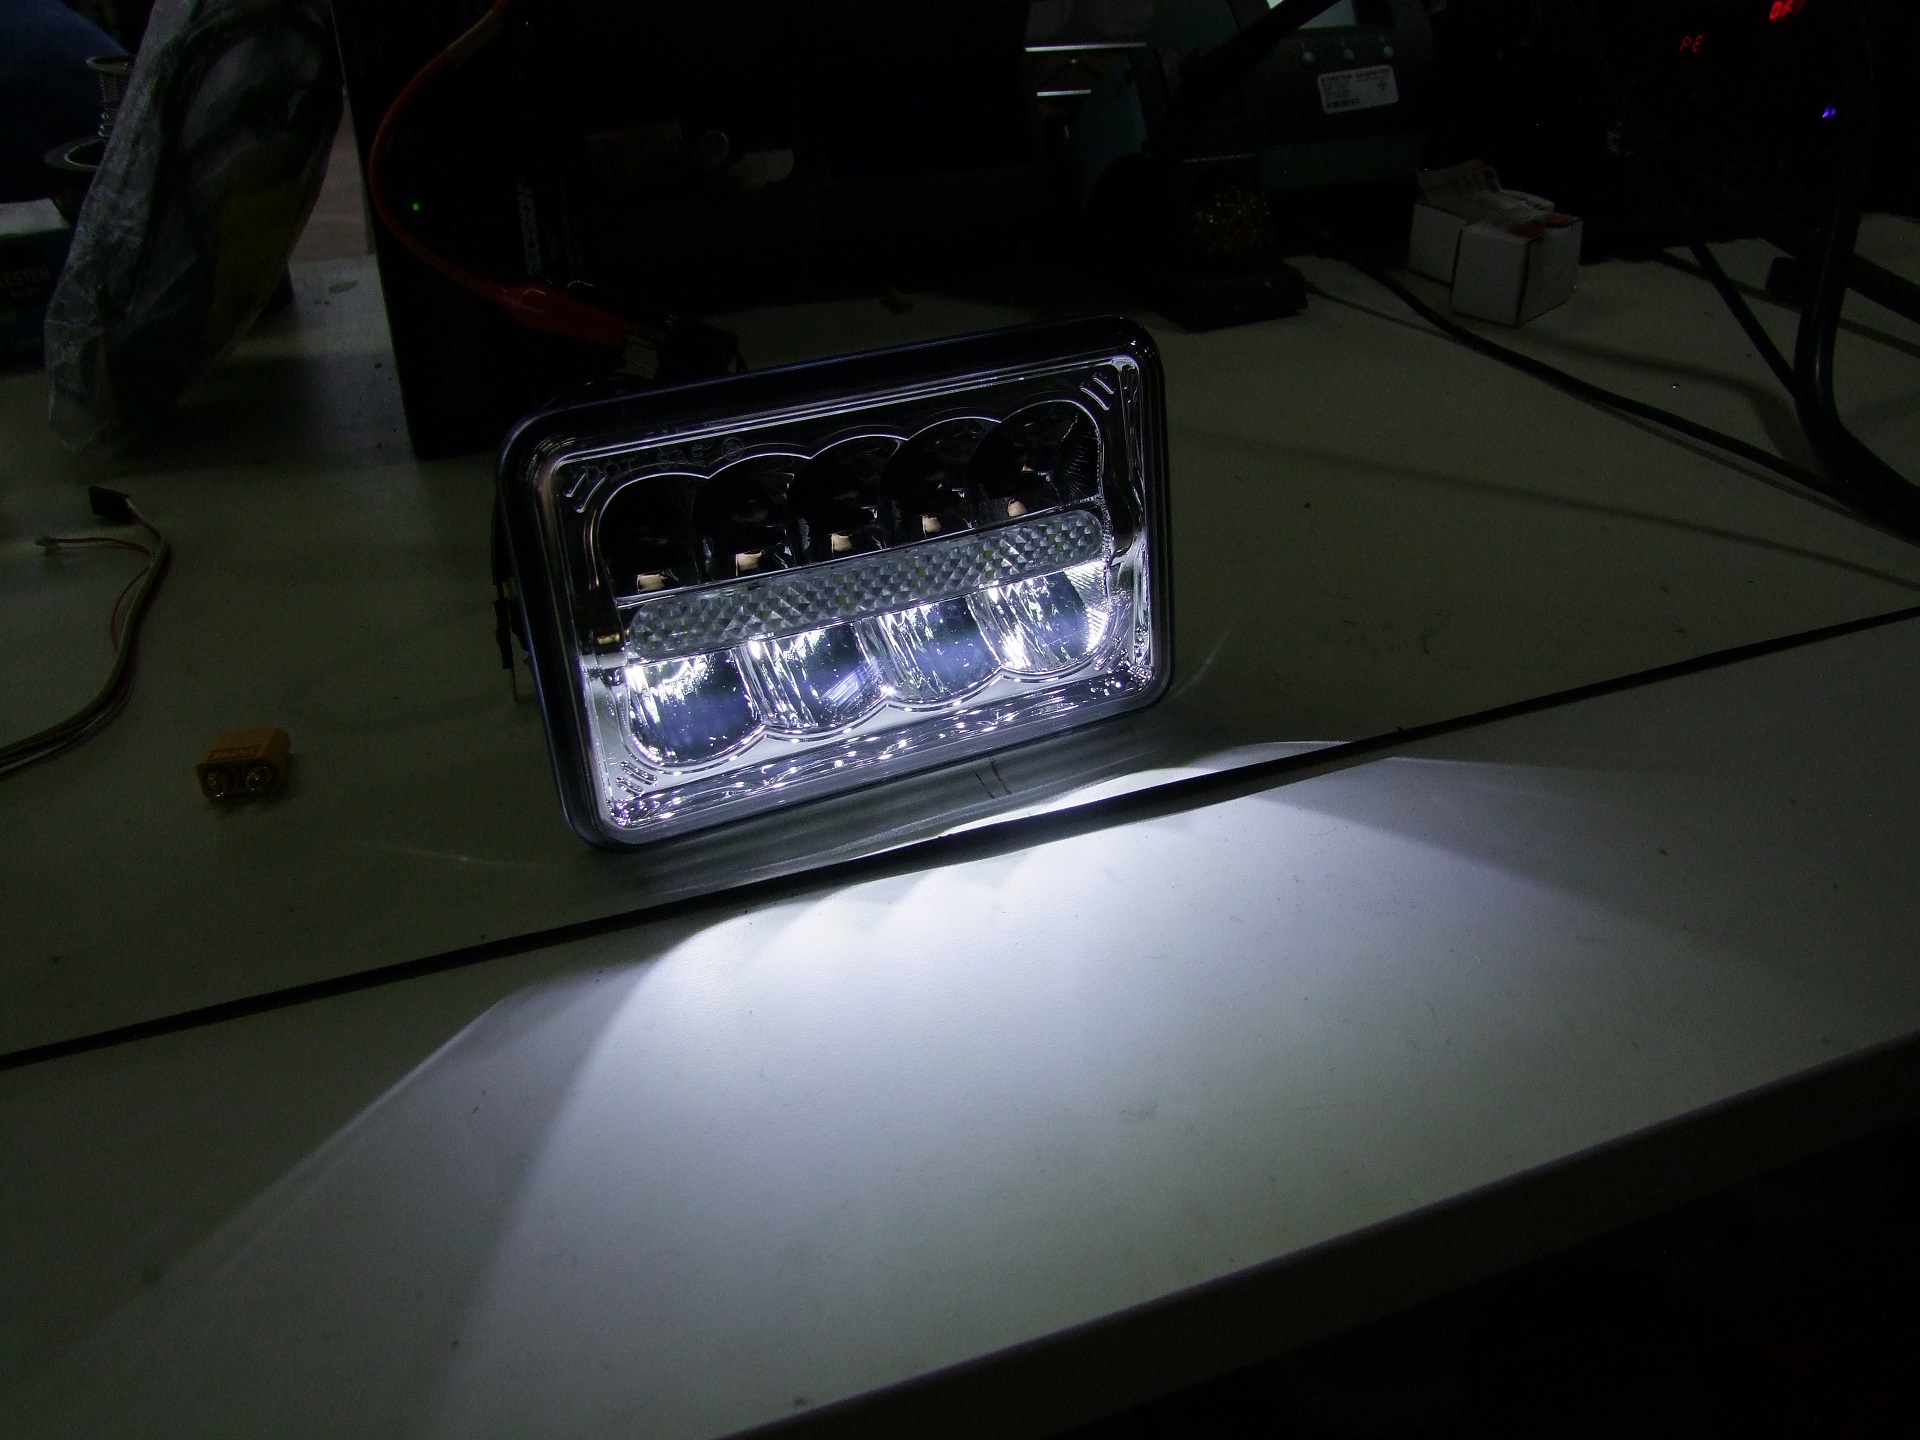
You know, I was honestly surprised at the beam definition. I pointed it across the dark warehouse and it wasn’t bad at all.  While looser than a modern xenon setup, it was still defined.

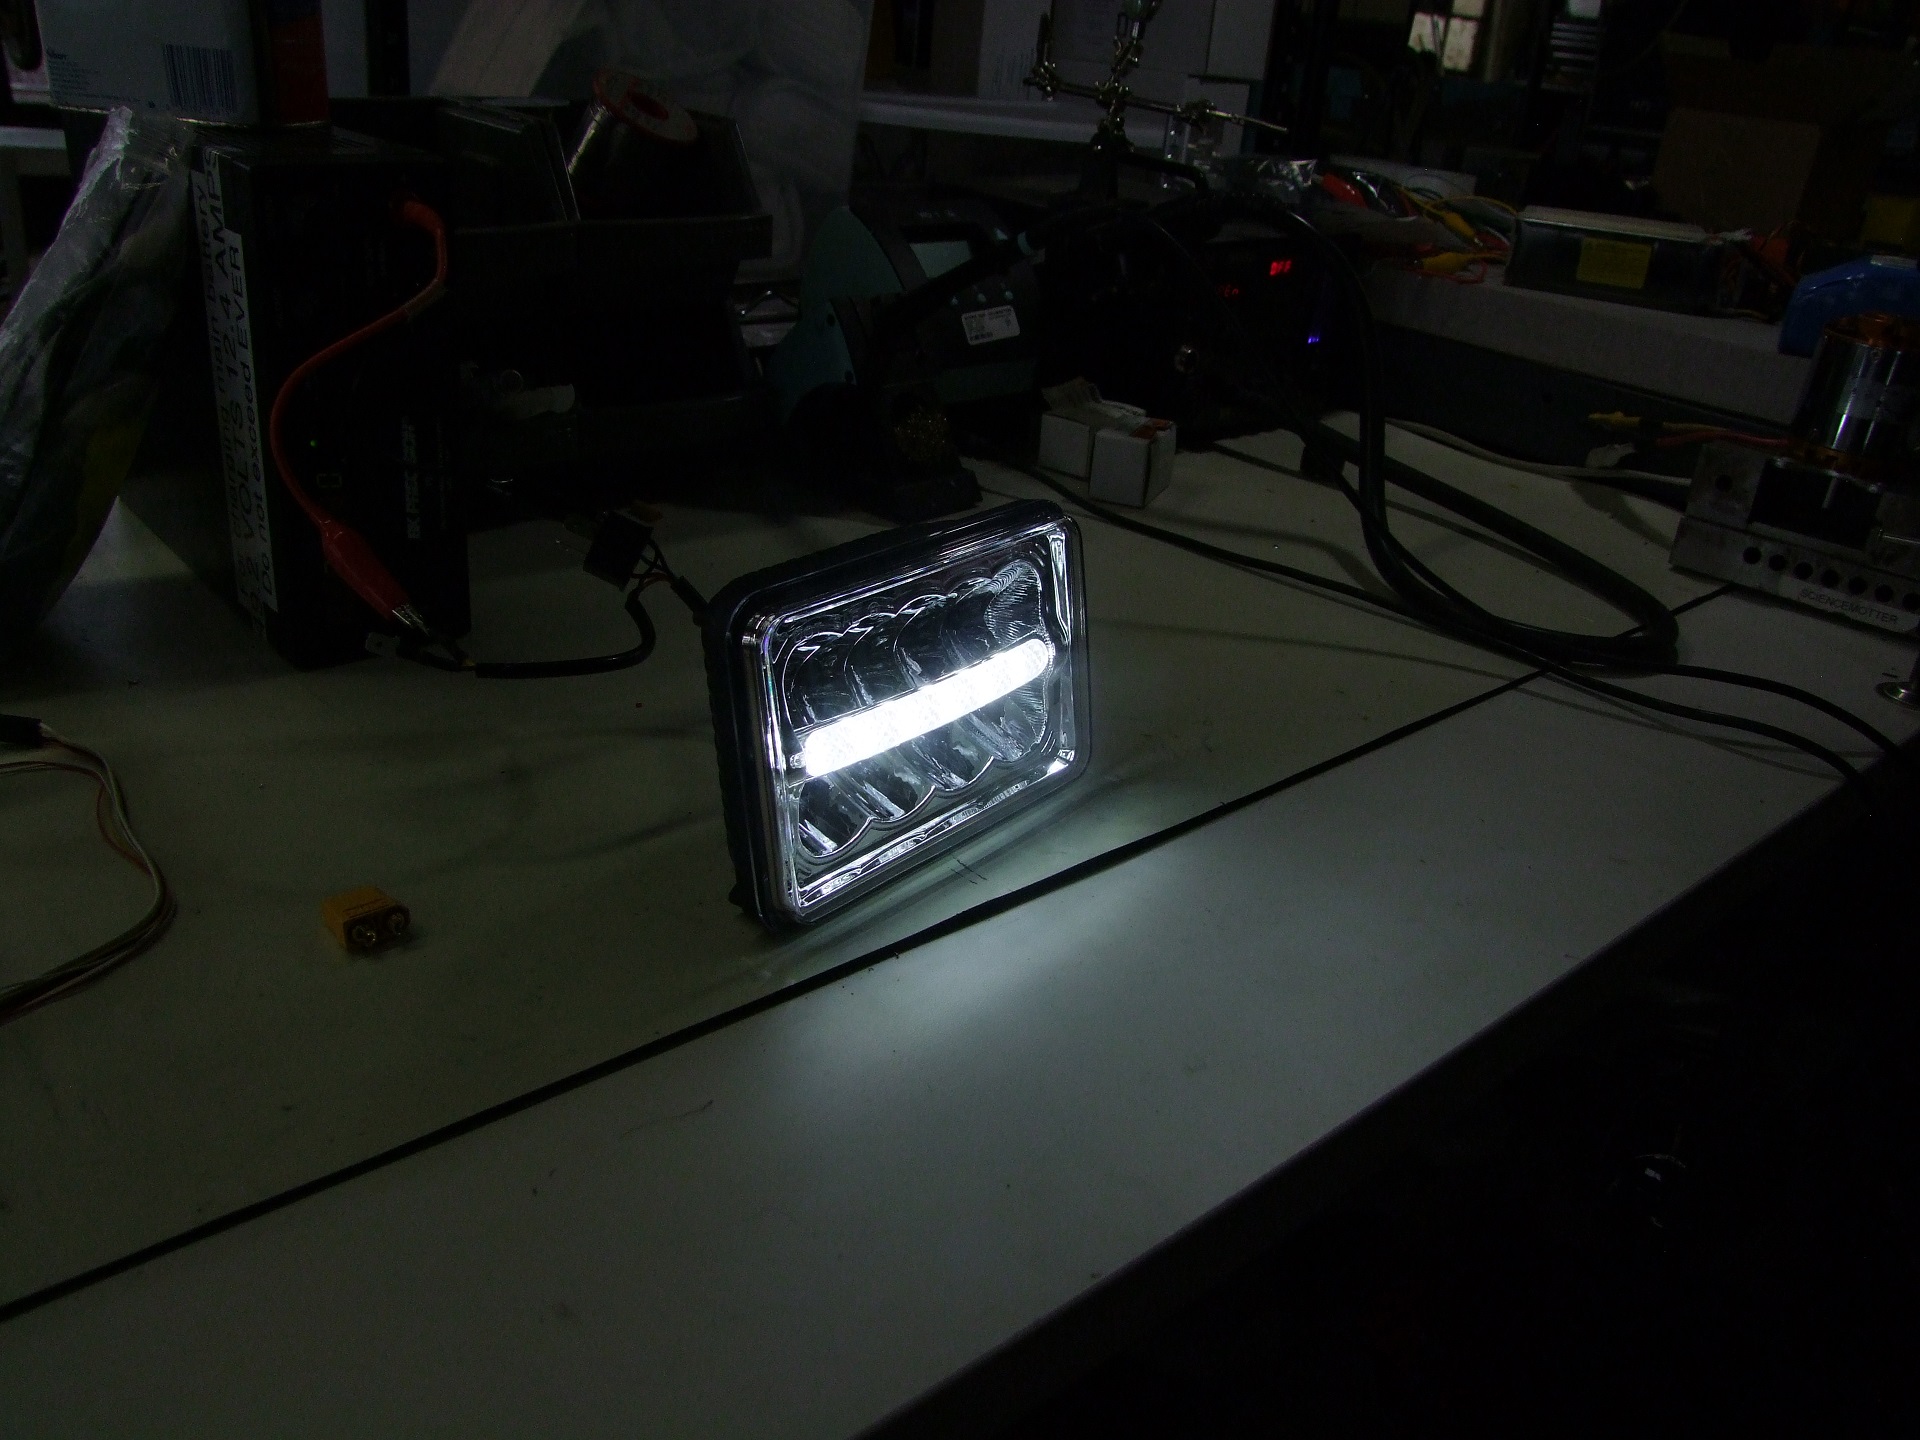
High beam lights up the top row of 5 LEDs, and boy is it bright. The bottom 4 still stay lit, however, so the difference between the centers of the beams is not as defined as for my current set of high-brightness halogen lights.  You’ll see this pattern change in the installation photos later.


The funny part was powering on what I called the “goat lights“. There’s a cute little LED strip in the middle behind a angular diffusing lens which is separately powered. They’re present as running lights. The extra wire emanating from the connector is so you can tap them into an existing DRL circuit.

So, overall I’m so far impressed. They don’t seem to be shitty. Let’s move onto the 5×7:

So this thing is interesting. Low beams shoot out the top half of the assembly, while high beam turns on the lower half while keeping the upper half lit.

It took me a minute to accept that yeah, this is also legitimate. The reflector on the top half is tilted slightly downwards, and the lower reflector is more straight-on. Actually desirable behavior for headlights. It seems like this one had some more R&D or engineering put into it. The beam pattern was even more concentrated than the 4×6 model since there is only 1 giant emitter per side, and there was more discernable shift between the high and low beam levels. I like it a lot actually! Unlike the 4×6, this type does not have a running light or accent. However, that style is also available in 5×7.

Alright, it’s install time. Since Vantruck is still mechanically indeterminate, I pitched the 5×7 units at Dane, so you might see them on his website soon. For now, I was going to install the 4×6 onto Mikuvan to see what the difference is like.

I set up the test in a parking garage, center-aligned with a spot marker line pointing at a wall about 25 feet away. I set up my camera on a tripod in the middle, immediately in front of the bumper aligned with the marker. I then tried to not move the camera for the entire test, including installation and aiming. The shutter and aperture speed were changed to a setting I liked and then they were not touched for the testing.

First, my regular old low beams. These are Wagner Britelite increased-brightness H4656 bulb modules. I’m not sure I can recommend them – as much as I like the light spam, I get maybe a little over a year to about 18 months out of them consistently. They’re advertised as having less lifetime, though, so I’m not even mad, just a little Disappointed Asian Dad.

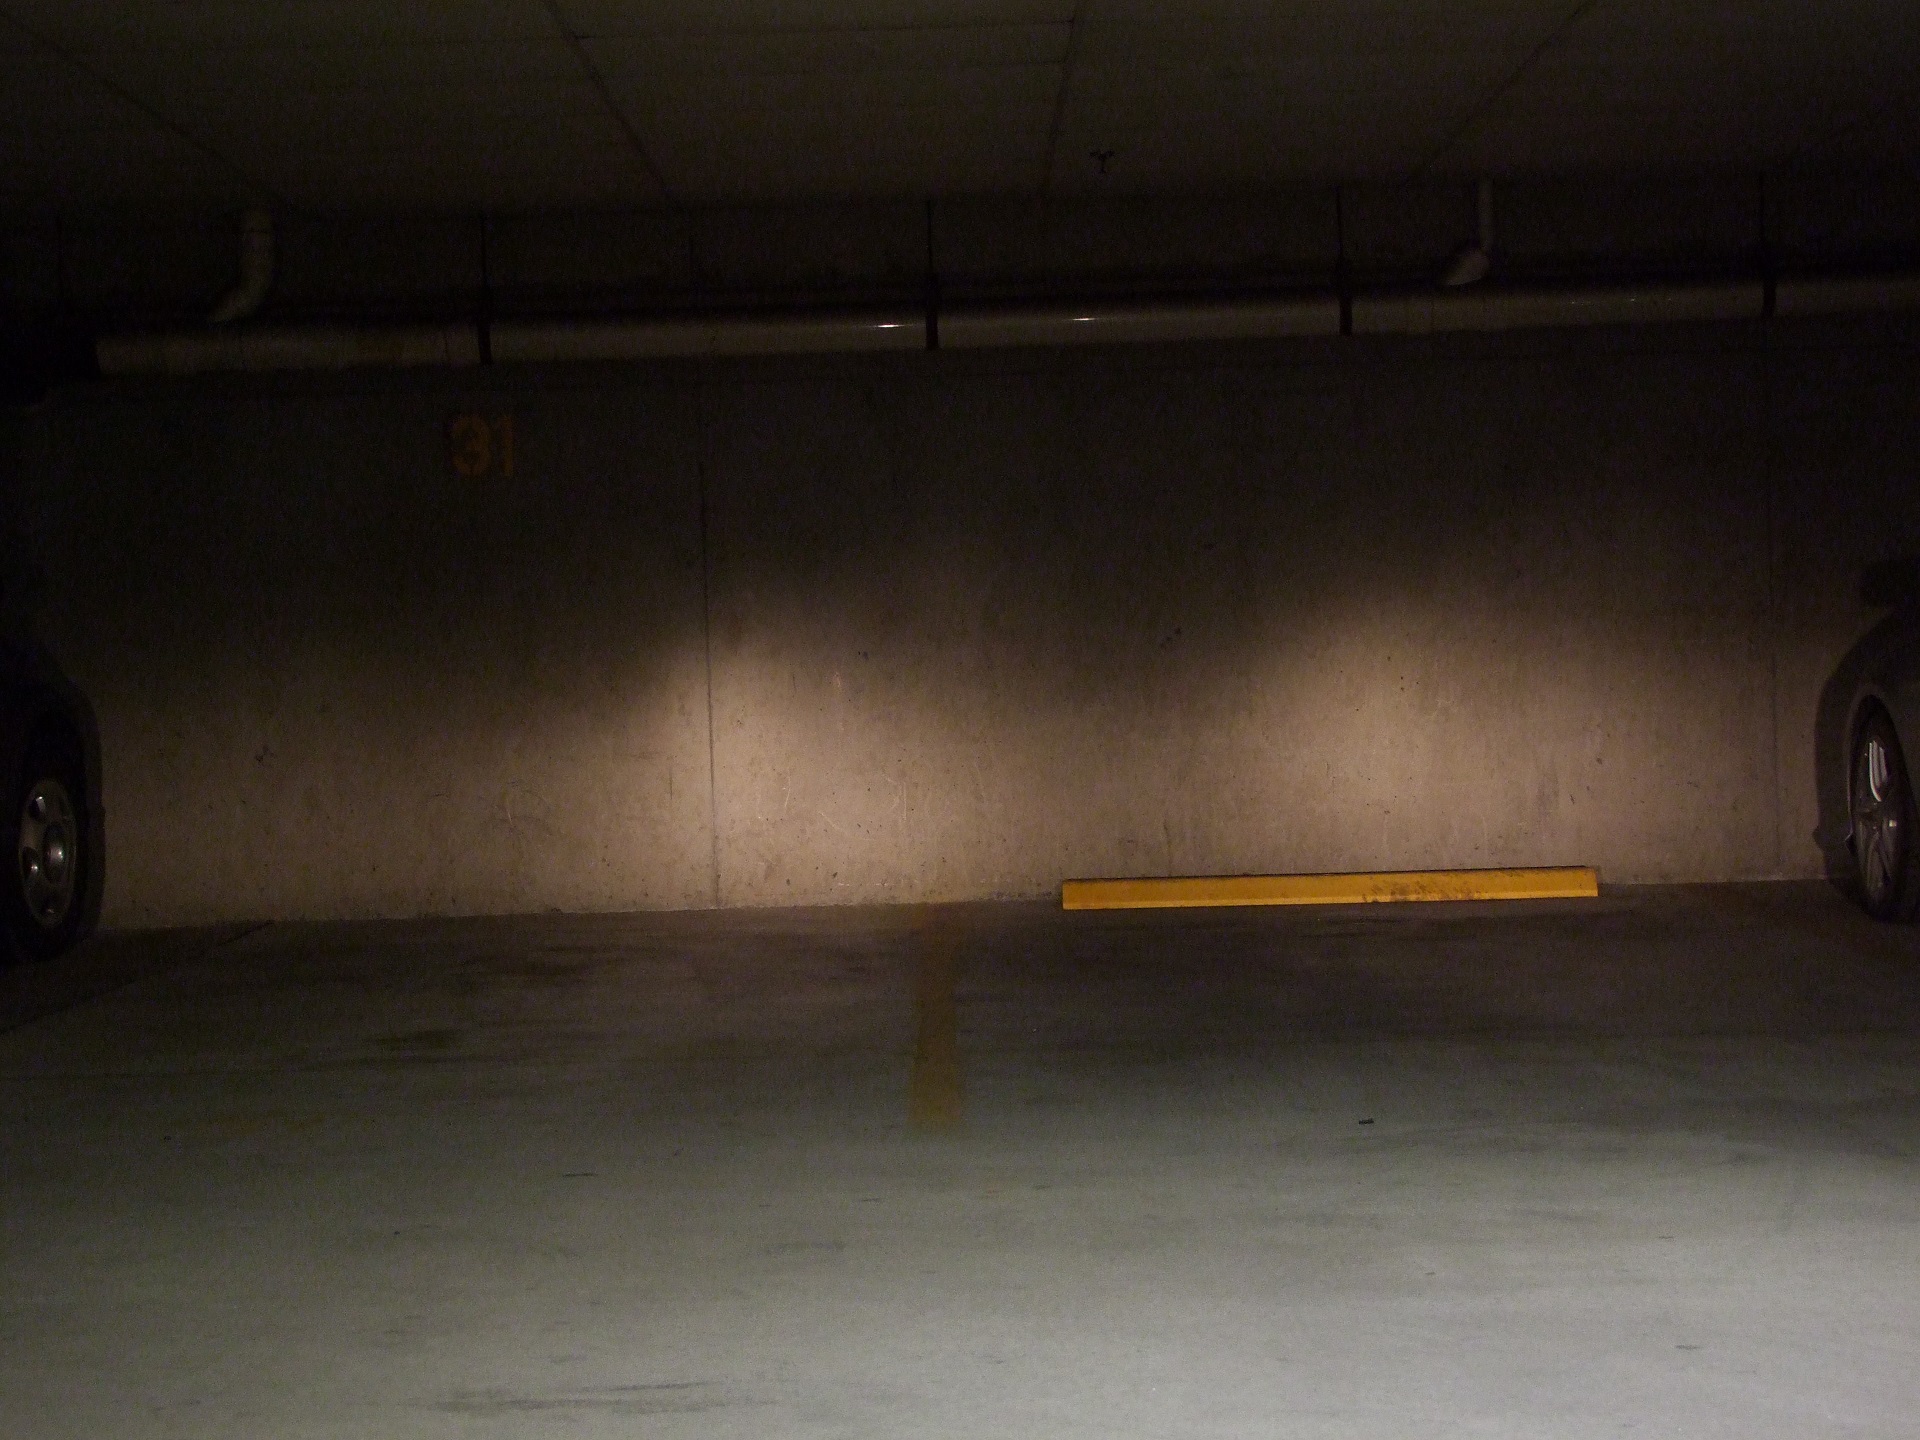
Two defined spots, slightly biased low and to the right. The left light was recently replaced and I couldn’t be arsed to aim it properly, so it’s sitting a little higher and not quite as right any more.

Stock high beam halogens, unified spot high and a little to the right. Mikuvan’s 4-headlight setup means in high beam operation, they’re ALL on – it has two dual-filament H4656 type bulbs for standard low beam operation (which the LED units will replace) and two H4651 dedicate high beams.

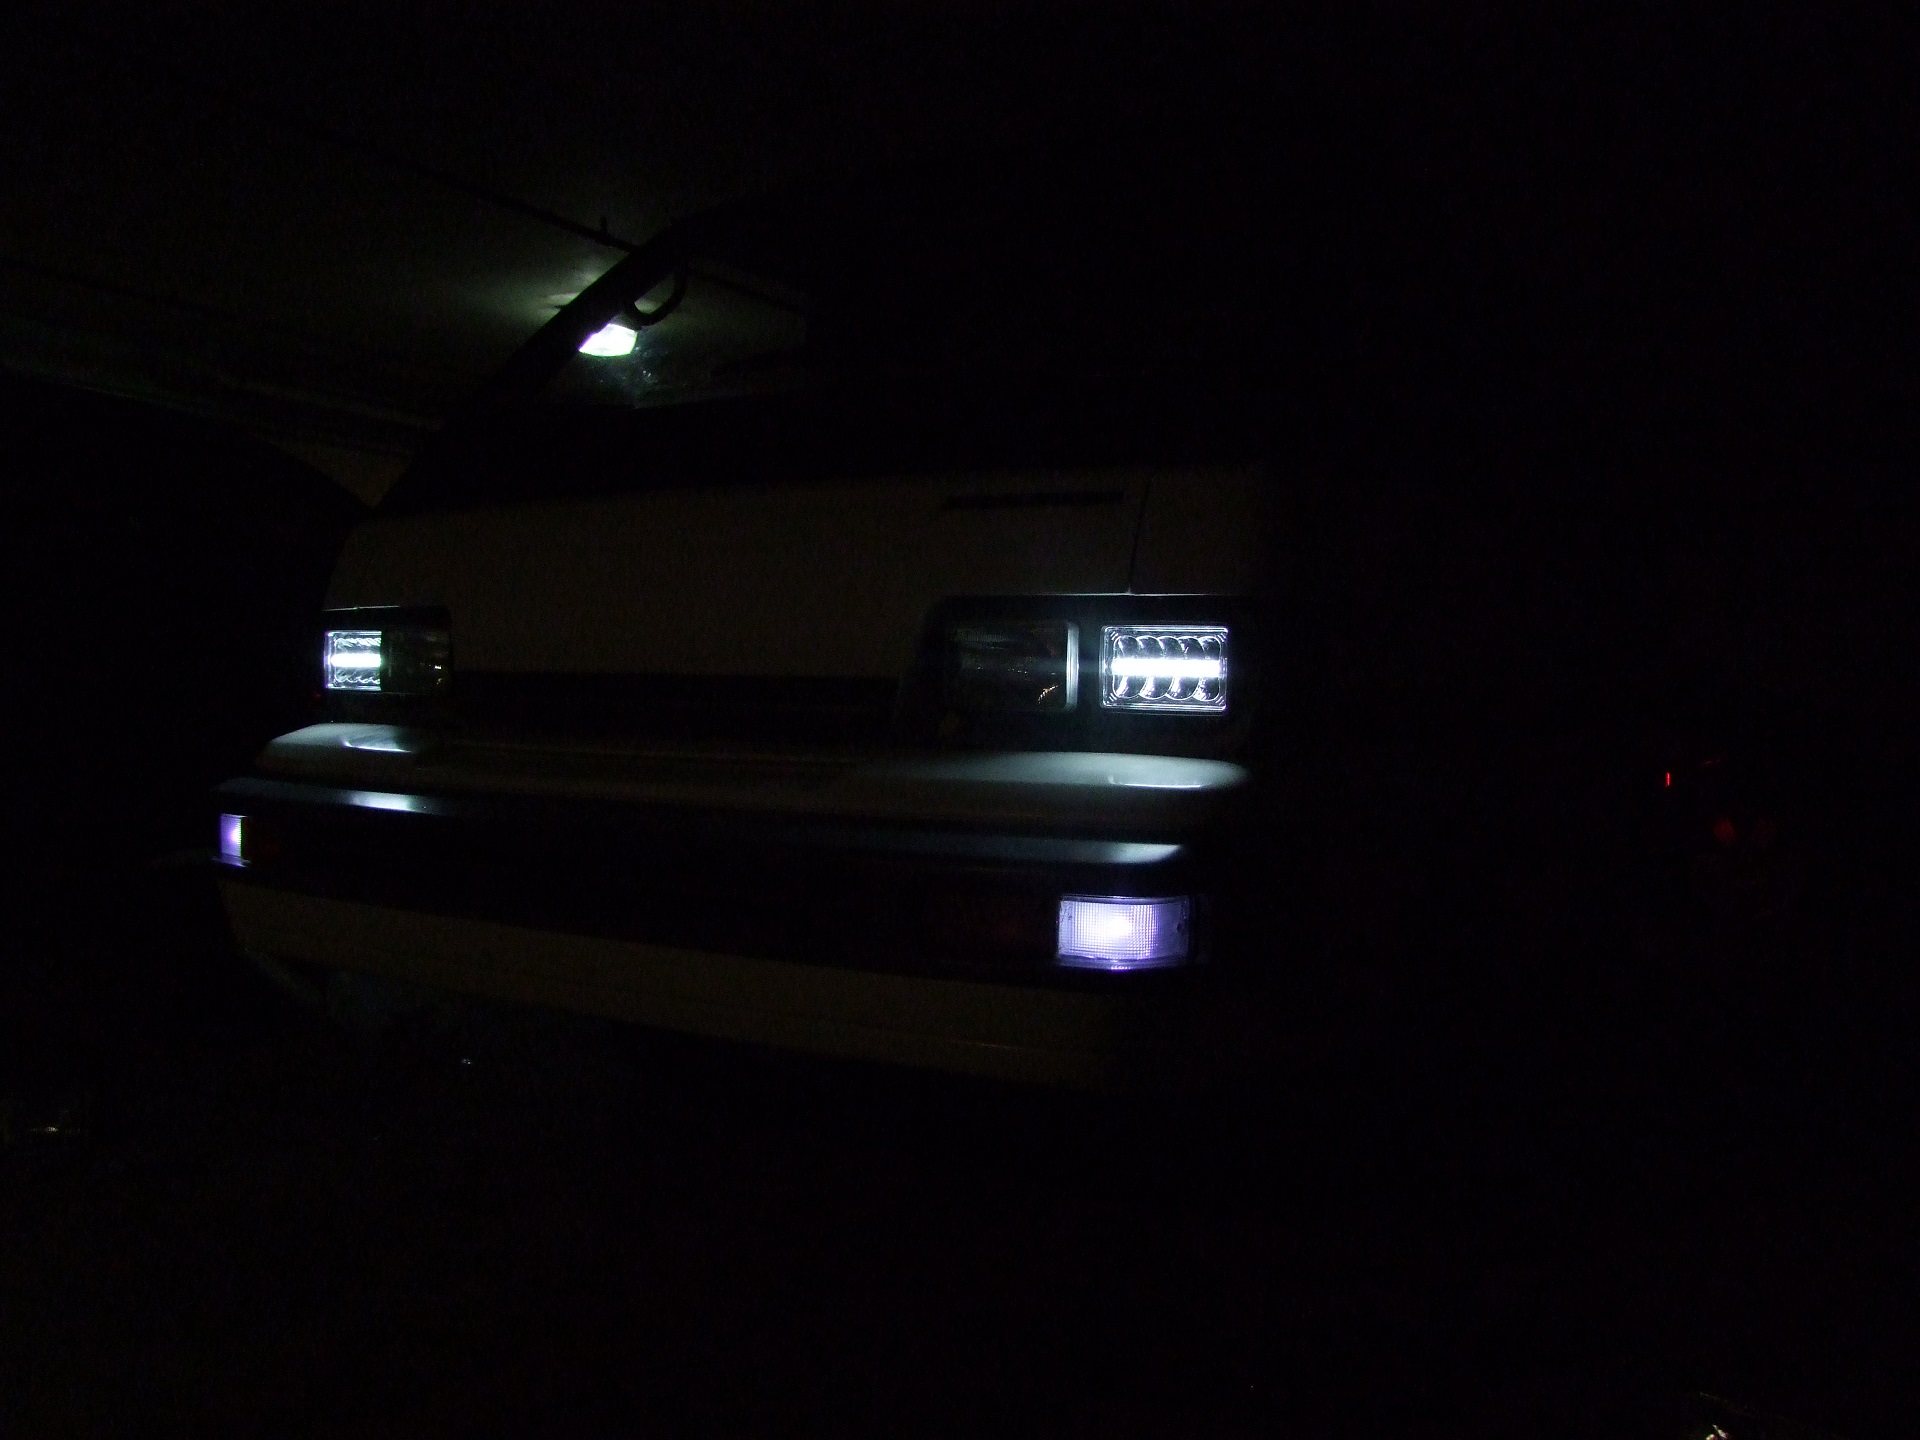
Install was simple. I modified the marker light wiring harness on each side to plug in the “goat lights”, and here they are. Very goaty.

The main power connector, though, is actually an H4 type, not a H4656. This is some stupid automotive U.S. vs. The World standard I don’t understand, but it just involves a fast pin change on the connector to be compatible. Seriously, people, this is stupid.

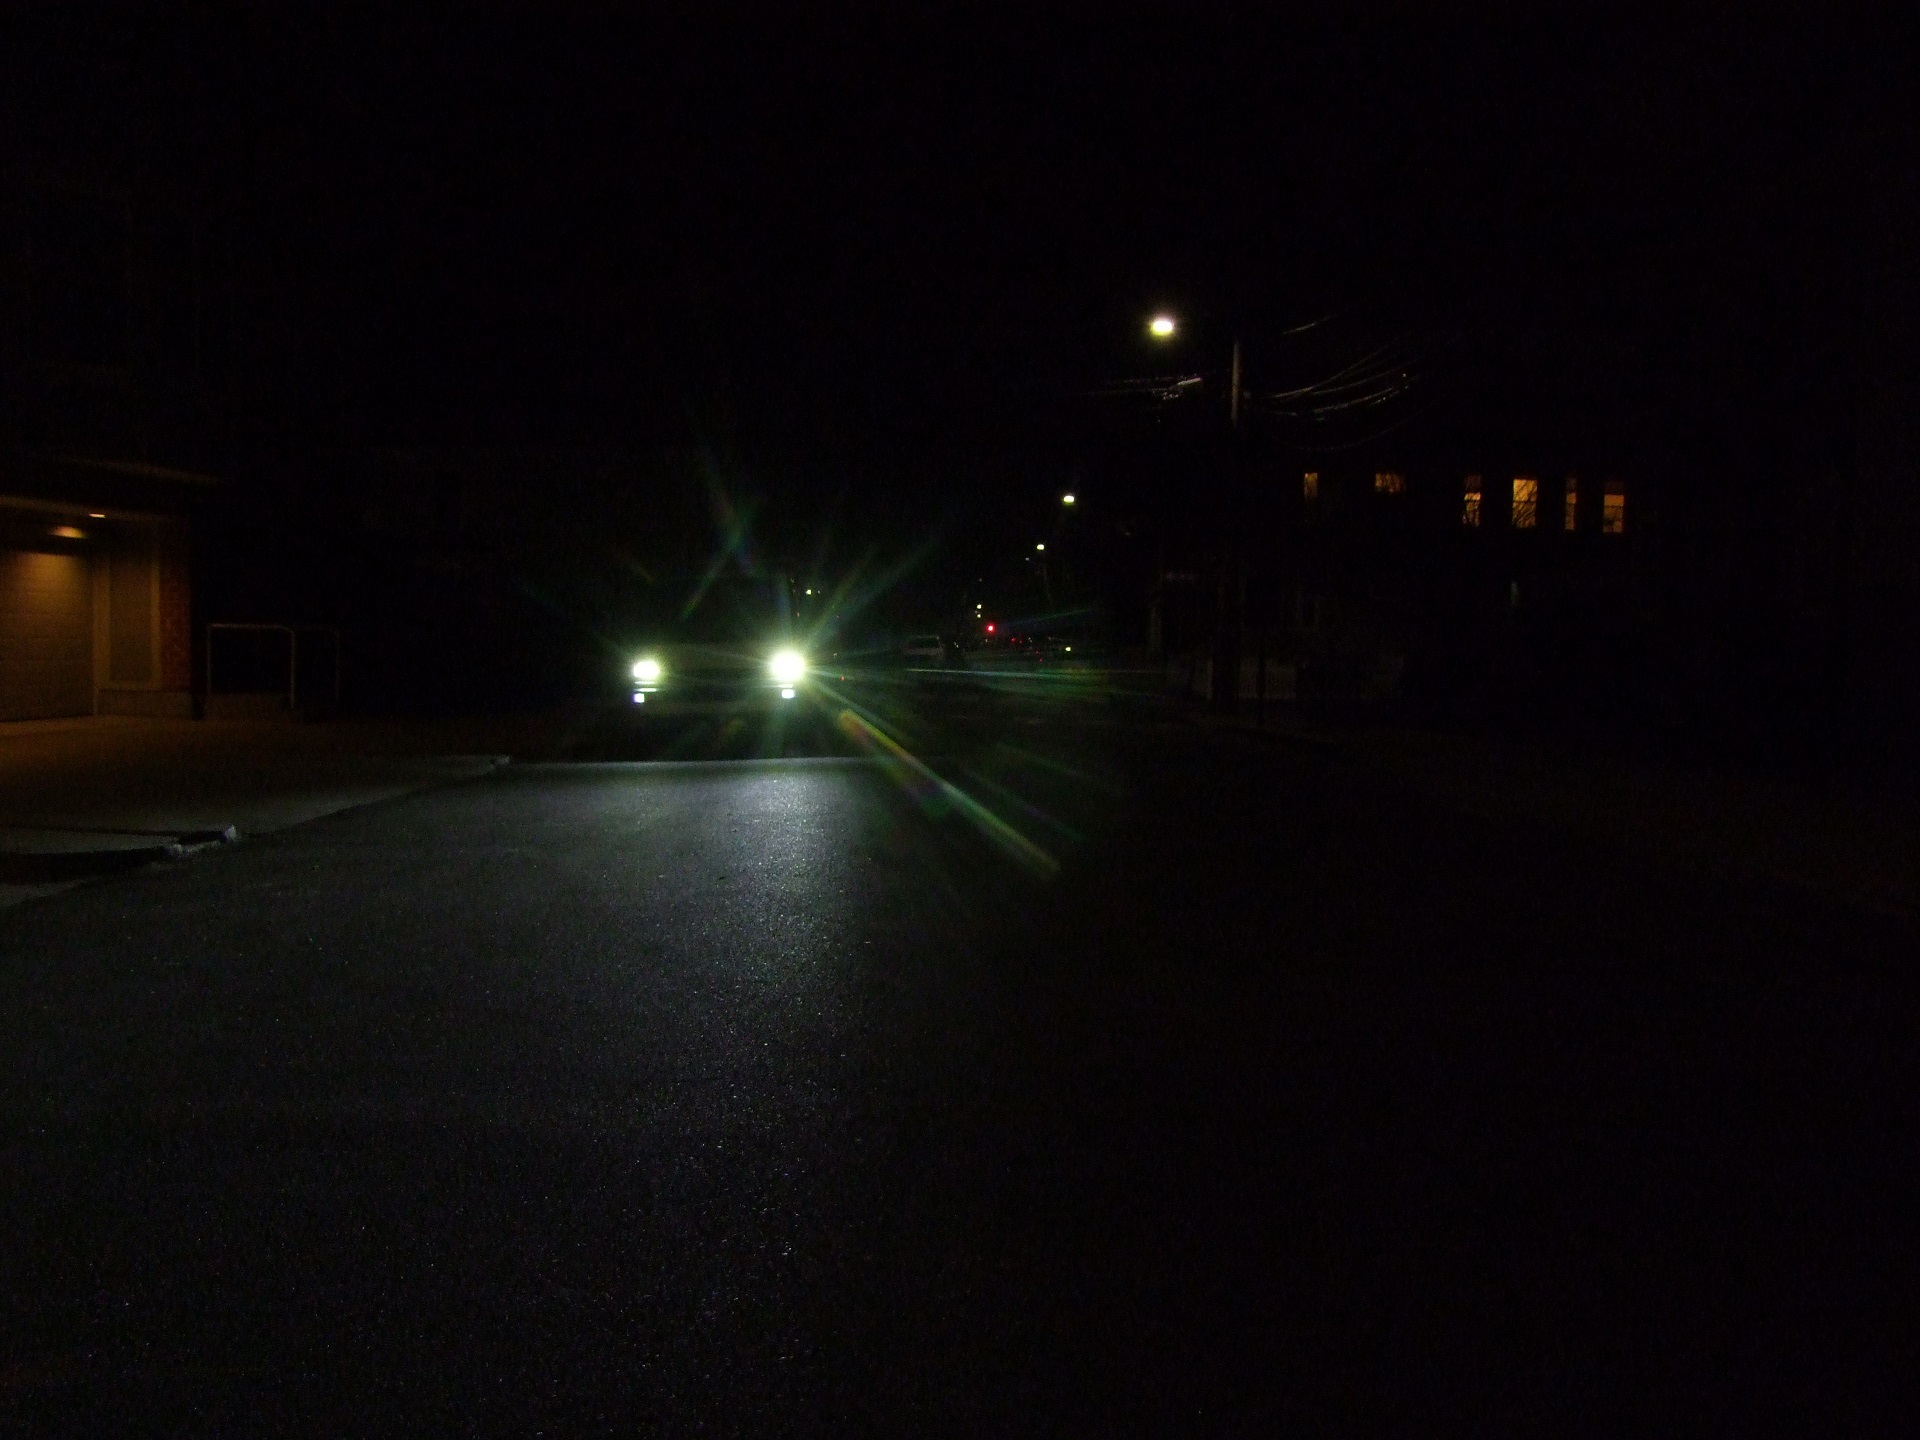
After a few attempts at aiming, here’s what I came up with.

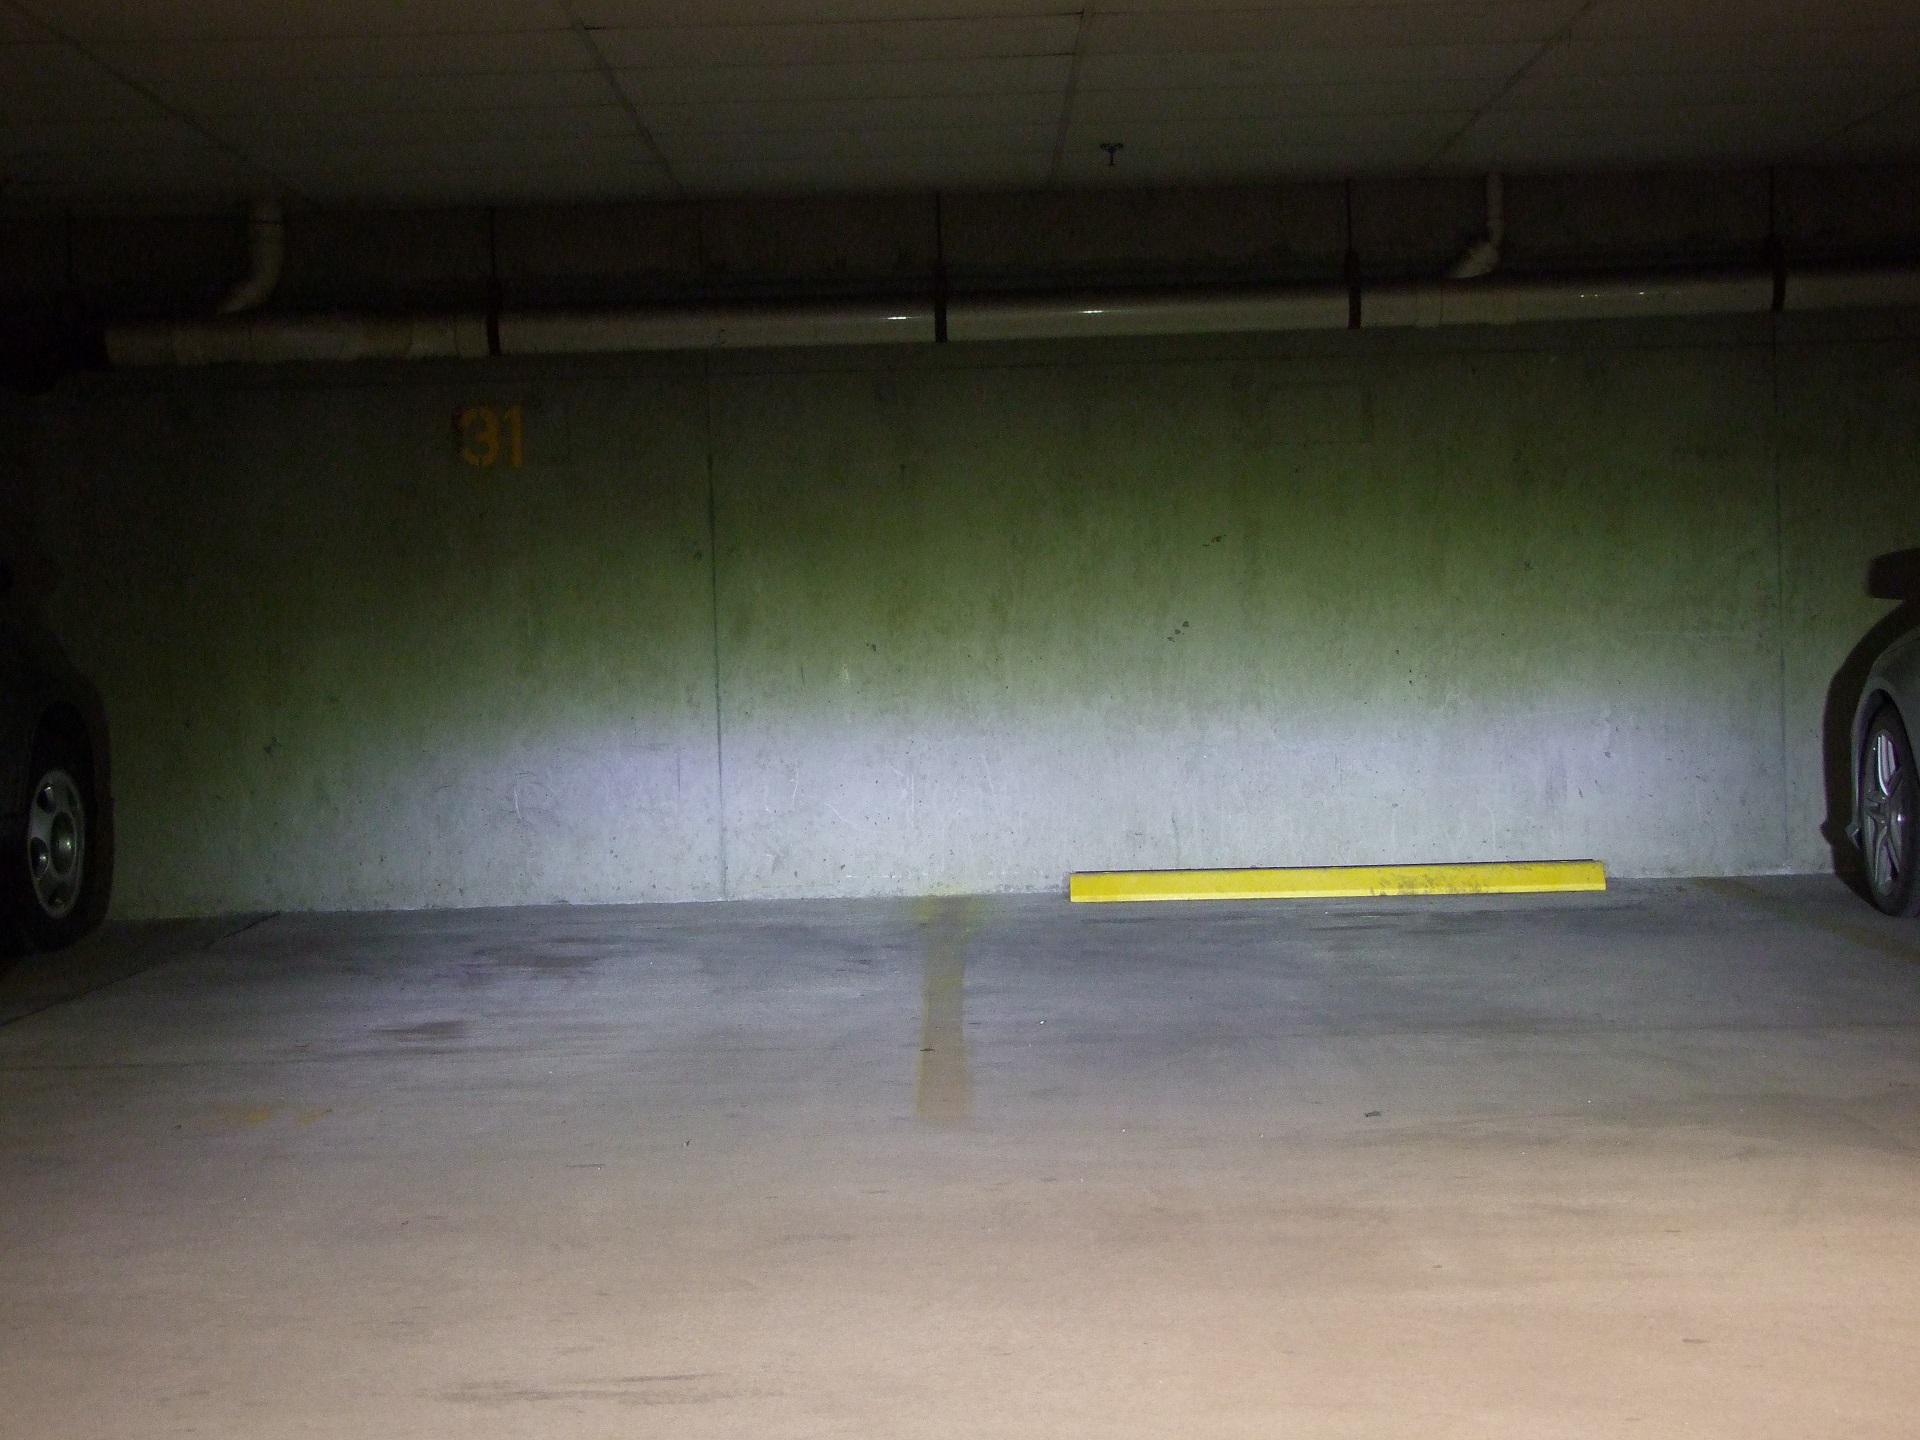
Damn. This was, again, taken with the camera in the same spot using the same shutter speed and aperture. I’d describe this as a curtain of light. The beam is so broad that I could barely aim it enough rightwards – I just about bottomed out the adjustment screw on the left headlight. However, it has a fairly sharp vertical cutoff, so that’s good for not glaring people.

Now with all 4 lights working in hi-beams mode, you can see how far rightwards the left headlight has been moved. This was all in an attempt to get it vaguely centered on the halogen lamp’s spot. I had to compromise here, as the difference in level between high and low wasn’t as drastic. I erred on the side of keeping the low beams lower to the ground, rather than broadcasting my lane change clearance to Mars.

I went on a run around the block to test everything out, and I must say it’s an immense improvment. My only concern was if it was significantly glare-inducing to someone oncoming because of the sheer width of the beams. I just vaguely tested this by squatting in the street at roughly the driver’s head height of the Honda Civic next to me. Result: Not any worse than what I get daily from people with modern HID setups, or even worse, from those HID retrofit kits that never aim correctly.

Here’s a test video I took shortly thereafter on a deserted road in Mexico showing the beam appearance. The scatter means it lights up distant road signs ridiculously well, much better than the halogen units.

So what to do after I have 2 of them? Now my headlight colors are mismatched, so I gotta…

Upgrade! See, now that the Chinesium base product has been hunted down and interrogated, I grabbed this set from a US seller instead. The box was exactly the same, just printed with some fancy letters and numbers and whatnot. The product? Also exactly the same!

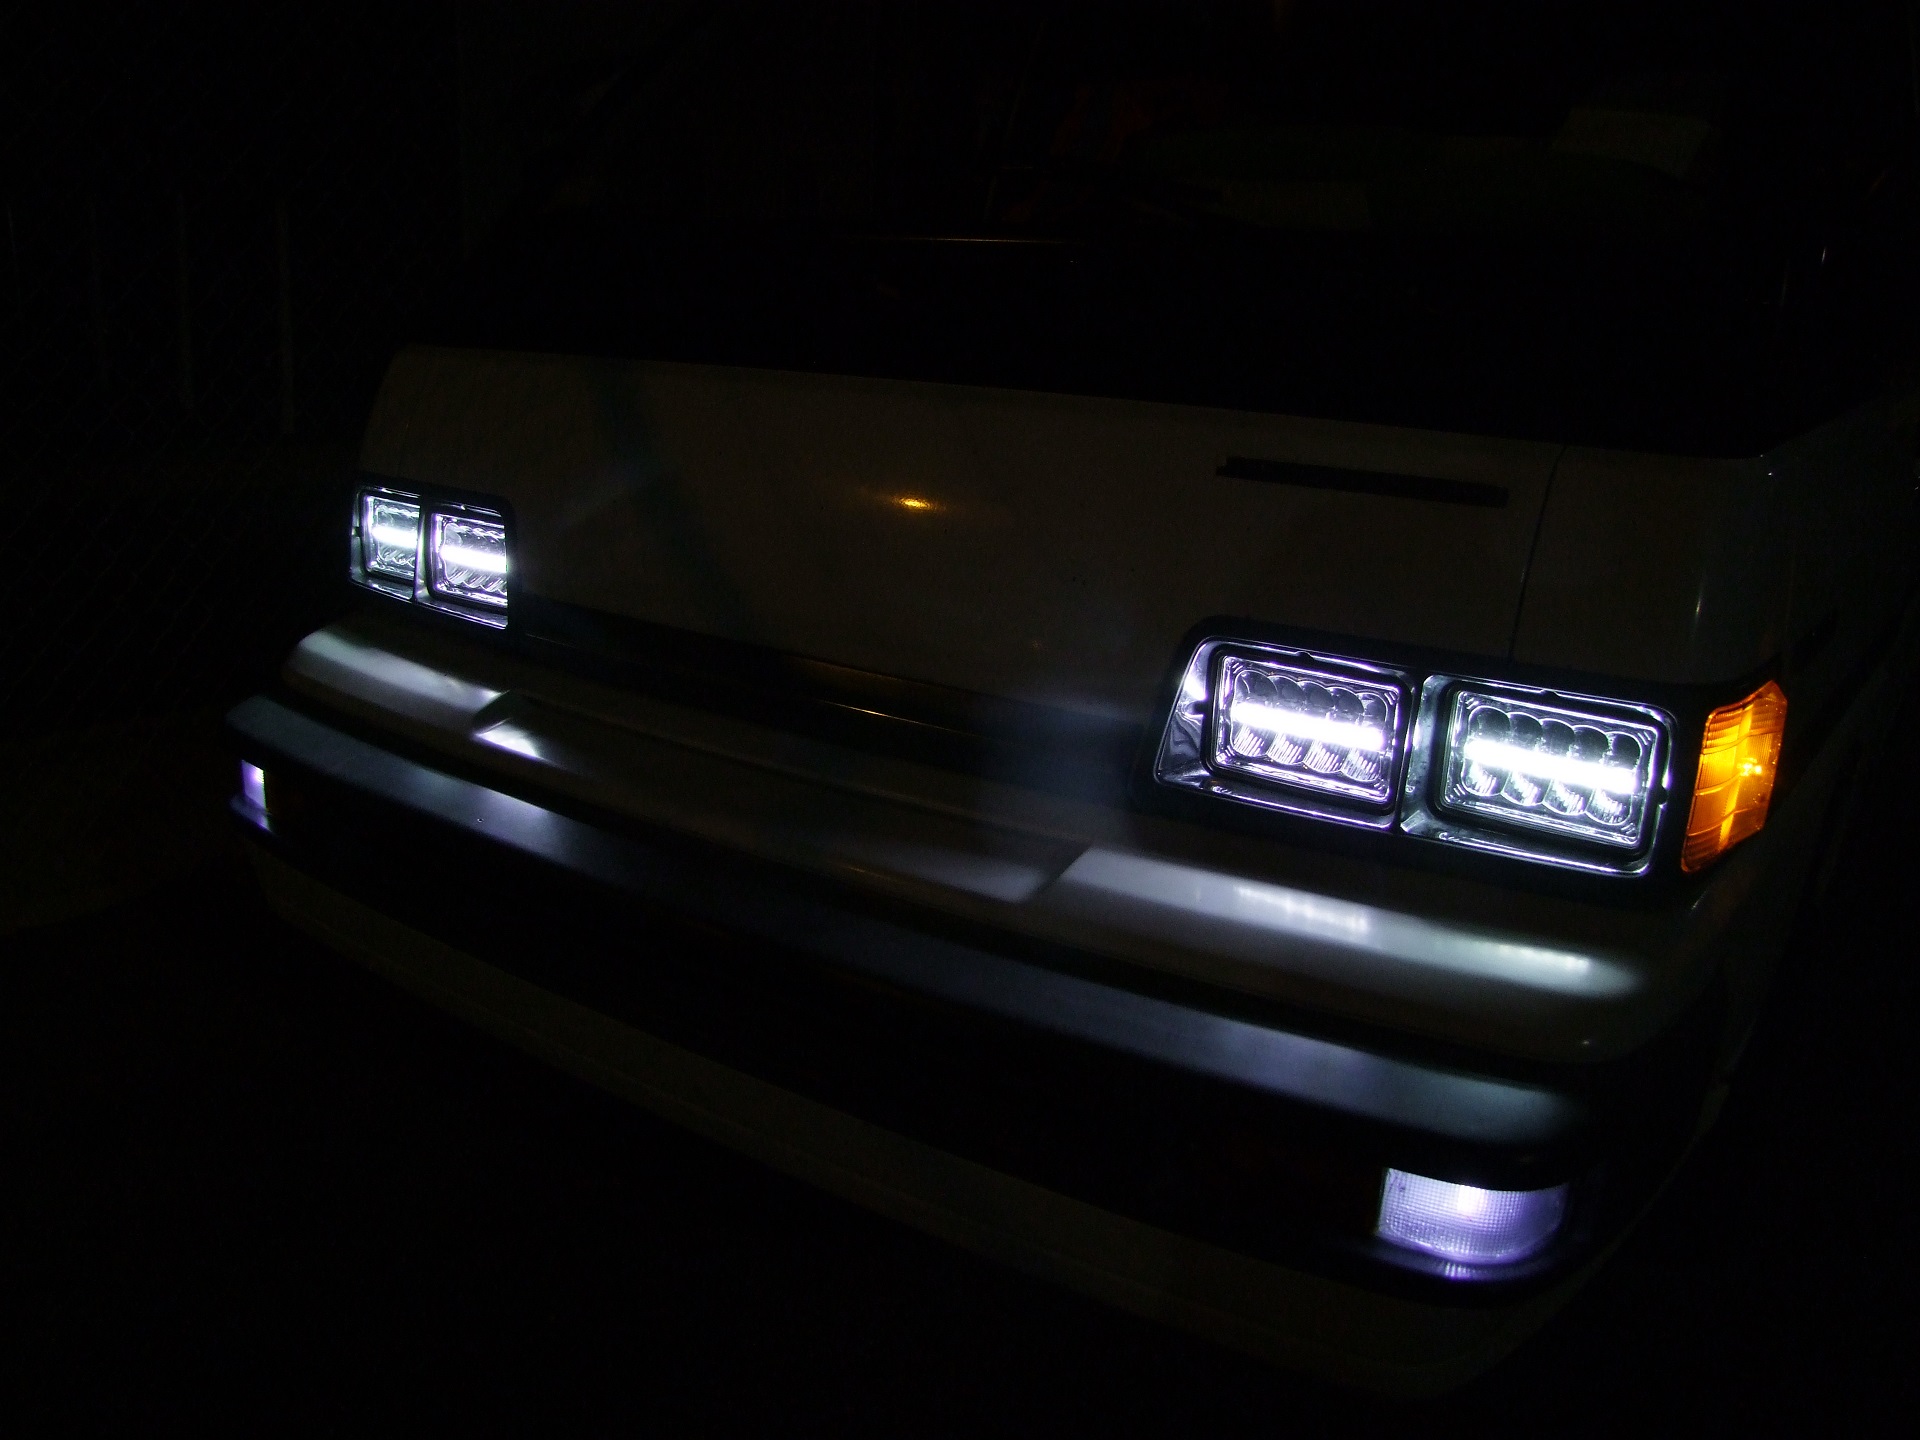
DOUBLE GOAT MODE ACTIVATE. This photo is retro-futuristic as hell. EXPERIENCE THE AESTHETIC

You know how I can tell these were the same product by different manufacturers? My headlights are still slightly different colors. The color temperature of the two purchases is barely not the same.

Alright, so what have I learned here? The current low-cost aftermarket for LED headlights seems to have some viable products now. I did not crack open any of the units to inspect the components inside – maybe I’ll do that down the line if one dies, or I pick up another one. The units, both 4×6 and 5×7 type, seemed to be built well. My only concern is really longevity and ambient temperature tolerance. That’s something only operating these for a while will reveal.

Here’s a caveat though. With all 4 units running in high beams mode, it’s a ridiculous amount of light. I light up highway signs from like a quarter mile away easily because of the beam spread. I actually am concerned about it being unsafely bright when I use high beams to signal someone, like acknowledging a turn. It’s like a camera flash, but even worse. I’ve worked into the habit of briefly blinking the running lights on and off instead of flicking high beams to counteract this. A little bit of a damper on something otherwise very great so far.

If you go for a set, the general trend based on my own tests and reading reviews and discussions is aim them lower than you think you should. The light spread counteracts the lower spot with standard halogen lights, so aiming lower covers more of the road in front, and also makes sure you don’t glare people.


A Different Kind of Chinese Motor Controller?! Adding Dynamic Braking to your Inexpensive Chinese VFD

Here at Big Chuck’s Robot Warehouse, we love our Chinese motor controllers. I some times think that at this point in life, I’ve become a kind of Chinese motor controller evolutionary biologist…. or at least like the Identifying Wood guy of underpowered gate drive amplifiers, I hope. Taking apart and examining motor controllers, which I’ve written up many times on this site in “Beyond Unboxing”,  is a large part of how I came to understand them, at least to the degree that Man can comprehend the transcendent nature of motor controllers.

Navigating the Pacific Rim of Chinese mass-market industrial products is not for the feint of heart – often times, products are sold over-rated and inaccurately advertised, and much of the knowledge base of using these products exists on hobbyist forums and message boards/email threads. This means anyone else outside of a circle of knowledge who tries to buy something and use it is often frustrated due to the lack of official documentation… and to find any good documentation often requires sifting through a forum thread or (heaven forbid) Github repository. That’s what I try to remedy whenever I cross paths with it, with some detailed writeup and explanation of what’s going on. Because at least that appears on a search engine result in a comprehensible fashion!

Today, we *gets out David Attenborough voice chipset* will be getting a closer look at a different species of Chinese motor controller. Rarely seen in the North American continent compared to its smaller, domesticated brethren, it is the majestic Giant Chinese VFD.

This one’s an adolescent male, with a 9/2016 date code. You can tell from his unadorned, angular ABS plastic case, compared to the more ornate and filleted females. He’s just begun to venture into the wild alone to expand his territory.

He stalks his prey, an aging Bridgeport J-head, from the safety of his preferred observation grounds, a nearby wall:

Okay, that’s enough, David. Also, lyrebirds are cool.

So why do I need a VFD? The shop has easily-obtainable 208V single-phase power which we had installed, as seen by the new junction box behind the mill. 208V is just missing the 3rd phase to become 3-phase, but that doesn’t exist in the vicinity and wasn’t going to be cheap to run. Hell, even if I had 3 phase, I’d still be getting a VFD anyway to have the additional running envelope and ability to change to arbitrary speeds. You mean keeping the Bridgeport in low gear and revving the motor to 13,000 RPM isn’t a good idea?

I did an initial sweep of the space of available Chinese VFDs back in January. Did you expect me to pay actual money for a real, working and supported product? Come on now, you know I’d rather jump into a pool of sharks. Chinese knockoff sharks!

As you can see, they all look kind of alike, and based on my brief research on DIY CNC forums and groups, they’re basically all the same genericized design. This is similar to other Chinese industrial products, including my favorite e-bike and R/C brushless controllers.

I have a rule called the “Law of Chinese Packaging Inertia” – if the Chinese product visually appears the same as a counterpart, it very likely is the same, or has trivial differences for marketing reasons. There’s been no better proof of this law than hoverboards seg-things, but it’s existed substantially in the past in the form of cordless drill motors for robots, the aforementioned e-bike controllers, and the like.

On eBay, there are numerous US-based resellers of the same products:


So I picked one which was severely overrated nominally for the motor it was to be running – a 3 HP (4kW) rated one, thereafter sorting by distance nearest and free shipping. You Only Line-start Once.

I figured I might as well err on the side of caution ratings-wise, since my other Chinese product rule is known as the “Harbor Freight Derating Factor”: derate by half if you intend to use it, and by 2/3rds if you’re standing under it. Vantruck weighs 3 tons. Have you seen how thin the metal is on a 3-ton Harbor Freight jackstand?! Don’t give me none of that shit…

The real reason, though, was because I picked the size originally for eventually powering the lathe, which has a pretty beefy spindle motor. I decided to outfit the mill first because it was a bit safer of a proposition to try something unknown on – there’s less rotating mass to bring to a halt.

Alright, my life is settling down a little after Motorama and the insurance & mechanics nonsense. Let’s wire up the mill!


Actually, speaking of “have you ever”…. have you ever seen inside a 1HP Bridgeport J-head “pancake motor”? I have actually never looked inside one until now, somehow, and it really is an axial-flux motor! For some reason I always mentally wrote it off as a very stubby conventional motor, but this makes so much more sense. Have a look at these photos! I didn’t take apart the motor since I “get it”, but that was a good trivia day.


I had to remove the drum switch (for manually powering in forward or reverse) and then drill an access hole in the 1/4″ thick cast iron junction box for a cable grip. This was when I discovered the previous operators used a 3-conductor service cord on a 3 phase motor with no ground. The ground was an extra piece of hookup wire mashed into the cable grip, electrical taped around the machine, and eventually into the 4-prong twist-lock plug. Well, at least it was grounded.

Wiring was pretty easy after that, and the instruction booklet which came with it was very Technical Chinglish but easily decypherable (and comparable to other more English manuals for VFDs).

Has anyone seen THE USE OF MANUAL???

These things will allow you to change a lot of parameters about the motor, and you can set the V/F line to have 2 slopes for more torque in certain operating regimes, etc. They call this “arbitrary” V/F curves, but no, it’s not really that. It came with a bunch of parameters set assume 50hz mains, which I changed to 60hz. Other parameters control what inputs the drive unit listens to – I hooked up an external potentiometer and told it to use the potentiometer to control the speed, as the unit DESPITE BEING ADVERTISED WITH ONE IN THE PHOTO didn’t come with a knob on the control board! See the very first photo above.

I cut the faceplate open to try and see if there was one hiding in there or something. Nope, missing. This will become a trend.

Most of the parameters I ended up leaving stock until I had a better feel for the system, since I’d not set up a VFD before. These inexpensive units are generally open-loop VFDs – they don’t have a tachometer input, though there seems to be an option in the settings… I’ll have to look a little more in detail.  They just bang out a frequency, and you can set how fast it increases that frequency for acceleration; if you set it too fast, you fall off the optimal slip region for maximum torque and your motor actually takes much longer to spin up (Induction motors require the supplied field frequency to be just a little faster than its rotational speed for torque production).


I call this the DOUBLE DANGLE


Slowing down was the hard part. Nominally, this thing had “braking”, and included terminals for a dynamic braking resistor, subway train style. I added one found in the bowels of MITERS – a 120 ohm, 50 watt unit. A little undersized, but it’s not like I’m stopping this motor every 10 seconds for a tool change.

Despite having the options selected, I couldn’t get it to actually perform any braking. I could either 1. set the ramp-down time to nearly as long as the machine would take to coast down by itself, or 2. just use “coasting stop” mode which was exactly the same damn thing because it just lets go of the output.

Attempting to set the spindown time faster simply resulted in the unit shutting down outputs and displaying an overvoltage error. Yes, it would make sense – when the motor regenerates power into the controller, it needs to go somewhere. In EV controllers, it’s back into the battery. I’ve never heard of a ‘grid tie VFD” for controlling machines before, though conceivable it could track the mains voltage to try and dump current back into the building, but why would you do that…. Or, you burn it off in a braking resistor.

Without any of those sinks of power, the voltage on the DC power rails of the VFD will spike upwards uncontrollably. It looks like this one will shut off at 400V on the DC power bus. I investigated a little more with stopping from different speeds, and it’s definitely correlated to the energy contained in the rotor and how fast I try to slow it down. So, it thinks it’s doing braking, but nothing is happening.

Well, I could leave it in coast mode, but what fun is not going down without a fight with a poorly documented Chinese product to the death?!


Step 1: Crack it open. Here’s what the power stage looks like. All the familiar trappings of a motor controller are there! Immediately, I can see that one of the gate drive optocouplers is missing…. probably the one that tugs on the braking IGBT.For a rundown on the symptoms I described here, read that article. It’s nice.

With some more research (read: forum threads… literally, read forum threads, like this one and this one) I found hints that a lot of these Inexpensive Chinese VFDs ship without any of the braking components populated. Given that this thing came with no potentiometer either, I’m entirely unsurprised. What I don’t get is what market they expect to sell to; a lot of them are advertised for process pumps (e.g. water pumps, blowers, oil pumps and the like) which I presume is a thing that doesn’t really need braking and doesn’t need constantly variable speed control, but maybe just 2 or 3 speeds and an on/off.

That’s another thing about Chinesium I can appreciate, even if I find it frustrating. Everything is stripped down and rat rodded to the point of doing only 1 thing, but it will probably do that 1 thing very well.

Staring at the P+ and PR terminals for the braking resistor under a backlight shows that there’s nothing connected to PR. It looks like there should be a wire jump…

Probably to here. The missing IGBT is connected via a wire jump to something. It’s functioning (based on the pinout of most IGBTs of this package) as a common-emitter  switch, one leg tied to ground and the other leg pulling on something. That something is supposed to be the DC rail (P+) through the braking resistor (between P+ and PR). My board seems to be a newer revision than the ones found on those threads, as a lot of the parts which were 8pin through-hole parts are now SMT parts, and the layout is different. Either way, from my investigation, 2 parts are missing: Q23, the bremschopper, and PC11, the optocoupled driver which tells it what to do.

So, if I haven’t reiterated, I fucking hate digging through forum threads to find the answer to my question. All y’all need to learn to keep a website. Read on if you want to add dynamic braking to your Inexpensive Chinese VFD!

I figured the parts used for this extra drive circuit should just be the same as the rest, so I ordered a pack of the IGBTs used on the board – FGH60N60SMD. The optocoupler driver TLP701AF didn’t have an exact match in-stock at Digi-Key, so I went for a similar equipped part number, TLP701HF.  The -AF part seems to have tighter switching time tolerances. In a single switch configuration here, I figured it doesn’t matter.

By the way, fully optocoupled drive is something I really, really want for Brushless Rage… but it takes up a whole lot of space compared to some driver ICs :(

Mounting the IGBT onto the power stage required some creativity. I cut up a spare RageBridge silicone insulation tab for it, and mounted it on the heat sink plate where it should go. Then I bent the legs up to the point where they should fall right into the empty solder eyes on the board. I decided to do it this way since trying to solder the IGBT to the board first wouldn’t have guaranteed it being able to lie down flat on the heat sink.

On the board itself, I made the wire jump from Q23 to the PR terminal.

And finally, I reflowed PC11, the optocoupler, onto the board.

And you know what?! That was it!

Man, whoever made this just couldn’t be motivated to put the extra 3 parts on it, eh? Guys, we saved like 80 cents! Yay!

Granted, again, if 99% of your users just drive their hydroponic pot farms with it, they’ll never need the braking feature and you might as well leave those parts out. For everything else, there’s my fucking MasterCard. Ugh.

Here’s a test video showing the braking in action. I cycle through the viewable parameters when the motor is running so you can see the DC bus spike up before the resistor does its job.

“DCB” is an added braking option where after the frequency gets low enough, it will just short the leads of the motor together. This provides extra braking power for speeds that are too low to generate any voltage to push across the braking resistor.

So there you have it. That’s literally the only thing stopping these controllers from being more useful running machinery! Now that I have additional parts, I’m going to purchase another one and wire up the lathe too.